
Thomas Northcut/DigitalVision/Getty Images
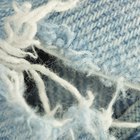
Pants are some of the most expensive garments in your wardrobe, so when your favorite pair rips, you're naturally reluctant to throw it out. If you know how to sew, you don't need to replace your pants or send them away for professional mending. Large, odd-shaped holes tend to look better when patched, but if the tear is thin or small, you can fix it with only a needle and thread.
Cut away the frayed threads surrounding the tear using a sharp pair of scissors. Do not cut into the fabric itself.
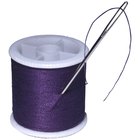
Cut a piece of thread that is a few inches longer than the tear.
Hold a medium-length sewing needle by the tip with the eye pointing up. Moisten the eye of the needle, if desired. This will make threading the needle easier.
Grasp the end of the thread and guide it through the eye of the needle. If you have trouble doing this, try holding the needle and thread against a contrasting background to make them easier to see. Alternatively, apply a small amount of beeswax to the end of the thread. This stiffens it, allowing it to slip through the eye.
Tie a knot at the end of the thread so it stays secure in the fabric.
Insert the needle into the pants from the inside about 1/2 inch to the right of the tear.
Pull the thread through the tear to make an upward stitch, then turn the needle down. Pull it through the tear to the left of the first stitch to make a downward stitch. You may need to make some stitches longer than others depending on the shape of the rip. Continue making stitches until you reach the end of the tear, then pull the tread taut.
Make a few tiny stitches to about 1/2 inch past the left end of the tear. Pull the treat taut again to make the stitches look almost invisible.
Cut or untie the thread from the needle. Tie a knot at the end of the thread to secure the stitches.
Related Articles
How to Fix a Rip in the Armpit of a ...

How to Fix a Frayed Buttonhole

How to Hand Sew a Belt Loop on Pants
Repairing Ripped Jeans Without a ...

How to Fix Cuts in Polyester Clothes

How to Sew Elbow Patches on a Knit ...

How to Extend a Neck Hole on a Hoodie
How to Get Cigarette Burns Out of Fleece

How to Cut off the Neckline of a ...
How to Make a Satchel
How to Fix a Ripped Pocket

How to Fix a Wire That Has Come Out of ...
How to Fix a Snag In Cotton Pants

How to Rip Jeans at the Bottom
How to Repair a Run in a Silk Blouse

How to Fix a Burn Hole in a Polyester ...

How to Cut Feet Off Tights

How to Repair Denim

How to Cut a T-Shirt Into a Tank Top ...

How to Get Scuffs Off Vinyl Shoes
References
Writer Bio
Melissa King began writing in 2001. She spent three years writing for her local newspaper, "The Colt," writing editorials, news stories, product reviews and entertainment pieces. She is also the owner and operator of Howbert Freelance Writing. King holds an Associate of Arts in communications from Tarrant County College.
Photo Credits
Thomas Northcut/DigitalVision/Getty Images