Strong arms are not only flattering but functional. After all, who likes taking two trips with the groceries? With these moves, you'll sculpt your arms and get stronger then ever. All you need is two sets of dumbbells — one lighter and one heavier.
Do these 14 upper-body exercises in order for the given number of reps. You can do this workout 2 to 3 times a week; just be sure to rest your arms on alternate days. Or you can pick and choose a few of your favorite exercises from the list and do 3 to 5 sets of each.
Video of the Day
Video of the Day
Move 1: Hard-Core Plank
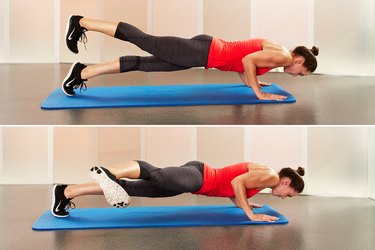
- Start in a high plank (the top of a push-up), balancing on your feet and hands and keeping your body in a straight line from your heels to head.
- Exhale as you lower halfway down toward the floor, elbows bent in close to your ribs. Get as low as you can without compromising form.
- Lift your right foot 4 inches off the floor and hold for 5 seconds.
- Set your right foot down for a second, then lift it out to the side at a 90-degree angle, still four inches off the ground.
- Hold it out at your side for 5 seconds.
- Return the leg back to starting lifted position, set the foot down.
- Repeat 4 times, then do the same series 4 times on the left side.
Tip
Starting off your workout with an intense static plank is a great way to get a full-body warm-up with a focus on your arms. You need support from your core through just about every arm exercise, and planks are no exception.
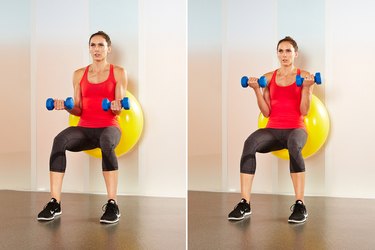
Move 2: Stability-Ball Biceps Curl
- Hold a stability ball against a wall with your back without leaning too heavily against it and take your feet hip- or shoulder-distance apart. Roll your shoulders back and down.
- Hold your heavier weights, one in each hand, and keep your arms down at your sides, palms facing in toward your legs.
- As you squat down, keeping the ball behind your back, lift your arms into a biceps curl, rotating the hands so the palms face your shoulders.
Tip
Celebrity trainer Astrid Swan loves stability-ball biceps curls as a starting point in a biceps routine. “It forces you to get full extension of the biceps,” she says, “and [this variation] multitasks the core, quad and glute muscles.”
Move 3: Concentration Biceps Curl
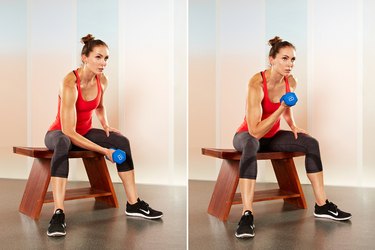
- Sit on a flat bench or chair with your legs apart. Grab one of your heavier weights with your right hand and rest your upper right elbow against your inner right thigh, right arm hanging toward the floor.
- Keeping your back straight, slowly curl the weight up toward your chest, squeezing your biceps.
- Slowly lower the weight back to the starting position.
- Do 10 on each arm.
Move 4: Triangle (or Diamond) Push-Up
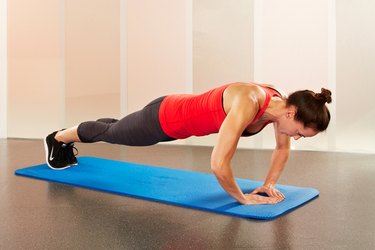
- Start in a plank but bring your forefingers and thumbs together on the floor so they create a triangle (or diamond) shape.
- From this position (lower to your knees to modify), bend your elbows to lower your chest toward the floor, keeping your elbows wide to the side.
- Squeeze your abs and glutes as you lower and lift back up.
Tip
Triangle push-ups are some of the most effective exercises at isolating and working the triceps, according to a 2011 study sponsored by the American Council on Exercise.
Move 5: Triceps Dip
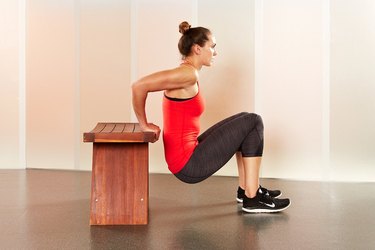
- Sit on the end of a bench and grip the edge with your hands by your hips.
- Slowly drop your butt off the edge. Make sure your ankles are directly under your knees or further away from your butt and not underneath your hamstrings.
- Slowly lower down, keeping your back as vertical as possible.
- Engage your abs as you lower and lift and do these dips slowly in both directions — 2 counts down and 2 counts up — for about a minute.
Tip
For an added challenge, when you’re in the lowered position, do tiny pulses (about an inch up and down) for the last 15 seconds of your minute.
Move 6: All-Fours Triceps Extension
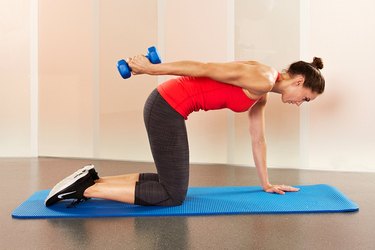
- Start on all fours and grab a weight with your right hand. Line your right biceps up to your ribs, keeping it glued there throughout this exercise.
- Extend your right forearm back until your right arm is completely straight and parallel to the floor.
- Bring you forearm slowly back toward the shoulder, pivoting from the elbow joint.
- D0 10 reps on each arm.
Tip
You can do triceps kickbacks (or extensions) in numerous positions, but for this version, you’ll start on all fours in order to better connect to your core and strengthen your back. Use a lighter set of weights for this move.
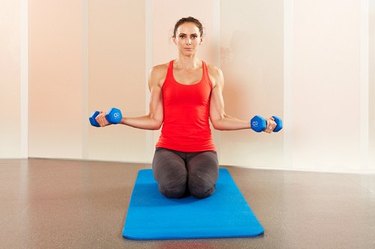
Move 7: Chest Opener
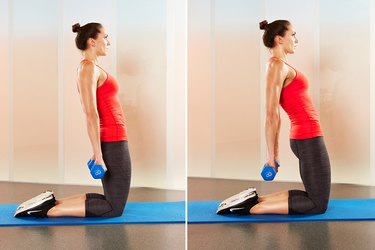
- With a weight in each hand, start in an upright kneeling position.
- Leaning slightly back with arms down at your sides, squeeze your glutes and inner thighs as you feel a slight stretch in your hip flexors.
- Face your palms behind you and press your straight arms back behind you.
- Pinch your shoulder blades together and engage your core and lengthen through the crown of your head.
Tip
The chest opener is an upper-arm exercise that requires core stability and engages your inner-thigh muscles. Sebastien Lagree — founder of Pilates-inspired program the Lagree Method — teaches the chest opener and says, “We do this to strengthen the postural alignment, open the chest and shoulders and as an overall arm toner.”
Move 8: Reverse Fly
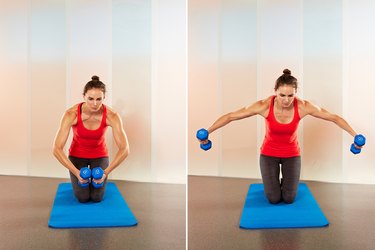
- Start kneeling, hold a weight in each hand, roll your shoulders back and lift your butt away from your heels.
- Squeeze your abs in as you bring your arms into a soft-bent circle in front of your chest, below shoulder height. Your palms should face inward toward each other.
- Slowly open your arms wide apart, with the movement coming only from your shoulder joints.
- Stop when your elbows are slightly behind your back.
- Resist as you bring the arms and hands back together.
Tip
The reverse fly is an excellent full-arm exercise that focuses on your biceps, shoulders and lats. You can do this standing, kneeling down or straddling an incline bench with your face down.
Move 9: Double-Arm Salute
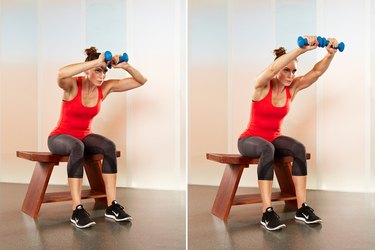
- Hold a hand weight in each hand and sit on a chair or flat bench.
- Bend your elbows and raise your upper arms to shoulder height, bringing your arms into the shape of a football goal post.
- Lean your chest forward and take your hands in toward your forehead, keeping your elbows wide.
- Slowly raise your palms and arms out straight from your forehead back to the starting position.
Tip
Double-arm salute is a great transitional exercise that works several muscles at once (the triceps, biceps, forearms, lats and shoulders) while the primary muscles (the shoulders) get warmed up and ready for more action.
Move 10: Serve-a-Platter
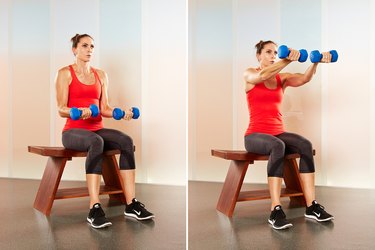
- Hold a weight in each hand and sit on a chair or flat bench.
- Bring your arms up as though you are carrying a tray, palms facing up.
- Keep your forearms parallel to the floor and your shoulders rolled back and down.
- Slowly lift your arms just above shoulder height as if serving the tray or platter up and forward.
- Use your core to resist lowering the arms quickly as you lower, bringing your elbows to start.
Tip
This arm exercise engages the core, lats, shoulders, triceps and biceps. Want to amp it up? When your arms have served the platter up, circle them up and outward back to your starting point. Exhale on each circle.
Move 11: Shoulder Press
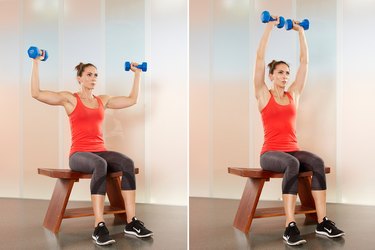
- Hold a weight in each hand and sit on a chair or bench.
- Bend your elbows and raise your upper arms to shoulder height so your arms form the shape of a football goal post.
- Inhale as you slowly press your arms up over your head toward the ceiling until the hand weights touch slightly. Keep your elbows strong, but don’t lock them at the top.
- Exhale as you bring your arms and elbows down, ending with your elbow joints at shoulder height.
Tip
Strong shoulders support you through biceps curls, triceps exercises and suspension exercises such as the plank or push-up. Because shoulder presses emphasize your shoulder muscles, they complement work you’ve done on other parts of your arms.
Move 12: Dumbbell Arm Circle
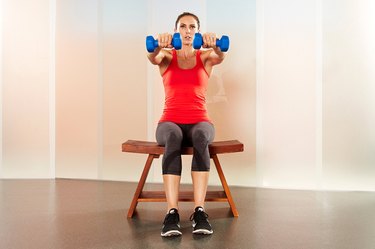
- Sit up tall in a chair or stand with feet shoulder-width apart and knees slightly bent. Hold a weight in each hand and bring your arms to chest height, slightly wider than your shoulders.
- With both arms extended out and straight, slowly make small circles inward (about four inches in diameter).
- Do this for 15 seconds before reversing your circles.
Tip
Arm circles are an intense exercise to engage your shoulders and create upper-arm definition.
Move 13: Rotator Cuff In and Out
- Hold a weight at each side as you kneel on the ground with your knees together.
- Lift the weights so your forearms are parallel to the ground, palms facing inward. Your elbows should be at a 90-degree angle with your upper arms by your ribs.
- Rotate your arms slowly in toward each other, then rotate them slowly out to the either side of your torso without allowing your forearms to lift.
Tip
One of the most common shoulder injuries for people over 40 is a rotator cuff tear. Strengthening this area not only helps prevent this injury, but also sculpts and defines your shoulder area.
Move 14: Reclining Chest Fly
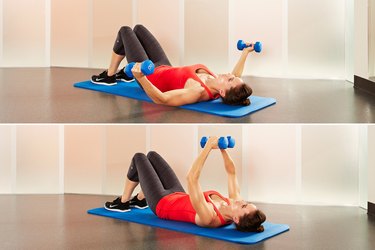
- Lie on the floor with your knees bent and your feet firmly planted hip-distance apart and hold a weight in each hand.
- Bring your arms out to your sides, palms facing up with a slight bend in the elbow.
- Maintaining the bend, bring your hands together directly over your chest, rotating from your shoulder joints. Imagine you are hugging a giant tree.
- Slowly lower back to the starting position, keeping the elbow bend.
Tip
The reclining chest fly is a great way to engage your chest muscles. This exercise also strengthens the rotator cuff, lats and biceps. You can do these from a reclining bench or lying on the floor.
- Exercise and Cardiovascular Health
- Exercise Rehabilitation in Peripheral Artery Disease
- Rehabilitation with Poststroke Motor Recovery: A Review with a Focus on Neural Plasticity
- Effect of physical training on function of chronically painful muscles: a randomized controlled trial
- American Council on Exercise: "ACE-sponsored Research: Best Triceps Exercises"