How to Measure Blood Pressure Using a Sphygmomanometer
Hypertension, or high blood pressure, affects an estimated one-third of Americans age 20 or older, according to the National Institutes of Health. Hypertension is defined as a blood pressure of 140 over 90 millimeters of mercury or higher. One or both numbers may be above normal with hypertension. Borderline high blood pressure -- or prehypertension -- is a systolic blood pressure of 120 to 139 mmHg, or a diastolic blood pressure of 80 to 89 mmHg. It is easy to monitor your blood pressure at home using a sphygmomanometer.
Digital Sphygmomanometers
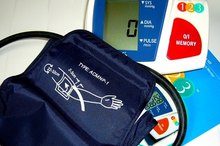
Digital sphygmomanometers, or blood pressure monitors, are widely available. They consist of an inflatable cuff and a digital display. When choosing a blood pressure monitor, be sure the inflatable cuff is the appropriate size by referring to the arm circumference range on the package. A digital wrist monitor is one variation of the standard arm blood pressure cuff. Wrist monitors fit most body types because the wrist circumference is usually not significantly affected by body weight. Whether you select a wrist or arm cuff, most digital blood pressure monitors are easy to use and require only the push of a button to check your blood pressure.
- Digital sphygmomanometers, or blood pressure monitors, are widely available.
- Wrist monitors fit most body types because the wrist circumference is usually not significantly affected by body weight.
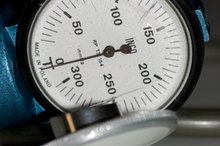
Aneroid Sphygmomanometers
What Is the Formula for Calculating Blood Pressure?
Learn More
An aneroid sphygmomanometer consists of an inflatable cuff, a pressure gauge and an inflating bulb. A stethoscope is also required. Because of the skills needed to take a blood pressure with this instrument, aneroid sphygmomanometers are recommended for use by medical professionals or others who have received comprehensive training in taking blood pressure readings.
Measuring Your Blood Pressure
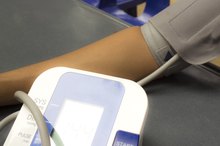
Once you have found a sphygmomanometer, put it to use by applying the blood pressure cuff snugly around your bare upper arm. If you are using a wrist monitor, position the cuff around your wrist. Relax your arm and position it at the level of the heart. Since each blood pressure monitor works differently, follow the manufacturer's instructions for inflating the cuff on your specific monitor. Keep your arm relaxed and still while the monitor is measuring your blood pressure.
- Once you have found a sphygmomanometer, put it to use by applying the blood pressure cuff snugly around your bare upper arm.
- If you are using a wrist monitor, position the cuff around your wrist.
Recording Your Results
How To Take Your Blood Pressure with Sleeves
Learn More
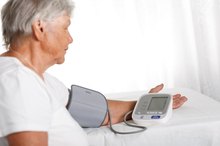
When the monitor finishes taking your blood pressure, the cuff deflates and your results show on the display. The top number is your systolic blood pressure and the bottom number is your diastolic blood pressure. Many digital monitors also display your heart rate. Record your results and take them to your next doctor's appointment. Bring your blood pressure monitor to your appointment as well. Doctor's office staff can check your monitor to make sure it is measuring your blood pressure accurately.
- When the monitor finishes taking your blood pressure, the cuff deflates and your results show on the display.
- Doctor's office staff can check your monitor to make sure it is measuring your blood pressure accurately.
Related Articles
What Is the Formula for Calculating Blood Pressure?
Learn More
How To Take Your Blood Pressure with Sleeves
Learn More

How to Calibrate a Blood Pressure Monitor
Learn More
How to Read the SYS DIA Pulse
Learn More
Equipment for Checking Blood Pressure
Learn More
How to Calibrate a Freestyle Glucometer
Learn More
How Do Automatic Blood Pressure Monitors Work?
Learn More

How to Calculate Body Fat Into Pounds
Learn More
NordicTrack A2050 Specs
Learn More

How to Troubleshoot a Blood Pressure Monitor
Learn More
References
- American Heart Association: Heart Disease and Stroke Statistics — 2014 Update
- American Heart Association: Recommendations for Blood Pressure Measurement in Humans and Experimental Animals
- American Heart Association. Understanding blood pressure readings.
- American Heart Association. Low blood pressure—when blood pressure is too low. Updated October 21, 2016.
- Centers for Disease Control and Prevention. High blood pressure symptoms, causes, and problems. Updated May 19, 2020.
- Salkic S, Batic-Mujanovic O, Ljuca F, Brkic S. Clinical presentation of hypertensive crises in emergency medical services. Mater Sociomed. 2014;26(1):12-16. doi:10.5455/msm.2014.26.12-16
- Institute for Quality and Efficiency in Health Care (IQWiG). What is blood pressure and how is it measured? InformedHealth.org. Updated May 23, 2019.
- American Heart Association. Know your risk factors for high blood pressure. Updated December 21, 2017.
- Sharma S, Hashmi MF, Bhattacharya PT. Hypotension. StatPearls. Updated May 23, 2020.
- American Heart Association. Health threats from high blood pressure. Updated October 31, 2017.
Writer Bio
Macy Lucas is a registered nurse with her main focus in cardiology. She graduated with a Bachelor of Science in Nursing from Grand Valley State University.