Full body massage may take many forms because of the variety of types of massage —like Swedish and deep tissue according to Winchester Hospital — practiced. The focus is on the feet, legs, hips, back, neck, shoulders, arms, hands and, occasionally, the face.
The portions of the body included are determined by the needs of the client and the characteristics of the modality. However, it is standard practice to include at least the majority of the body area when giving a full body massage. Remember to stay within the scope of your training to provide a safe and beneficial full body massage experience.
Video of the Day
Video of the Day
Warning
Many massage lotions contain ground and tree nut derivatives. Do a skin patch test before the intake interview to check for an allergic reaction.
Know the health conditions that are dangerous when combined with massage. Do not proceed until you have clearance from the patient's physician if there are serious health issues.
Full Body Massage Instructions
Conduct an intake interview with your client, as suggested by the American Massage Therapy Association, to learn of his goals for massage and any medical conditions. Position the client comfortably and securely on the massage table with a towel or sheet in place to provide privacy and warmth.
Develop a mental flow chart to map which areas of the body you will massage and the amount of time you will allot to cover those areas. Begin with long, smooth effleurage strokes from the ankle to the knee or hip to spread the lotion and begin to warm the tissue.
Apply petrissage, a milking type of stroke, and local compression to work specific muscles or tight areas. Finish the first leg with a return to long, slow strokes, and then move to the other leg and repeat.
Transition to the Back
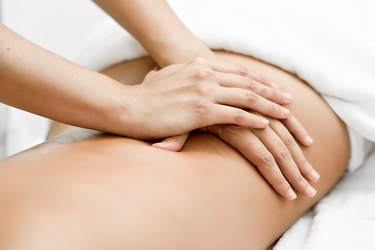
Transition from the legs to the back and begin another series of long, slow effleurage strokes on both sides of the spine, covering the whole surface of the back. Use fingers, knuckles, wrists or elbows to work more deeply after the tissue is lubricated and warmed.
Relieve tight muscles by working not only on the tight areas but also by working along the whole length of the muscle with appropriate strokes, such as petrissage, compression, friction and percussion with the sides of the hands. Return to the long, soothing strokes to finish the back massage. If the client wants you to ease up on the pressure you must do so according to BreastCancer.org.
Arms and Hands
Work with the client's arms and hands in either the face down or face up position, depending on when you want him to turn over. Use the long, slow effleurage strokes much as you did with the legs. Alternate the more intense, deeper work of petrissage, compression and friction with a wringing motion if you can support the weight of the client's arm in your hands.
Grasp the client's hand in yours and insert your little fingers by his little finger and thumb so you can support the hand securely while leaving your thumbs free to provide small, circular friction to the palm of the client's hand. Finish with the effleurage strokes and move to the opposite arm.
Face-Up Position
Ask the client to roll over to the supine or face-up position for the remainder of the massage. Move to the end of the table near the client's head and reach under the neck to comb the fingers upward from the back to the base of the skull.
Let the weight of the client's body provide the pressure for this work rather than risk cramping and muscle injury to yourself by trying to produce pressure from this awkward position.
Press down across the tops of the shoulders and use petrissage of moderate intensity in this area, which is prone to significant muscle tension. Stroke across the upper chest and collarbone area but avoid the throat area on the front of the neck.
Read more: 3 Benefits of Getting a Foot Massage
Head and Jaw
Massage the client's jawline with small, light friction circles. Perform this portion of the massage seated at the head of the massage table if you cannot stand comfortably while working with the facial muscles. Continue up the jawline and around behind the ears with the small friction circles. Use this same stroke on the client's temples, but lighten the pressure.
Use the pads of your thumbs to smooth from the midline of the forehead to the sides, and continue this separating stroke across the brow ridges, from the bridge of the nose, across the cheekbones and cheeks, below the nose and across the chin.
End With a Foot Massage
Notify the client if you have completed the massage or whether you will conclude with a foot massage. Work with the feet last to avoid spreading bacteria to the rest of the body. Always wash your hands immediately after working with the client's feet to avoid contamination of other surfaces.
Use moderate pressure effleurage strokes from the ankle across the top of the foot to the toe area. Roll and lightly pull each toe. Use the pads of your thumbs to provide circular friction to the sole of the client's foot and heel area.
Tip
Establish clear boundaries regarding the areas of the body you include in your full body massages and inform the patient prior to starting the massage.
Professional boundaries and proper draping techniques reassure patients that there will be no inappropriate physical contact during the massage.
Use background music to mask outside noises and help the patient relax.