
The 30-Day Yoga Challenge progresses from foundational poses to more complex asanas with variations and modifications for every body. Get all the details on the challenge here.
For all your legs and hips do for you — walking, running, climbing stairs — do some good for them.
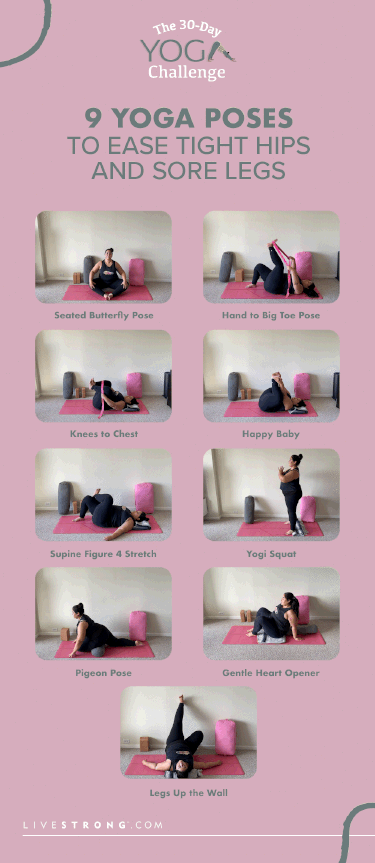
These nine yoga poses from Natalia Tabilo, yoga teacher, creator of Yoga for All Bodies and host of our 30-Day-Yoga Challenge, help stretch and strengthen your lower-body muscles. And though they're meant to be part of our month-long challenge, you can do them whenever and wherever you want.
Video of the Day
Tabilo offers suggestions for modifications and variations in the videos below to help you find a way to make each pose work for you. But you can also play around with positioning and props to find what feels best.
If you're following along with the 30-Day Yoga Challenge, aim to hold each pose for 30 to 60 seconds, breathing in and out through your nose, at least twice a day. But you can do any of these yoga poses as part of a regular practice or on their own whenever you'd like.
1. Seated Butterfly Pose (Baddha Konasana)
- Sit up tall and bring the soles of your feet together, knees bent and pointing out to the sides.
- Use your hands to press your feet together and keep the outer edges of your feet pressed into your mat.
- Bring your hands together into prayer position at your chest.
Variations
Try sitting on a chair with your feet on a block and gently resting your hands on your knees or bringing them up to prayer position at your chest.
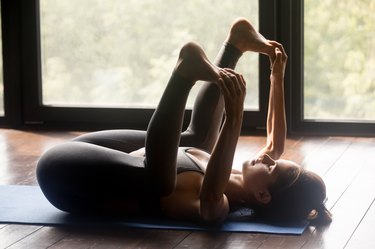
2. Hand to Big Toe Pose (Supta Padangusthasana)
- Sit up tall, then loop a strap around the sole of your left foot and hold the strap in both hands.
- Inhale and straighten your leg, pressing your left heel forward.
- Walk your hands up the strap until your elbows are fully extended.
- Draw your shoulders down and away from your ears.
Variations
You can perform this either lying on your back or standing up. And you have the option to use a strap or your hand to reach for your foot. If you don't have a strap, you can keep your leg slightly bent if you don't have the flexibility to straighten your leg.
3. Knees to Chest (Apanasana)
- Lie down on your back with your knees bent and feet planted, and take a deep inhale.
- Exhale as you draw your knees into your chest.
- Hug your shins with your hands or forearms.
- Rock side to side gently as you breathe naturally.
Variations
Hug your knees to your chest with a strap or place your hands behind your knees if that's more comfortable.
4. Happy Baby (Ananda Balasana)
- Lie on your back and bend your knees up toward your armpits.
- Grab your feet with your hands and pull your knees closer to your armpits, keeping your shins perpendicular to the floor.
Variations
Loop a strap around your feet to gently pull your knees closer to your armpits.
5. Supine Figure 4 Stretch
- Lie on your back.
- Cross your left foot over your right thigh and bend your right knee.
- Pull the back of your right leg gently toward your chest.
- When you feel a comfortable stretch, hold for 30 to 60 seconds.
- Switch sides and repeat.
Variations
Leave one foot on the floor and cross your other foot to the opposite knee, holding there. Or you can pull your supporting leg toward you using a strap wrapped around your shin.
6. Yogi Squat (Malasana)
- In a wide stance with your feet turned slightly out, bend your knees and sink down into a deep squat.
- Maintain length in your spine as you lift and open your chest and relax your shoulders away from your ears.
- Bring your hands into a prayer position, gently pressing your elbows against your inner thighs.
Variations
Sit on a chair or block(s) for support or stand with a blanket under your heels to help with ankle mobility.
7. Pigeon Pose (Eka Pada Rajakapotasana)
- From all fours, extend your right leg straight behind you as you walk your left foot toward your right hand so your left shin is parallel to the front of the mat.
- Keep your foot flexed as you sit back to stretch your outer hip. Breathe deeply as you come to your end range of motion.
Variations
For this pigeon pose alternative, sit on a chair with both feet on the floor. Cross your left foot on top of your right knee and fold over your left shin, using a bolster or folded blanket (or both) for support. If you're on the floor, you can use a bolster for support under your hips. (Check out more pigeon pose modifications here!)
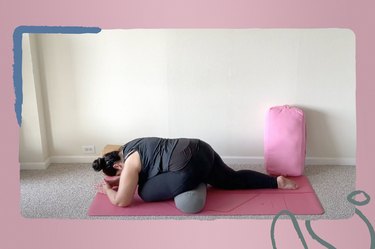
8. Gentle Heart Opener
- Set a bolster lengthwise along your mat. (If you don't have one, a rolled-up towel or blanket or a small pillow works, too.)
- Lie down on top of the bolster with your lower back at the bottom and your shoulders at the top.
- Allow your arms to hang off the bolster as you feel the muscles in your chest open up.
Variations
Use bolsters, pillows or folded blankets as needed to support your shoulders, back, hips and tailbone.
9. Legs Up the Wall (Viparita Karani)
- Sit with your left side against a wall. Rest your lower back against a bolster or pillow if you’re using one.
- Gently turn your body to the left and bring your legs up onto the wall. If you're using a bolster, shift your lower back onto the bolster before bringing your legs up the wall. Use your hands for balance as you shift your weight.
- Lower your back to the floor and lie down. Rest your shoulders and head on the floor.
- Shift your weight from side to side and scoot your sit bones close to the wall.
- Let your arms rest open at your sides, palms facing up. If you’re using a bolster, your lower back should now be fully supported by it.
- Let the heads of your thigh bones (the part of the bone that connects the hip socket) release and relax, dropping toward the back of your pelvis.
- Close your eyes and breathe in and out through your nose.
- To come out of this pose, slowly push yourself away from the wall and slide your legs down to the right side. Use your hands to press yourself back up into a seated position.
Variations
Use a chair instead of a wall, bending your knees and resting your calves on the seat of the chair.
Back to the 30-Day Yoga Challenge