
With a flash of pain every time you take a step, hip bursitis can sideline nearly anyone. Bursae, which are small, jelly-like sacs, are located throughout the body, and are meant to reduce friction between bones and soft tissues. The bursa on top of the bony point of the hip, the greater trochanter, can become inflamed and irritated for a number of reasons, including overuse injuries — common in runners or cyclers — a hip injury due to falling or being overweight.
Although you should have a physician check out your hip and provide you with a treatment plan, simple yoga poses can help stretch and open your hips. They also help strengthen your hip muscles that surround the joint that contains the inflamed bursae, which will help resolve the issue.
Video of the Day
Video of the Day
Read More: Stretching Exercises for Hip Bursitis
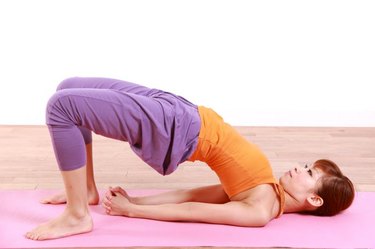
Bridge Pose
By engaging your hip flexors, glutes, hamstrings and quadriceps, hip bridges strengthen all the muscles surrounding your hip joint.
Step 1
Lie flat on your back with your legs bent and your feet flat on the floor, close to your glutes.
Step 2
Push your heels down and raise your hips, so they create a line from your knees to your shoulders.
Step 3
Hold for four to five breaths, and then slowly release to the ground.

Pigeon Pose
Stretch one hip and strengthen the other at the same time with this seated pose.
Step 1
Start on your hands and knees and bring your right knee forward, placing it as closely to the back of your right wrist as possible.
Step 2
Slide your left leg back, straightening your knee and pointing your toe behind you. Keep yourself propped up on your palms in front of you.
Step 3
Lower your right hip down while opening the leg so your knee is pointing toward the wall. Keep your left leg straightened behind you and your hips level, using a block under your right butt cheek, if necessary.
Step 4
You can stay in this position, or, if you feel comfortable, walk your hands forward and bend your torso so it's leaning over your front leg.
Step 5
On each exhale, release the tension in your right hips.
Step 6
Leave the pose by pushing your hands up, lifting your hips and bringing your hands and knees back to all fours. Repeat on the left side.
Side Angle Pose
Stretch both the inner thighs and the hip muscles with the Side Angle pose.
Step 1
Place your feet 4 to 5 feet apart, and turn the right foot and knee to the right.
Step 2
Bend your right knee to a 90-degree angle and place your right forearm on your right thigh. Reach up to the ceiling with the opposite hand. Keep your left leg straightened.
Step 3
Hold for four to five breaths, and repeat on the opposite side.
Half Lord of the Fishes Pose
Feel the stretch in your hip muscles and spine while doing the Half Lord of the Fishes pose.
Step 1
Sit down on your mat and cross your right foot over your left thigh, placing it on the floor next to your left hip. Your right knee should be bent, and your left leg straight.
Step 2
Turn your body to the right and place your right hand on the floor behind you, twisting your torso. Use your left arm to hug your bent right knee to provide leverage in the twist. Feel the stretch in your back and right hip, and hold for four to five breaths.
Read More: Stretching Exercises for Hip Pain
Is this an emergency? If you are experiencing serious medical symptoms, please see the National Library of Medicine’s list of signs you need emergency medical attention or call 911.