What does fact checked mean?
At Healthfully, we strive to deliver objective content that is accurate and up-to-date. Our team periodically reviews articles in order to ensure content quality. The sources cited below consist of evidence from peer-reviewed journals, prominent medical organizations, academic associations, and government data.
The information contained on this site is for informational purposes only, and should not be used as a substitute for the advice of a professional health care provider. Please check with the appropriate physician regarding health questions and concerns. Although we strive to deliver accurate and up-to-date information, no guarantee to that effect is made.
How Do Automatic Blood Pressure Monitors Work?
Over time, untreated or undetected blood pressure can permanently weaken and damage your blood vessels. Having high blood pressure increases your risk for heart disease and stroke, which the Centers for Disease Control and Prevention accounts as the first and third leading causes of death in the United States.
If you are experiencing serious medical symptoms, seek emergency treatment immediately.
High blood pressure can be managed through monitoring by your physician and at home 1. The most common way you can regularly check your blood pressure at home is through the use of an automatic blood pressure cuff.
Blood Pressure
Blood pressure is the pressure the blood exerts on the walls of the blood vessels. The measurement of blood pressure is reported with two numbers, a systolic and a diastolic number. The systolic number is the top number, which is the pressure on the vessels when your heart is contracting. Because the heart is contracting, the force of the blood flow is higher. Therefore, in healthy adults, the systolic number will be higher when compared to the diastolic pressure. The diastolic, or bottom number, is when your heart is relaxed. When the heart is relaxed, the blood is not being forced through the vessels, therefore the diastolic number is lower.
- Blood pressure is the pressure the blood exerts on the walls of the blood vessels.
- The systolic number is the top number, which is the pressure on the vessels when your heart is contracting.
Types
Equipment for Checking Blood Pressure
Learn More
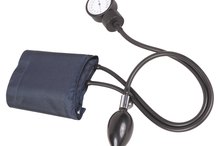
Blood pressure can be measured manually or through the use of an automatic cuff. The basic principal of both methods is the same. The cuff is inflated to temporarily cut off blood flow through the brachial artery. The cuff is slowly released and the point at which blood begins to intermittently flow through the brachial artery is sensed. This reads the systolic pressure.
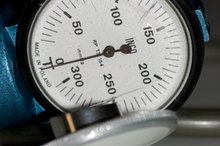
During manual measurement, the stethoscope is used by a technician to hear the return of blood flow. The point at which that pulse is heard, the technician reads the pressure on a manometer to obtain the reading.
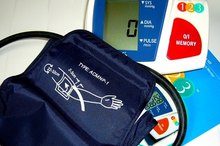
In an automatic cuff, a sensor, called an oscillometer, is in place to sense that return of arterial blood flow.
The diastolic pressure is when the flow goes from an intermittent to a continuous flow. Both readings are reflected on a digital screen.
- Blood pressure can be measured manually or through the use of an automatic cuff.
- In an automatic cuff, a sensor, called an oscillometer, is in place to sense that return of arterial blood flow.
Use
Some level of technique is involved when using an automatic cuff. The cuff fit is key. If a cuff is too loose it will produce readings that are underestimating your blood pressure.
If the cuff is too tight, it will produce a higher blood pressure reading.
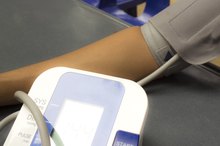
The cuff should be snug, where it does not slide around on the arm, but where you can still slide your finger under it. Different cuff sizes are available on the market to accommodate for larger or very thin arms. The tubing should be lined up over the brachial artery, which is in the crease of the elbow.
If your cuff does not have tubing, there should be a mark on the cuff to line up over the artery.
During measurement, you should be sitting down, with your arm at heart level, and the elbow slightly flexed. In addition, during your next doctor’s appointment, you should take your monitor and compare it’s reading with the nurse’s reading to see if they are close to one another.
- Some level of technique is involved when using an automatic cuff.
- The cuff should be snug, where it does not slide around on the arm, but where you can still slide your finger under it.
Monitoring
How to Calibrate a Blood Pressure Monitor
Learn More
In addition to your physician following your blood pressure, the American Heart Association recommends home monitoring in the following people 1. If you have been diagnosed with pre-hypertension, hypertension, or risk factors for developing high blood pressure then home monitoring is recommended 1. The diagnosis of high blood pressure is never made on one reading alone. Therefore you should take your blood pressure at different times of day and record those measurements. This allows your physician to trend your blood pressure over time to make the determination if you need to have it medically managed.
- In addition to your physician following your blood pressure, the American Heart Association recommends home monitoring in the following people 1.
- This allows your physician to trend your blood pressure over time to make the determination if you need to have it medically managed.
Considerations
The AHA defines high blood pressure as a systolic pressure greater than 140 mmHg or a diastolic pressure of 90 or greater.
If you are regularly getting readings above either of those levels you should seek out your physician immediately. Also, if you are taking medications for your blood pressure, you should not stop taking them at any time without consulting your physician.
Related Articles
Equipment for Checking Blood Pressure
Learn More

How to Calibrate a Blood Pressure Monitor
Learn More
How to Assemble a Blood Pressure Cuff
Learn More
What Is the Formula for Calculating Blood Pressure?
Learn More

Causes of Error in Measuring Blood Pressure
Learn More
How to Read the SYS DIA Pulse
Learn More
How to Calibrate a Blood Glucose Monitor
Learn More

How to Measure Blood Pressure Using a Sphygmomanometer
Learn More
How To Take Your Blood Pressure with Sleeves
Learn More

How to Troubleshoot a Blood Pressure Monitor
Learn More
References
Writer Bio
Amy Dixon has been writing on a local level since 2005, focusing on health and fitness. She is an ACSM Registered Clinical Exercise Physiologist and holds a Master of Science degree in exercise and wellness promotion from Slippery Rock University of Pennsylvania.