A yoga practice allows you to connect your mind and body through movement. But that can be difficult to accomplish when you struggle to do the poses.
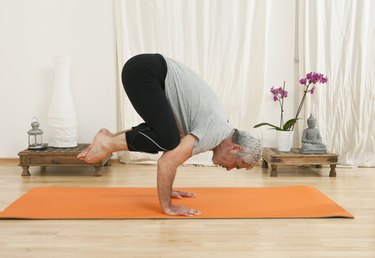
Crow pose (Bakasana) is a challenging yoga pose that requires upper-body and core strength, as well as balance. It requires you to support your body weight on your hands as you rest your knees on the back of your arms with your feet lifted off the ground.
Video of the Day
If it sounds complicated, that's because it is. You may find that you experience wrist pain, can't balance or can't get your knees to your triceps.
If you haven't been able to achieve crow pose, we have some tips for you below. But before we get into them, it's important to remember that just because advanced poses aren't in your wheelhouse yet, doesn't mean you're not a yogi.
"Don't be discouraged, and if it's not something you feel comfortable with, that's perfectly fine," Betsy Karr, RYT-200, yoga teacher at Hot Yoga Plus Palm Springs, tells LIVESTRONG.com. "You're not any less of a yogi because you are unable or not ready to do certain poses."
If You: Have Wrist Pain
You Might: Need More Wrist Mobility
Crow pose requires being able to balance all of your body weight on your hands, which may cause your wrists to hurt. One of the reasons for this is the lack of mobility in your wrists.
"Leading up to crow pose, it's really important to warm up your wrist flexors," Karr says.
Fix It
You can warm up your wrists by rotating them, making sure you move both clockwise and counter-clockwise, Karr says. She also suggests doing body rolls from a tabletop position (demonstrated below).
- Start in a tabletop position with shoulders over wrists and hips over knees.
- Circle your entire body around counter-clockwise as many times as you'd like.
- Then, circle your entire body around clockwise as many times as you'd like.
- Next, flip your wrists so your fingers are facing in toward you.
- Circle your entire body around clockwise as many times as you'd like.
- Then, circle your entire body around counter-clockwise as many times as you'd like.
If You: Struggle to Balance
You Might: Need to Strengthen Your Core
Your core is essential to crow pose, as you're essentially lifting yourself up through your core, not just leaning toward your wrist and balancing there, Karr explains.
"You really need to lift your knees up toward your armpits, and that requires a lot of core strength," she says.
Fix It
One exercise you can do to activate and strengthen your core is plank (demonstrated below). If you aren't able to hold yourself in a plank, the strength isn't necessarily there for crow pose, Karr says. So planks are a great starting point to gauge your core strength.
- Lie face down on your belly with your palms on the floor underneath your shoulders and your feet flexed with the bottoms of your toes on the floor.
- Take a deep breath and press through your palms to lift yourself up into the top of a push-up position. Your body should make a straight line from your heels through your hips to the top of your head.
- Draw your navel toward your spine and squeeze your glutes.
- Look at the floor directly below your head to keep your neck in a neutral position and breathe normally.
Another move you can do is inverted crow pose (demonstrated below), which is essentially crow pose but done lying on your back. This move will allow you to get into the correct shape of crow pose while also activating your core like a crunch.
- Lie on your back and draw your knees in toward your chest.
- Curl your tailbone off the floor and lift your shoulders off the mat as you press your lower back into the mat and draw your navel to your spine.
- Extend your arms directly out from your shoulders and flex your wrist as if you were placing them on the ceiling.
- Bring your knees in toward your triceps as if you were in crow pose on your back.
If You: Struggle to Lift Your Feet
You Might: Need to Use Yoga Props
If you find it difficult to get your feet off the ground, grab some yoga blocks while learning crow pose, Karr says. They're a great way to build strength to practice crow pose in it's full expression.
Fix It
Do crow pose as you normally would but place a yoga block underneath each foot. From there lean forward to take flight, Karr says.
In this pose, it's common to feel like you're going to tip forward, Karr adds, which can be a little scary. She suggests placing blankets in front of you if you're afraid of falling forward to protect yourself in case you do.
"Look forward and not down," Karr says. "Your body will go wherever you look. So, if you're looking down, you will go down. If you're looking forward, you will go forward — which is what you want to do in this pose."
If You: Can't Support Your Body Weight
You Might: Need to Strengthen Your Shoulders and Upper Back
Because you're required shift the weight of your body forward to be fully supported by your upper body, it's important to have a strong shoulder girdle (which consists of your clavicle and scapula) and upper back. Strengthening and stretching these muscles will improve your overall posture and balance in crow pose.
Fix It
Cat-cow pose (Bitilasana Marjaryasana), demonstrated below, is great for warming up your spine, Karr says. Driving the heels of your hands into the floor as you lift your spine toward the ceiling in the cat position and arching your back in the cow position will help you loosen up your shoulders and upper back.
- Start on all fours on your hands and knees.
- Inhale as you drop your belly toward the floor, arching your back and lifting your head and tailbone toward the ceiling.
- Exhale as you round your back, pressing your mid-back toward the ceiling and tucking your chin under.
Downward dog (Adho Mukha Svanasana), demonstrated below, is another position that will strengthen and stretch your shoulders and upper back. It'll also help you get comfortable with the inverted position of crow pose and holding your body weight on your hands through the use of your shoulders, Karr says.
- Start from a tabletop position on your hands and knees with your wrists under your shoulders and your knees under your hips.
- Curl your toes under and press through your hands and toes to lift your knees away from the mat or floor.
- Extend your arms while lifting your hips up and back. Your body should form an inverted “V.”
- Let your head relax naturally toward the ground.
- Keep your knees soft to avoid shifting your weight too far forward.
- Distribute your weight as evenly as possible between your hands and feet.
- Prioritize finding length and extension in your spine over pressing your heels to the floor or straightening your knees all the way.


