"Your body, your practice." It sounds like a simple mantra, but it can radically change your relationship with yoga.
After all, in a yoga class or when following along to a video, it's far too easy to compare ourselves to others and think there's a right or wrong way to do a given yoga pose. But, in reality, no two bodies move in the exact same ways, says Natalia Tabilo, a certified yoga instructor and founder of Yoga for All Bodies.
Video of the Day
Video of the Day
And while she encourages all of her students to "work with their body as a friend and as a partner," unfortunately, many yoga instructors don't offer enough variations for athletes who are plus-sized. Jessica Rihal, a meditation teacher and 200-hour certified yoga instructor at Everybody in Los Angeles and Joyn online, recommends taking ownership of your practice. "Show up for yourself and your body and nothing else," she says.
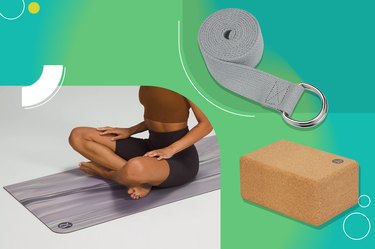
To do that, it's helpful to have a few go-to options you can turn to when a so-called "standard" yoga move doesn't feel right for your body. So we spoke with Rihal and Tabilo about their favorite feel-good yoga variations for larger bodies.
The Best Yoga Pose Variations for Plus-Sized Yogis
Move 1: Child’s Pose With Blanket
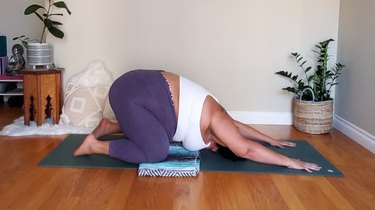
- Place a blanket or cushion on the ground.
- Get on your hands and knees with your knees on top of the blanket.
- Lower your hips behind you toward the floor as far as feels comfortable. Extend your arms and let your torso sink toward the floor.
- Hold, breathing deeply throughout.
Tip
You can also use a blanket under your knees in cat-cow. Any pose that involves placing your knees down on the ground will likely feel better with extra cushioning, Rihal says.
Move 2: Elevated Downward Dog
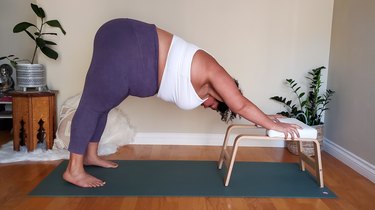
- Stand and place your hands in front of you on an elevated surface.
- Straighten your arms and fold forward. Lower your chest between your shoulders.
- Keep your hips up and heels against the floor.
- Hold, breathing deeply throughout.
Tip
Downward dog is a foundational pose you'll encounter in almost every yoga class. Placing your hands on an elevated surface like a chair, couch or block reduces any stress on your wrists and hands, Rihal says.
Move 3: Elevated Plank
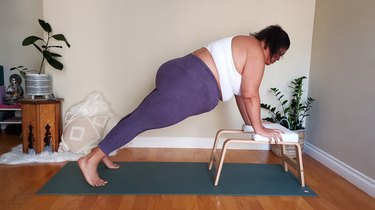
- Place your hands shoulder-width apart on a sturdy, elevated surface.
- Step your feet back into a plank position with your arms straight and shoulders over your wrists. Your body should form a straight line from head to heels.
- Hold, breathing deeply throughout.
Tip
Just like with downward dog, placing your hands on an elevated surface for a plank can be more comfortable on your wrists, Rihal says. By increasing your body's incline, it also reduces the amount of weight your core has to support and any lower back pain.
Move 4: Mountain Pose With Wide Stance
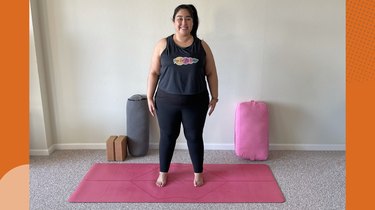
- Stand with your feet shoulder-width apart or wider.
- Brace your legs and core.
- Rotate your arms so your palms face forward and let your arms hang by your sides.
- Roll your shoulders down and back.
- Hold, breathing deeply throughout.
Tip
“Tadasana, or mountain pose, is usually taught with the feet together, but if you live in a larger body, bringing the feet together only squishes the legs,” Tabilo says. So, as you stand in the posture, simply separate your feet to the position that feels best for you.
Move 5: Tree Pose With Block
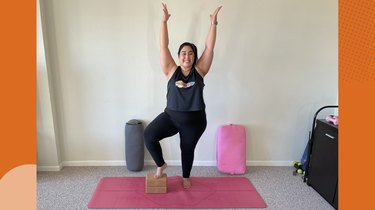
- Stand tall next to a block or two.
- Shift the majority of your weight to the leg farthest from the block.
- Raise your opposite foot and rest its toes on the block.
- Bring you arms up overhead as comfortable.
- Hold, breathing deeply throughout.
Tip
Instead of trying to bring your leg up to your pubic bone, give your leg more space to move with blocks, Tabilo says.
Move 6: Low Lunge With Blocks
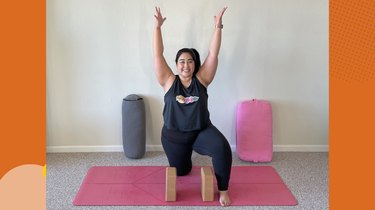
- Get in a half-kneeling position with two blocks in front of you on the floor and inside your front foot. Hold onto the blocks for balance.
- Once you feel stable, raise your arms straight overhead.
- Hold, breathing deeply throughout and lowering your hands to the blocks as needed.
Tip
Using blocks, instead of placing your hands on the floor, creates more space for your abdomen and chest, Tabilo says.
Move 7: Boat Pose With Straps
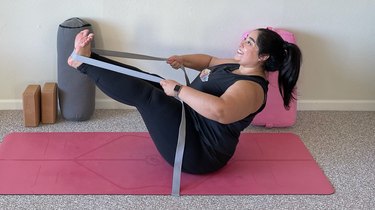
- Sit on the floor. Place a strap around the arches of your feet and hold strap on each side of your legs.
- Squeeze your core to raise your legs off the floor at a 45-degree angle. Bend your knees if needed.
- Hold, breathing deeply throughout.
Tip
Adding a strap to navasana makes it more accessible. As your drive your feet into the strap, you use the strap as an extension of your arms, Tabilo says.
Move 8: Half Moon With Block
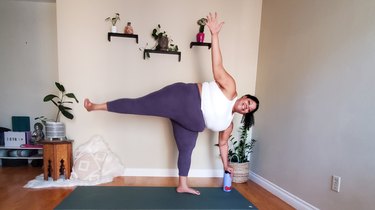
- Place a block or water bottle at the top of the mat.
- Facing it, place your left hand on top of the block and lift your right leg from the floor.
- Stack your hips and shoulders as you open up to the right. Keep your right leg straight.
- If you want, extend your right arm toward the ceiling.
- Hold, breathing deeply throughout.
- Switch sides.
Tip
Move 9: Happy Baby With Strap
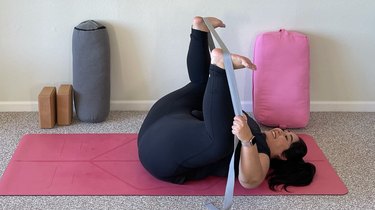
- Lie on your back. Place a strap around the arches of your feet and hold both ends.
- Lift your feet up toward the ceiling and bring your knees wide and toward your shoulders.
- Gently pull the strap, holding as close to or far from your feet as feels comfortable.
- Hold, breathing deeply throughout.
Tip
The strap serves as an extension of your arms, Tibalo says. That way, to reach your feet, you don’t have to bring your shoulders up or round your spine to reach your feet.
Move 10: Seated Forward Fold With Wide Legs
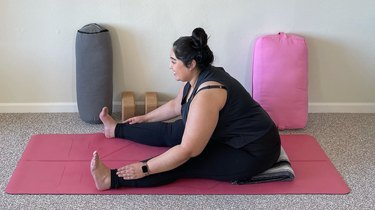
- Sit on the ground with with your legs extended diagonally in front of you in a V.
- Leading with your chest, fold your torso forward toward the floor as far as comfortable.
- Hold, breathing deeply throughout.
Tip
Often times, yoga instructors say to do a seated forward fold with your legs together. But to make space for your body, Tabilo suggests keeping your legs wide.