
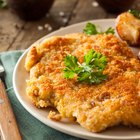
Breading commonly fails because of details, usually the minor, yet finer, points of the breading-frying dynamic. The breading technique, the right ingredients and the first 30 seconds of frying are perhaps the most important factors when it comes to keeping a crusted coating intact. Breaded items, especially meats like pork, require a dry surface and a proper dredging for the egg wash and breadcrumbs to adhere, and then they need placed in a high-temperature oil -- heated to no less than 350 degrees Fahrenheit -- to set firmly and make it through the frying process.
Breading
Step 1
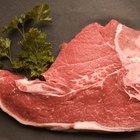
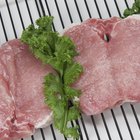
Take the pork chops out of the refrigerator about 45 minutes before you want to fry them and season them with kosher salt. Seasoning the pork chops early lets the salt penetrate deeper and starts a tenderizing process similar to salt curing. The pork chops also release less moisture during frying when you season early, which helps the breading stick.
Step 2
Place the pork chops on a plate and let them reach room temperature.
Step 3
Set up the breading station while the pork chops are warming up. Pour enough all-purpose flour in a shallow dish to coat each pork chop on the top, bottom and the sides. You can mix some dry spices in the flour if you like.
Step 4
Whisk whole eggs and milk or cream -- about 1 egg and 1 teaspoon of cream or milk for every two chops, if you're measuring -- in a large bowl until the whites, yolks and cream fully incorporate.
Step 5
Pour panko breadcrumbs in an even layer in a shallow dish. Pat the chops on the top, bottom and sides with paper towels to dry them.
Step 6
Dredge the pork chops in the flour, first on the sides, then on the top and bottom. Shake off the excess flour from each pork chop.
Step 7
Dip each pork chop in the egg wash one at a time, coating it completely on the top, sides and bottom. Lay each chop in the panko and dredge and coat the next piece.
Step 8
Press the pork chops into the panko breadcrumbs gently to help them stick to the egg wash. Grasp each pork chop by the tip and coat it on the sides, and then lay the bare side of the chop in the panko. Press the chop into the breadcrumbs gently.
Step 9
Lay each pork chop on a wire rack set on top a tray or baking sheet while you bread the remaining pieces. Let the pork chops set on the rack while the oil heats. The breading is more likely to stay intact on a rack than on a plate so air can reach the bottom of them.
Frying
Step 1
Pour enough peanut, canola or corn oil in a wide, straight-sided, heavy-bottomed frying pan to reach about halfway up the sides of the pork chops; about 1/4 inch of oil for 1/2-inch-thick chops, and about 1/2 inch of oil for 1-inch-thick chops. Don't use a nonstick pan to fry in.
Step 2
Place the pan on a large burner on the stove and adjust the heat to the medium setting. If you have numbers representing the burner's setting, set it to between 4 and 5. Let the oil heat a full five minutes.
Step 3
Place the pork chops in the pan carefully. Don't crowd the pan; the pork chops should have at least 1 or 2 inches between them. The oil returns to frying temperature faster when you space the food out evenly.
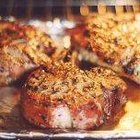
Step 4
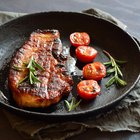
Fry the pork chops on the first side until the edges curl and turn golden brown, about four minutes for 1/2-inch-thick chops and about five or six minutes for 1-inch-thick chops. Don't move the pork chops at all until you turn them over.
Step 5
Turn the pork chops over gently one at a time with tongs in the same order you placed them in the pan.
Step 6
Fry the pork chops on the second side a little over half as long as you did the first, or about two or three minutes for 1/2-inch-thick chops, and three to four minutes for 1-inch-thick chops.
Step 7
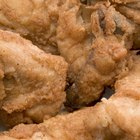
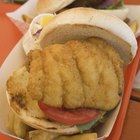
Take the chops out of the pan and place them on a plate lined with paper towels. Blot the tops of the pork chops gently with paper towels as soon as you get them in the plate to help them crisp.
Step 8
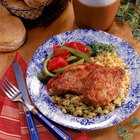
Serve the chops while steam still rises from the breading. Steam rising means the breading hasn't started to absorb moisture yet and is still crisp.
Related Articles
How to Keep Breading on Veal Cutlets ...
How to Cook a Breaded Thick Cube Steak
How to Make Sour Cream Pork Chops

How to Deep Fry Haddock Fish
How to Cook Pork Chops on an Electric ...
How to Cook Fried Drummettes
How Long Do You Bake Veal Cutlets?
How to Make Flour Stick to Chicken Wings
How to Cook Swai With Breading
How to Pan Fry and Sear Pork Chops in a ...

How to Cook Double Thickness Rib Lamb ...
How to Coat Pork Chops With Breadcrumbs
How to Prepare Breaded Pork Cutlets ...
How to Make Pulled Pork In A Slow Cooker
How to Get a Thick Coating on Fried ...
Easy Baked Pork Chops Recipe
How to Fry With Bread Crumbs
How to Cook Pork in a Skillet
How to Cook Thin Cut Butterfly Pork
How to Cook Fish With Flour
References
Tips
- If you use your hands to bread the pork chops, use one hand for the flour and breadcrumbs and the other for dipping them in the wash. You also might find holding the pork chops with tongs while breading them is easier than using your hands.
- Panko breadcrumbs form better breading than regular breadcrumbs because they have more surface area, absorb less oil and have a pointed, elongated shape that helps them stick to the egg wash.
Warnings
- Cook pork to a minimum internal temperature of 145 degrees Fahrenheit. To check the temperature, insert a meat thermometer in the side of the pork chop horizontally and wait 10 seconds for it to register.
Writer Bio
A.J. Andrews' work has appeared in Food and Wine, Fricote and "BBC Good Food." He lives in Europe where he bakes with wild yeast, milks goats for cheese and prepares for the Court of Master Sommeliers level II exam. Andrews received formal training at Le Cordon Bleu.
Photo Credits
Thomas Northcut/Photodisc/Getty Images