The shoulder dislocates exercise might sound like a painful party trick, but it's actually an expert-approved mobility drill — one that can help open your shoulders, up your exercise form and improve your joint health. (No, despite its name, this exercise doesn't actually dislocate your shoulder. It just kind of looks like it does.)
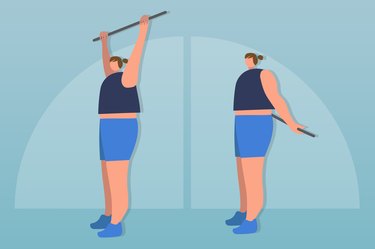
- What is the shoulder dislocate exercise? Also called the shoulder dislocation exercise, it's a shoulder mobility exercise that involves lifting a PVC pipe, dowel or resistance band overhead and behind your body with straight arms.
- What muscles do shoulder dislocates work? It targets your rotator cuff muscles: the supraspinatus, subscapularis, infraspinatus and teres minor, while also engaging the deltoids.
- Who can do this exercise? This exercise is great for anyone without a shoulder injury who wants to loosen up their shoulders before a workout and improve their shoulder mobility. If you have a previous shoulder dislocation or injury, you still might be able to do this mobility move — just make sure to get the green light from your physical therapist.
Video of the Day
How to Do the Shoulder Dislocates Exercise With Perfect Form
Shoulder Dislocates
- Stand with your feet shoulder-width apart, toes facing forward. Hold a broomstick or PVC pipe in front of your thighs with your hands about a foot wider than hip-width apart.
- Squeeze your butt and brace your core throughout the movement to prevent bending your lower spine.
- Keeping your arms straight and chest proud, lift the stick in an arc in front of your body and above your head, then rotate the stick behind you.
- If the bar or your elbows start to bend, stop the movement at your end range and hold the stretch, then return to the starting position.
- If you can move the bar and your arms without bending, continue rotating the stick all the way around until it touches your butt or the back of your thighs (depending on the length of your arms and the width of your grip on the stick).
- With straight arms, pull the stick back up overhead and in front of you, returning to the starting position.
Watch the Full Tutorial
- Stand with your feet shoulder-width apart, toes facing forward. Hold a broomstick or PVC pipe in front of your thighs with your hands about a foot wider than hip-width apart.
- Squeeze your butt and brace your core throughout the movement to prevent bending your lower spine.
- Keeping your arms straight and chest proud, lift the stick in an arc in front of your body and above your head, then rotate the stick behind you.
- If the bar or your elbows start to bend, stop the movement at your end range and hold the stretch, then return to the starting position.
- If you can move the bar and your arms without bending, continue rotating the stick all the way around until it touches your butt or the back of your thighs (depending on the length of your arms and the width of your grip on the stick).
- With straight arms, pull the stick back up overhead and in front of you, returning to the starting position.
Warning
There's no need to force it if your shoulders aren't able to move past a certain point without pain. Hold the stretch at your end range or do arm circles instead to warm up your shoulders.
“Unless you’re doing Olympic lifts [or an exercise where the bar needs to go behind the midline of your skull while overhead], nobody needs to be 40 degrees behind their torso with that pole,” says Brandon Lirio, CPT, director of BattleGround Fitness.
3 Tips for Better Results
1. Keep Your Chest Up, But Not Out
Standing with your chest proud helps keep your shoulder blades back and down, but be careful not to puff out your pecs too much as it can cause your lower back to bend. Make sure to also brace your core and squeeze your glutes throughout the exercise so that the movement stays in your shoulders and not in your back.
2. Use a Wide Grip
Place your hands about a foot wider than hip-width on the dowel. A wider grip isolates your shoulders and allows you to move the dowel in a full arc without bending your arms or the bar.
If the bar (or your elbows) is bending, your arms are basically trying to widen so that your shoulder can continue the movement, Lirio says. If this happens, widen your grip even more or hold the stretch at the point where the bar or your elbows start to bend.
As you make this exercise a routine, your shoulder mobility will improve, and eventually, you'll be able to bring your arms farther down behind your body. You might even be able to make your grip on the stick narrower. (See the below progression.)
3. Don't Force It
Can't keep your arms straight or get the dowel all of the way behind you? That's OK. Trying to push your joint through an uncomfortable range of motion puts you at a significant risk of injury.
During the exercise, only move as far as actually feels good. Yes, this is a challenging mobility drill. But it should never be a painful one.
2 Shoulder Dislocates Exercise Benefits
1. It Improves Shoulder Health
Fascia is connective tissue that runs through your whole body, including your tendons and ligaments. When you lift weights, your muscles not only transfer force to your bones but also to your connective facia. And if your fascia is tight around the muscles, it can limit mobility and cause painful knots, according to Johns Hopkins Medicine.
Doing the shoulder dislocates stretch relieves tightness in the rotator cuff muscles and lubricates the shoulder joint, making it easier to move. Your shoulder is a synovial ball-and-socket joint, meaning every time you move the joint, fluid inside the joint (called synovial fluid) coats your bones.
This reduces the friction between your bones and increases the range of motion in your shoulders. Synovial fluid also supplies oxygen and nutrients to your shoulder joints to keep them healthy and functional.
2. It Preps Your Shoulders for Exercise
Good, effective workouts require excellent exercise form. And by activating all of the tiny muscles surrounding your shoulder joint, the dislocates exercise can improve your workout form in a big way.
"It can open the shoulder joint and allow for a greater range of motion by stretching the inside of your rotator cuff, your labrum [the thick piece of tissue that holds the ball of the shoulder joint in the socket] and the back shoulder muscles," Lirio says.
For instance, overhead presses, while great for building shoulder strength, are one of the most commonly botched exercises. Why? Because few people have the shoulder mobility to do overhead presses. But warm up your full shoulder range of motion before your lifts, and you'll be better able to get your arms overhead without throwing your spine out of whack.
Try doing this exercise prior to any upper-body movements, as well as exercises like back squats and deadlifts that require shoulder mobility and/or stability.
2 Modifications to Make Shoulder Dislocates Easier
Resistance-Band Shoulder Dislocates
- Stand with your feet shoulder-width apart, toes facing forward. Hold a resistance band in front of your thighs with an overhand grip, hands about a foot wider than hip-width.
- Squeeze your butt and brace your core throughout the entire movement to avoid bending your lower back.
- Keeping your arms straight and chest proud, lift the band in an arc in front of your body and above your head, then rotate the band behind you.
- If your elbows start to bend, stop the movement at your end range and hold the stretch before returning to the starting position.
- If you can continue to move the band and your arms without bending, continue rotating the band all the way around until it touches your butt or the back of your thighs (depending on the length of your arms and the width of your grip on the band).
- Keeping your arms straight, pull the band back up over your head and in front of you, returning to the starting position.
Doing the shoulder dislocation exercise with a band is a great option if you don't have a big stick available or if you want to just something with some "give." Because the band can stretch, it's a little bit easier to move through a full range of motion without bending your arms.
Supine Shoulder Dislocates
- Lie face-up on a bench with your knees bent and feet on the bench. (You can also do this with your feet on the floor, but placing your feet on the bench makes it harder to arch your lower back.)
- Hold a PVC pipe over your chest with your hands a little wider than shoulder-width. Brace your core.
- Keeping your arms straight, lift the stick in an arc in front of your body and above your head, then rotate the stick behind you.
- If the stick or your elbows start to bend, stop the movement at your end range and hold to feel the stretch.
- Bring the stick back to the starting position and repeat.
If you have trouble getting the bar over your head, this can be a safe way to work on your range of motion with the help of gravity. Just be sure to go slow and keep your core tight so your back doesn’t arch.
1 Progression to Make Shoulder Dislocates Harder
Shoulder Dislocates With Narrow Grip
- Stand with your feet shoulder-width apart and toes facing forward. Hold a broomstick, PVC pipe, or other bendable stick in front of your thighs with an overhand grip, hands about 6 inches wider than hip-width.
- Squeeze your butt and brace your core throughout the movement to keep your lower back from bending.
- Keeping your arms straight and chest proud, lift the stick in an arc in front of your body and above your head, then rotate the stick behind you.
- If the bar or your elbows start to bend, stop the movement at your end range and hold the stretch before returning to the starting position.
- If you can continue to move the bar and your arms without bending, continue rotating the stick all the way around until it touches your butt or the back of your thighs (depending on the length of your arms and the width of your grip on the stick).
- Keeping your arms straight, pull the stick back up over your head and in front of you, returning to the starting position.
The narrower your grip, the harder this exercise becomes, so stop at your end range if your elbows or the stick starts to bend.
More Shoulder Mobility Exercises


Was this article helpful?
150 Characters Max
0/150
Thank you for sharing!
Thank you for your feedback!