While focusing on a single muscle at a time may not always be the ideal way to exercise, knowing which exercises are most efficient and functional is key when putting together a quality workout routine.
And it's not only which exercise is best for each body part, but, more importantly, how that exercise is executed. Doing an exercise with improper form will limit your results and could result in injuries.
Video of the Day
Video of the Day
The list below not only describes how to do some of the best exercises for each body part but also provides a recommended rep range for each. Pick one of the moves for each muscle group and do them for 3 sets, resting for 30 seconds in between sets.
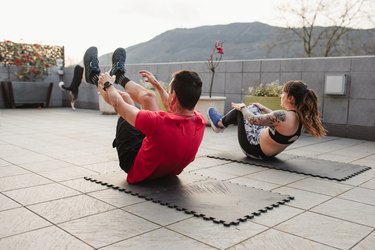
You can also perform all of the exercises as a circuit (only doing one set of each exercise) for a full-body workout or incorporate the exercises individually in another routine. Or if you're more adventurous and want to design your own workout, you can do multiple pairings in one workout. For example: deadlift + push-up with pause + wide-grip pull-up + forward lunge.
Have fun, work hard and, most importantly, work smart and be creative!
Quadriceps
Move 1: Front Squat
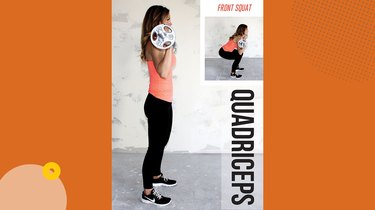
- With a barbell across the front of your shoulders, keep your abs engaged as if you were to pulling a zipper up your ribcage.
- Push your hips back and keep your knees from rotating toward each other as you lower into a squat.
- Keeping your back flat (do not round the upper back or overarch the lower back), imagine pushing the floor away as you drive back up to standing.
Tip
Or you can do a goblet squat: Hold a kettlebell or dumbbell in front of you tight to your chest and just below the chin and perform the same movement.
Move 2: Forward Lunge
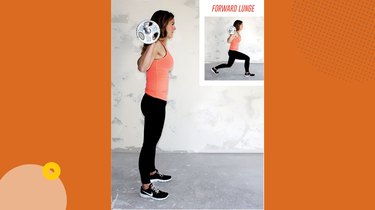
- Keeping the abs engaged, take a hip-width stance.
- Step forward with one foot, making sure it stays in line with the hip and does not cross toward the midline of the body.
- Lower yourself to the floor slowly, keeping the back knee below the hip. Be sure not to allow the front knee to drive forward excessively or rotate inward.
- Drive the ground away to push yourself back to the starting position.
- Complete all reps on one side first before switching to the to the other leg.
Hamstrings
Move 1: Barbell Romanian Dead Lift (RDL)
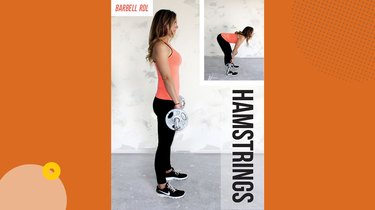
- Keeping your abs engaged, push your hips back and keep your back flat as you lower the barbell just past your knees.
- Keep your knees soft as you feel a stretch in the hamstrings and glutes.
- Drive through your heels and focus on pushing your hips forward to raise the bar, not by simply lifting your chest.
- Squeeze the glutes at the top to finish the rep.
Move 2: Natural Glute Ham Raise
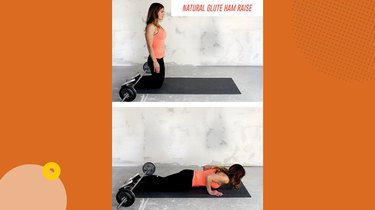
- Starting on your knees, place your feet (at the ankles) underneath a loaded barbell or other heavy object that will keep your feet from moving (you can also use a partner here).
- Keep your abs engaged and lower yourself slowly, feeling the work take place in the hamstrings.
- Catch yourself with your hands as you lower your chest to the ground.
- Start to pull through your hamstrings as you lightly push yourself off the ground.
Tip
Keep the back from arching throughout the exercise by keeping your abs engaged and hips from tipping forward.
Glutes
Move 1: Deadlift
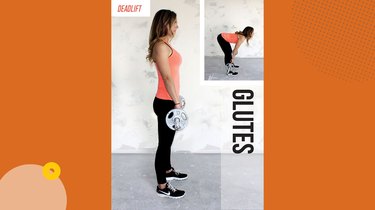
- With a loaded barbell, take a hip-width stance and stand so that your shins are at the bar.
- Keeping your abs engaged, push your hips back as you hinge at the hips to bend down to the bar.
- Grab the bar so the hands are just outside your knees with your knees soft (slightly bent).
- Keep your back flat as you drive your heels through the ground, and think about bringing your hips forward to lift the bar off the ground.
- Squeeze your glutes at the top to finish the rep.
Move 2: Single-Leg Hip Thrust From Bench
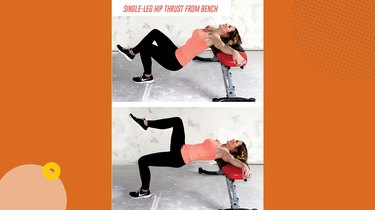
- With your shoulders up against/on a flat bench, place your feet hip-width apart and bend your knees so your ankles are right beneath your knees.
- Keep the abs engaged as you drive your heels through the ground to bridge your hips off the ground.
- At the top position, squeeze the glutes and lift one leg without allowing the hips to rotate.
- Slowly lower your hips to the floor and then drive through the heel, squeezing the glute of the down leg to finish in the bridge position.
Abs
Move 1: Side-Plank Wall Slide
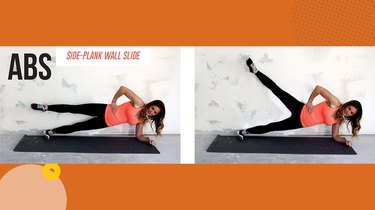
Get into a side-plank position so that your head, upper back, butt and heels are in contact with a wall. Keep your abs engaged and body straight from your shoulders to your heels (don’t allow the hips to sag). Press the heel of your top foot into the wall behind you as you slide it up the wall, all the time keeping the hips from sagging. Slowly lower your leg back to starting position. You should feel the work taking place in the down-side lateral core. You will also feel work taking place in the hips on this one!
Move 2: Barbell Rollouts
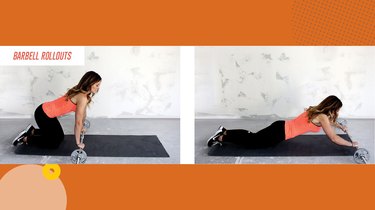
- Put a pair of round plates (one on each side; 10 pounds should do) on a barbell and place the barbell on the floor.
- From the kneeling position (use a pad if necessary), keep your abs engaged and roll the bar away from your body.
- Make sure to keep the hips from sagging to the floor and the low back from arching as you roll the bar overhead.
- Once you reach your furthest point, reverse direction making sure to continue to prevent the hips from sagging or low back from arching.
- Come back to the starting position before going for your next rep.
Tip
If the barbell rollout starts to get easier, don’t come all the way back to the starting position in order to keep more tension on the core.
Chest
Move 1: Push-Up With Pause
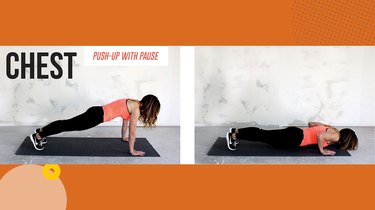
- From a high plank with your hands beneath the shoulders, keep your abs engaged as to not allow the hips to sag, low back to arch or upper back from rounding.
- Keep the elbows at 45 degrees to the body as you lower yourself down into the push-up, making sure your chest is the first thing to hit the ground and not your chin or hips (you will not actually be hitting the ground, but this is a good cue).
- Hold the bottom position for 3 to 5 seconds, making sure your elbows do not pass behind the body as you keep a wide chest that doesn’t allow the shoulder blades to tip forward.
- Explosively push yourself away from the ground and return to the top position.
Move 2: Alternating Flat Dumbbell Bench Press

- Keeping your abs engaged so that your low back stays in contact with the bench, press a pair of dumbbells toward the ceiling while keeping your elbows at 45 degrees to the body.
- From the top position, keep one dumbbell up as you lower the other one down again, keeping the elbow at 45 degrees and focusing on keeping the chest wide.
- Do not allow the elbow to pass behind the body in order to prevent the shoulder blade from tipping forward.
- Explosively push the dumbbell back up as if you were trying to push it through the ceiling.
- Keep the dumbbell up and repeat to the other side, alternating sides for the total number of reps.
Shoulders
Move 1: Pike Push-Up

- From a high plank, keep the abs engaged as to not allow the hips to sag or low back to arch.
- Next, pike your hips toward the ceiling as high as you can as you push the floor away from you (you will be pushing overhead as your hips go toward the ceiling). This is the starting position.
- Lower yourself toward the floor, but this time keep your hips piked the whole time.
- Push yourself away from the floor, focusing on bringing your shoulder blades up and around your ribcage and slightly shrugging your shoulder blades to finish the top of the push.
Tip
You will essentially be performing a modified handstand push-up as your feet will still remain on the floor. To make the exercise more challenging, move your feet closer to your hands and eventually kick yourself into a handstand position (start with your feet on a wall).
Move 2: Half-Kneeling Overhead Angled Barbell Press
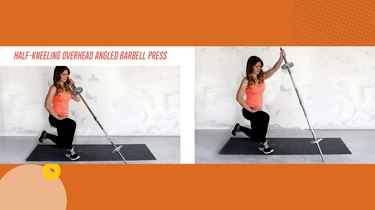
- Place a barbell so that one end is secured in the corner of a wall or landmine.
- From a half-kneeling position (one knee is down and the other is up with both knees at 90 degrees and in line with your hips), keep the abs engaged and stay tall so the low back is not arching and the upper back is not rounding.
- Grab the end of the barbell in the opposite hand of the up knee. Keep the elbow in front of the shoulder with your knuckles facing your cheek.
- Press the barbell overhead, focusing on bringing the shoulder blade up and around the ribcage and finishing with the shoulder blade elevated toward the ear slightly and tipped back (slightly shrug your shoulder blade toward your ear and tip the top of the shoulder blade toward the floor behind you).
- Lower the barbell under control in the same path and repeat for reps before switching hands and leg position.
Upper Back
Move 1: Farmer’s Carry
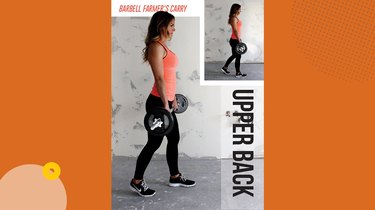
- With a heavy pair of dumbbells or a barbell, keep your abs engaged and stand tall (think of putting the top of your head through the ceiling).
- Focus on keeping a wide chest and keeping the shoulder blades up and tipped back.
- Do not allow the lower back to arch or the upper back to round as you walk in a straight line.
Tip
Keep the feet from crossing over one another (imagine a line between your feet you don’t want to cross). Think “tight and tall” throughout.
Move 2: One-Arm Dumbbell Row
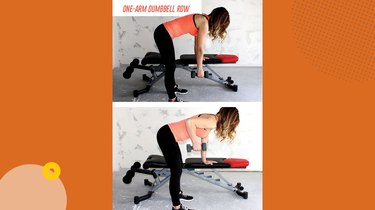
- Assume an athletic three-point position by hinging and sitting your hips back and placing one hand on a box or bench.
- Keeping the lower back from arching and upper back from rounding (the back should be relatively flat), grab a dumbbell using a neutral grip (knuckles facing in toward your body) with the off hand.
- Keep your abs engaged so that your body does not move as you row the dumbbell, focusing on initiating the row with the upper-back muscles to pull the shoulder blade across your back.
- Keep a wide chest and do not allow the elbow to pass behind the body to keep the shoulder blade from tipping forward. Slowly lower the dumbbell and repeat.
Lats
Move 1: Wide-Grip Pull-Up
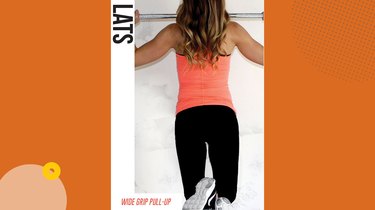
- Grab a pull-up bar with your hands about 4 inches wider than your shoulders on each side with the backs of your hands facing you.
- Engage your abs so your lower back doesn't arch as you begin the pull-up by tipping the shoulder blades back.
- Focus on bringing your chest to the bar while not allowing your chin to pop out or your shoulder blades to tip forward.
- Squeeze your lats at the top, the lower back down with control.
Tip
As you start the pull-up, make sure to bring the shoulder blades down (putting them in your back pocket) as you begin to bend the arms.
Move 2: Chest-Supported Dumbbell Row
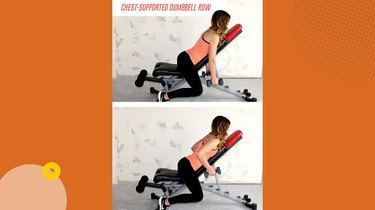
- With a bench set at approximately a 45-degree incline, lie facedown on the bench so your chin is above the top of the bench.
- With a dumbbell in each hand, keep your abs engaged so you don’t arch your back as you lift your chest slightly off the bench.
- Row the dumbbells, focusing on initiating the movement with your shoulder blades moving toward each other. Keep the chest wide and focus on tipping the shoulder blades back as you row, not allowing the elbows to finish behind the body.
- Squeeze the lats at the top, then lower the weights back down with control.
Biceps
Move 1: Chin-Up
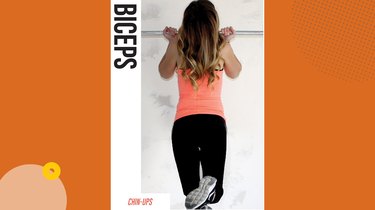
- Grab a chin-up bar so that your palms are facing you. Keep the abs engaged so that your low back does not arch.
- Initiate the movement by pulling your shoulder blades into your back pocket while simultaneously bending the elbow. Keep the elbow tight to the body to finish as you focus on bringing your chest to the bar.
- Your chest should stay wide as you finish and the shoulder blades should be kept from tipping forward as you squeeze the biceps at the top.
- Lower back down with control.
Move 2: 1.5 Dumbbell Hammer Curls
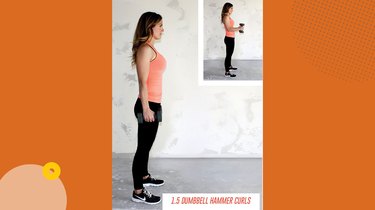
- Hold a pair of dumbbells with a neutral grip by your sides (palms facing your body, abs engaged and shoulder blades back).
- Curl the weights to 90 degrees — your forearms should be parallel to the floor.
- Slowly lower back to the starting position, then curl all the way up to your shoulders. That’s one rep.
Tip
Keep the elbows in tight to your body, don’t arch your lower back and keep your shoulder blades from caving forward. Hold the top position for a quick 2-count before slowly lowering your arms.
Triceps
Move 1: Dumbbell Skullcrusher
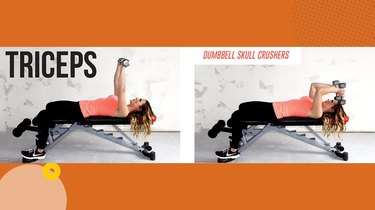
- Lying on your back, press a pair of dumbbells toward the ceiling using a neutral grip (knuckles should be facing each other).
- Keeping the upper arms from moving so that your elbows stay directly above the shoulders, bend the elbows carefully lowering the dumbbells back, keeping them just to the outside of the forehead at the bottom of the range of motion.
- Extend the elbows so the arms come back to the straight position just over the shoulders.
Tip
Keep the abs engaged throughout so the low back does not arch and the chest does not pop up.
Move 2: 1.5 Narrow Push-Ups

- From a high plank with your hands close together (or touching), engage your abs to keep your hips up and lower back from arching.
- Lower yourself to the floor as if you are pulling yourself down, making it so it would be your chest to hit the ground first, not your chin or hips.
- Press yourself back up halfway, stop, then lower yourself back down to the bottom of the rep.
- Push yourself all the way up to complete one full rep.
- Repeat for reps focusing on squeezing the triceps, especially at the top of the rep.