
Training wheels save the day when you learn to ride a bike as a kid. But if you're learning in middle age — or getting reacquainted after a few years out of the saddle — you only have yourself to rely on to avoid spills.
That's why it's crucial to build up your balance and coordination if your goal is cycling for exercise, especially as you age and problems with balance become more common, according to the National Institute on Aging.
Video of the Day
Video of the Day
Cycling is a predominantly lower-body exercise, but your core and upper body shouldn't fall by the wayside. Strengthening these areas will help improve your overall balance and give you the agility that's needed to bike through tougher terrain — at any age.
Related Reading
"Strength and core work help you stabilize on the bike, gain stamina and reduce fatigue for your ride," Rod Murray, a Morristown, New Jersey-based USA Cycling coach, owner of Body4Life Training and the author of Dynamic Flexibility: Train Your Body to Move, tells LIVESTRONG.com.
He also suggests doing upper-body movements to reduce fatigue in the neck and shoulders and strengthen the mid and lower back, where cyclists are typically weak, as well as exercises to develop the hamstrings, like the glute bridge, to help avoid muscle imbalances in the lower body.
Murray, who works with many cyclists over 50, shared some balance and strength exercises from his book below that can specifically help older riders looking to build a cycling routine.
Tip
Complete 2 to 3 rounds of these exercises a few times a week until they feel comfortable, and you'll be ready to ride.
Move 1: Exaggerated Marching
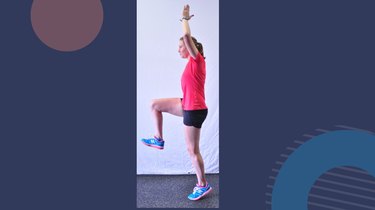
- Start standing with your feet together and your arms by your sides.
- Raise your left arm overhead.
- At the same time, raise the right knee to hip height so the knee and thigh are flexed as much as possible.
- Come up on your left toes and step forward with the right leg.
- As you lower your right foot to the floor, bring your left arm back to your side.
- Repeat on the other side.
- Continue to alternate until you complete 20 reps.
Move 2: Piriformis Walk
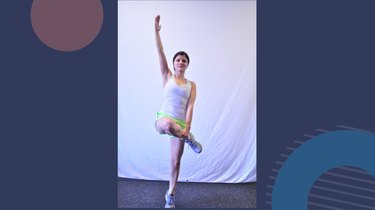
- Start standing with your feet together.
- Raise your right arm overhead.
- Lift your right leg to hip height and bend the knee as you grasp your shin just above your ankle with your left hand.
- Pull your ankle toward the opposite hip. Continue to gently support and lift the leg as you come up on your left toes.
- Release your right leg from this position and step it forward.
- Repeat on the opposite side and continue alternating legs.
Move 3: Y
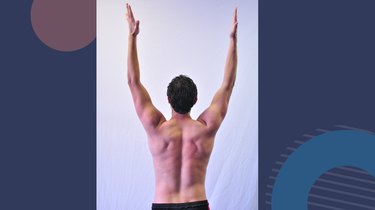
- Start standing in an upright position.
- Raise both arms straight up overhead as far as you comfortably can with your palms facing each other and fingers open to create an overhead Y.
- Gently pull your shoulder blades down and back, then squeeze them together and release. Do not use your arms to force your shoulders backward. Focus on achieving a controlled backward motion in the shoulder blades.
Move 4: T
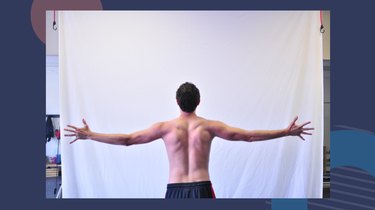
- After you complete the Y exercise, go directly to the T exercise. Bring your arms up and out to the sides at shoulder height with your palms facing forward. Remember to keep the fingers open.
- Using the same motion as the Y exercise, pull the shoulder blades backward, squeezing them down and back. Use your shoulder blades to perform the motion with control and don't force the arms.
Move 5: W
- After you complete the T exercise, transition to the W exercise. Bend and draw your elbows into the sides of your body toward your hips. Your arms should resemble the letter W. Keep your fingers open and palms facing forward.
- Just like the Y and T exercises, draw your shoulder blades backward in a controlled motion.
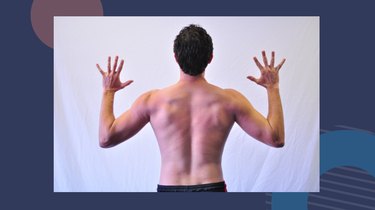
Move 6: Shoulder Protraction and Retraction
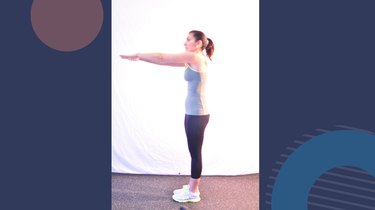
- Start standing and keep your chin, neck and head in a neutral position throughout the movement. Avoid shrugging your shoulders.
- Raise your arms to shoulder height with your palms facing either the floor or each other. Keep your arms and fingers level with your shoulders. Your shoulders should be relaxed and aligned.
- Using only your shoulders, gently push your arms forward as far as you comfortably can, keeping them level with your shoulders. Round your shoulders forward while the rest of your back maintains its neutral position.
- Once you have rounded your shoulders as far forward as possible, begin retracting your shoulder blades by pulling them back to the starting position. Continue to pull your arms backward until the shoulders are pulled back as far as comfortably possible.
Tip
Murray says this exercise employs the forward (protraction) and backward (retraction) movements of your shoulder blades. The only movement is the arms being pushed forward and pulled backward by the shoulder blades.
Move 7: Forearm Plank
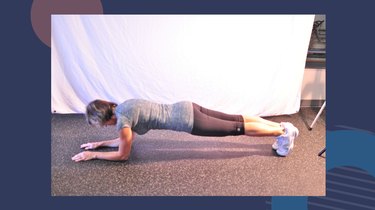
- Come down onto your hands and knees on the floor or a mat. Bend your elbows, and rest your weight on your forearms, stacking your shoulders over your elbows.
- Extend your legs to create a straight line from the top of your head to your heels.
- To keep your lower back from dropping or sagging, engage your abs, glutes and quads as you hold this plank position. Keep your gaze toward the floor and your neck straight.
- Hold this plank for five to 10 seconds for five to 10 rounds. Build up to holding a one-minute plank.
Move 8: Glute Bridge

- Start by lying on your back on the floor or a mat with your knees bent and feet flat on the floor.
- Squeeze your butt and lift your hips off the floor as far as you comfortably can.
- Aim to achieve a diagonal line from your shoulders to your knees. Be careful not to arch your lower back. Your knees should be bent to about 90 degrees or as much as comfortably possible.
More Workouts for People Over 50 We Love