There's certainly no shortage of glute bridge variations out there. And just when you thought you'd tried them all, it's time to add another to your exercise repertoire: the Kas glute bridge.
Popularized by (and named after) Kassem Hanson, creator of N1 training, this exercise is sure to give your glutes an other-worldly workout. So, if building a strong butt is on your to-do list (and it probably should be), it's time to give the Kas glute bridge a go.
Video of the Day
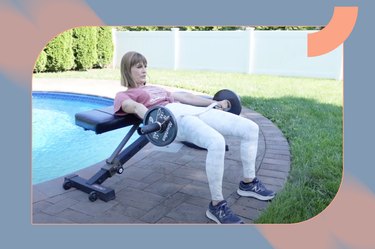
- What is a Kas glute bridge? It's a lower-body exercise that involves sitting on the floor with your back against a bench, knees bent at 90 degrees. With a weight (dumbbell or barbell) across your lap, you lower your hips about halfway to the ground and then press back up to the starting position. You can do the Kas glute bridge at home (if you have the equipment) or at the gym.
- What muscles does it work? The main Kas glute bridge muscles worked include your glutes, hamstrings and core.
- What's the difference between a Kas glute bridge and a hip thrust? A Kas glute bridge is kind of like a modified hip thrust, according to Carolina Araujo, CPT, a California-based strength coach. Instead of lowering your butt to hover above the ground (as in a standard hip thrust), you lower only about halfway as slowly and controlled as possible.
Related Reading
How to Do the Kas Glute Bridge With Perfect Form
Before you get started, follow along with the instructions and full tutorial of the Kas glute bridge below, demonstrated by Holly Perkins, CSCS, creator of The Glutes Project ACTIVATE.
- Sit on the floor next to a loaded barbell with your mid-back against the edge of a bench or box.
- Place your feet on the floor about hip-width apart. Your feet can be slightly turned out, depending on what feels comfortable for you.
- Place a pad, like a towel or Airex pad (like this one from Amazon), on top of your pelvis. You can also place a barbell sleeve (like this one from Amazon) around the bar, so you don't have to worry about anything shifting.
- Roll the barbell onto the crease of your hips.
- Squeeze your glutes and push through your heels to raise your hips and the weight up toward the ceiling. Keep your back flat and head pointed toward the wall in front of you.
- Lock your hips out at the top of the movement by fully extending the hips and squeezing your glutes. Your shins should be vertical, knees neutral or slightly externally rotated and legs forming 90-degree angles.
- Pause, then slowly lower your hips halfway to the ground.
- Pause again and then press back up to the starting position.
Watch the Full Kas Glute Bridge Tutorial
3 Kas Glute Bridge Benefits
1. It Strengthens and Activates Your Glutes
Although you'll get some hamstring action with this move, it's really a glute isolation exercise, Araujo says. Because it's so slow and controlled, it keeps your glutes under tension for longer. And the longer your muscles stay contracted under tension, the more strength you build.
"Since it's so focused on your glutes, it's also a good activation exercise, too," Araujo says. "You can do this exercise with a light dumbbell or no weight at all to wake your muscles up before a workout."
2. It Improves Your Movement
Stronger glutes make you less reliant on weaker muscle groups for mobility, like your hips and lower back (more on that below). The stronger your glutes, the stronger your daily movement patterns and the less likely you are to experience injury, Araujo says.
Generally, the activities you do take place in the front of your body or in a forward motion (like walking or running), which means these muscles are stronger. But strengthening muscles on the back of your body, like your glutes and hamstrings, can help prevent muscle imbalance and the aches and pains that usually follow.
3. It Helps Prevent Lower-Back Pain
Your glutes are responsible for initiating a lot of the movements and exercises you do each day, like picking up a box from the ground, Araujo says. But your lower back tends to compensate when these muscles aren't strong enough, causing unwanted stress on your spine.
Strengthening your glutes helps take some of the pressure off your lower back and helps stabilize your hips, preventing aches and pains.
4 Common Kas Glute Bridge Mistakes
1. Your Feet Are Too Close to Your Hips
As mentioned above, the Kas bridge is a glute exercise, which is where you should feel the most burn. But if you feel it in your quads or knees, your feet are probably too close to your hips, Araujo says. This mistake, though common, defeats the purpose of the exercise and can lead to knee pain.
Fix It
Move your feet out farther away from your hips. When you're in the starting position at the top of the exercise, your knee should form a 90-degree angle.
"Keep your feet at hip-width distance," she says. "And if you want a little extra focus on your glute medius — or middle glute — turn your toes out slightly."
2. You're Lowering to the Floor
Lowering your glutes all the way to the ground isn't a mistake, per se, but isn't exactly what this exercise calls for, Araujo says. The beauty of the Kas glute bridge is that it keeps your glutes at the highest point of tension to really build this muscle group. Lowering all the way to the floor defeats the purpose of the exercise.
Fix It
Only lower your hips halfway between the ground and the starting position. If you're having trouble staying within this range of motion, you may need to lower the weight you're lifting, Araujo says.
3. You Arch Your Back
"A lot of people tend to arch their back as they lower their hips," Araujo says. "But this puts a lot of tension and pressure on your lower spine, which you absolutely don't want."
Fix It
To avoid over-arching your back, you need to engage your core. Tuck your hips under you to help prevent your butt from sticking out and imagine pulling your bellybutton into your spine, Araujo says. Do the exercise in front of a mirror or record yourself to double check your form.
4. Your Head Is on the Bench
Although resting your head on the bench may seem convenient, it's another mistake you want to avoid. Often, people tend to let their head rest on the bench behind them while their lower body moves the weight. But this puts tension on your neck, making you more prone to injury.
Fix It
Keep your head up and neck in line with your body as you do this exercise. "Imagine one straight line from the top of your head down your spine," Araujo says. "As your back shifts with the movement, your neck and head should move with it."
3 Kas Glute Bridge Variations
Once you've perfected the standard Kas glute bridge, you can start trying some variations and alternatives that let you build more lower-body strength or scale back where needed.
1. Weighted Glute Bridge
- Lie on your back, knees bent and feet flat on the ground hip-width apart. Your feet should be close enough to your hips that if you reach one hand at a time toward each heel, you can just touch it with your fingertips.
- Place a dumbbell across your hips and hold it in place.
- Squeeze your glutes and core, and press your heels into the ground to drive your hips up toward the ceiling until you form a diagonal line from knees to hips to chest. Resist the urge to arch your lower back as you raise your hips. Focus on keeping your spine in a neutral position throughout.
- Pause at the top, then slowly lower your hips back down to the ground.
2. Single-Leg Kas Glute Bridge
- Sit on the floor with your mid-back against the edge of a bench or box.
- Place your feet on the floor about hip-width apart. Your feet can be slightly turned out, depending on what feels comfortable for you.
- Place your hands behind your head and lift one leg up.
- Squeeze your glutes and push through your down-side heel to raise your hips. Keep your back flat and head facing forward.
- Lock your hips out at the top of the movement.
- Pause, then slowly lower your hips halfway to the ground.
- Pause again, then press back up to the starting position.
3. Isometric Kas Glute Bridge
- Sit on the floor next to a loaded barbell with your mid-back against the edge of a bench or box.
- Place your feet on the floor about hip-width apart. Your feet can be slightly turned out, depending on what feels comfortable for you.
- Place some sort of pad (towel, squat sponge, Hampton thick bar pad, Airex pad) on top of your pelvis. You can also place a barbell sleeve around the bar, so you don't have to worry about anything shifting.
- Roll the barbell onto the crease of your hips.
- Squeeze your glutes and push through your heels to raise your hips and the weight up toward the ceiling. Keep your back flat and head pointed toward the wall in front of you.
- Lock your hips out at the top of the movement by fully extending the hips and squeezing your glutes. Your shins should be vertical, knees neutral or slightly externally rotated and legs forming 90-degree angles.
- Pause for 5 seconds, then slowly lower your hips halfway to the ground.
- Pause again and then press back up to the starting position.