A key movement to build a strong, muscular and more resilient body, squats are a commonly prescribed exercise for athletes and the fitness enthusiast.
Unfortunately, though, squats have been known to cause unwanted low back soreness, so if you're wondering why your lower back is sore after squats, you're not alone. While the squat will work the muscles of your lower back, if your low back becomes the most targeted region during the squat, chronic soreness and overuse injury can occur.
Video of the Day
To prevent lower back pain after squats, and to continue to maximize the benefits you can experience with the squat, keep in mind the following key considerations.
Review Your Technique
Understand first the technique for a safe and effective squat. In a squat, you want to sit back and down — producing the movement from your hips and knees, and not your lower back.
If your hips roll underneath you and your back rounds, you place your lower back in a position that is at a greater risk for injury. The more your back rounds the greater the shear force on your spine, which is dangerous.
Likewise, if you overarch your lower back, when your hips tip forward and your butt pops out, you're not only compressing your spinal segments, but using the muscles of your lower back to keep your spine from rounding forward.
While preventing your spine from rounding is a good thing, doing so by only using the muscles of your low back will overwork those muscles and create soreness and potential injury. You can tell this happens when you complete the squat and your lower back feels overworked and tight.
Aim to keep your back neutral throughout the movement, meaning you don't allow it to round or overextend. Use a mirror to monitor your low back position.
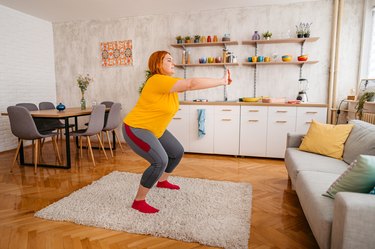
How to Do a Squat With Proper Form
- Stand tall with your feet hip-width apart and brace your core. Focus on keeping your feet rooted into the ground and your core tight the entire time.
- Extend your arms out in front of you and slowly bend your knees as you push your hips back to lower toward the floor. Focus on lowering your body as if you were going to sit on a chair.
- Lower down as far as comfortable, or until your thighs are parallel with the floor.
- Pause for a moment at the bottom of your squat.
- On an exhale, reverse the motion by pressing through your heels to return to standing. As you stand, lower your arms back to your sides.
Related Reading
3 Tips to Alleviate Lower-Back Soreness From Squats
1. Strengthen Your Core
Your core is a group of muscles that has a major influence on the position of your hips and spine. When your core muscles — particularly the fronts of your abs, hips and low back — are strong and working in unison, they help to stabilize your pelvis and spine. This reduces the demand on the muscles of your low back, therefore preventing them from becoming overworked.
Some exercises that help to strengthen your core and encourage it to hold your back in a safe position are planks and side planks. Add these to your regular workout routine to help prevent lower-back pain after squats.
High Plank
- Start kneeling on the floor with your hands at shoulder-width distance on the ground.
- Take a deep breath and press through your palms, stepping your feet back to straighten your legs. Your body should make a straight line from your heels through your hips to the top of your head.
- Draw your navel toward your spine and squeeze your glutes.
- Look at the floor directly below your head to keep your neck in a neutral position, and breathe normally.
- Hold for at least 10 seconds and lower yourself back to the floor.
Tip
If holding a high plank feels painful for your wrists, try and lower to your forearms.
Side Plank
- Lie on your side with your legs and feet stacked on top of each other.
- Prop yourself up on your forearm.
- Keeping your knees straight, stiffen your torso and lift your hips off the ground, balancing on your forearm and outer foot
- Hold here.
Tip
You can progress this move with a few side plank variations, like the side plank leg lifts.
2. Squat to an Appropriate Depth
While you may have heard that you need to squat to or past parallel (when your thighs are parallel to the ground), no one's hips are exactly the same. This means you may have a hip that is built to squat to parallel or below, or you may have a hip that is built to squat to above parallel before running out of room.
If you squat past your available range of motion, you likely compensate and move through other joints (like your back). This creates extra movement through your lower back that can result in soreness and injury over time.
So, only squat to the depth that you can control with good form and a neutral back. If you push past this and go deeper, you put yourself at a greater risk for injury and a sore lower back after squats.
Related Reading
3. Try Different Squat Variations
The back squat is the classic squat variation, but is also the most difficult variation to do. Because of the position of the bar on your back, it places more direct stress on your back than other variations. Venture beyond the back squat and use different variations to prevent low back soreness.
Goblet Squat
- Stand with your feet about shoulder-width apart. Hold a dumbbell in front of your chest vertically. Your hands should cup the head of a dumbbell — like you’re holding a goblet. Brace your core.
- Push your hips back and bend your knees to lower down as far as comfortable. Keep your chest up and your weight in your heels. Keep a straight, largely vertical torso.
- Press through your feet to stand back up.
Related Reading
Barbell Front Squat
- Set up in a rack with your feet about shoulder-width apart and place the bar in front of your shoulders. As you prepare to unrack the bar, it should be barely touching your neck in the front.
- Unrack the bar and set your feet at a comfortable stance. Your feet can be slightly turned out or facing straight ahead. If you don’t know where you’re comfortable, play with your foot placement with some light warm-up sets.
- Brace your core and upper back. Maintain a tight torso throughout the movement with a small, natural arch in your low back.
- Keeping your weight in your heels, push your hips back and bend your knees to lower as far as comfortable or until your thighs are parallel to the floor.
- Press your heels into the ground to stand back up.