From letting your knees collapse inward to raising your heels, there are a multitude of mistakes you can make during squats. But there's another common error you might be less familiar with that can also mess with your squat gains: the butt wink.
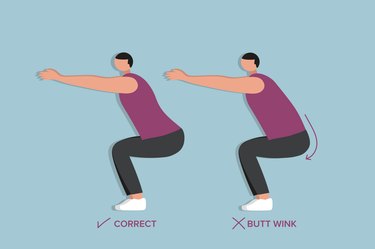
A butt wink happens when you tuck your tailbone under your pelvis at the bottom of your squat. This poor squat form results in a posterior pelvic tilt (when the front of your pelvis rises and the back of your pelvis drops) and flexed lumbar spine (a rounded back) that can impede performance and potentially produce pain or injury (more on this later).
Video of the Day
Here, Grayson Wickham, DPT, CSCS, a physical therapist, certified strength and conditioning specialist and founder of the Movement Vault, explains why the butt wink happens, how it can squash your squat progress and ways to fix the problem.
What Causes a Butt Wink?
The primary cause of a butt wink is limited mobility in your hips and ankles, Wickham says. In other words, tight muscles and joints in these regions restrict your movement and sabotage your squat.
During a squat, you need to have an adequate amount of hip flexion (which allows you to bring your knees and thighs closer to your chest) and hip external and internal rotation (when the ball of your hip joint can rotate in both directions within the socket of your hip joint), Wickham tells LIVESTRONG.com. Ankle dorsiflexion range of motion (which enables your shins to travel forward over the middle of your feet while your heels remain on the ground) is a must as well, he says.
"When you have limited joint mobility in your hips and/or your ankles and try to move past your current mobility limits — such as squatting to parallel or deeper — your pelvis and low back will then have to compensate," Wickham says. That's why your pelvis tucks underneath your hips and your low back rounds in the squat position.
"Core stability and the ability to maintain a rigid midsection also play a role in the butt wink," Wickham says. A strong, stable core helps keep your pelvis and low back protected and stationary during squats.
When your core is weak, your pelvis and low back are more likely to move while squatting, which increases your likelihood of injury and decreases your performance, he says.
Watch the Full Tutorial
How the Butt Wink Makes Squats Less Effective (and Potentially Painful)
Because the butt wink bungles the mechanics of the squat, it can prevent you from performing at your best. Here's why: The limited mobility in your hips and ankles — combined with core instability — places your hips and pelvis in a suboptimal position for generating force and power when coming out of the bottom of the squat, Wickham says.
Not only will your performance suffer, but, over time, butt winks may also lead to pain and more serious issues. That's because when you squat with poor form over time, you are repetitively putting strain on your low back and pelvis, Wickham says. And this increases your risk of pain and injury in these areas.
The most common injuries related to butt winks include lumbar and pelvis ligament sprains; low back, pelvis and hip muscle strains; pain in the sacroiliac joints (which link your pelvis and lower spine) and lumbar disc bulges and herniations, Wickham says.
And, repetitive injuries can occur regardless of load size. "You can get injured performing a squat with a butt wink with light weights and higher repetitions as well as with heavier weights and lower repetitions," he says.
Essentially, the frequency of poor form — not necessarily how much you lift — is the fundamental factor. That means even body-weight squats with a butt wink can potentially cause damage when repeated often enough.
How to Fix the Butt Wink for Better Squats
"There is no amount of concentration or cueing from your coach or personal trainer that can help you when you have tight muscles and joints," Wickham says.
To fix your butt wink (and nail perfect squat form), you need to focus on doing mobility drills to help you restore your unrestricted movement and keep your joints healthy.
The four exercises below, courtesy of Wickham, will improve the mobility and range of motion in your hips and ankles through muscle and fascia release, active stretching and muscle activation.
Keep in mind: Correcting your butt wink problem may take time, so be patient. With consistency (i.e., doing these moves daily), you can see improvements in a few weeks. And don't stop once you do see these improvements. To maintain mobility gains (and prevent possible future impairments), you'll need to keep up with these exercises regularly.
1. 90-90 Hip External Rotation Eccentrics With Hold
- Start seated in a 90-90 position on the floor. Both knees should be bent at 90 degrees. Your right leg should be in front of you with the outside of your shin, ankle and foot on the floor. Your left leg should be out to the side, with the inside of your thing, shin and foot on the floor.
- Hinge at your hips, and slowly fold forward toward your right ankle as far as possible, keeping your back flat. (Folding forward directly over your thigh will not give you a good stretch.)
- Lower yourself using a 5-second descend, using your hands if needed, and hold this position for 5 seconds.
- Slowly lift back up to the starting position.
- Perform 10 reps, then switch sides.
2. 90-90 Hip Internal Rotation End-Range Stretch Isometrics
- Start seated in a 90-90 position on the floor. Both knees should be bent at 90 degrees. Your right leg should be in front of you with the outside of your shin, ankle and foot on the floor. Your left leg should be out to the side, with the inside of your thing, shin and foot on the floor.
- Keeping your upper body as straight as possible, rotate your torso and arms toward your back leg as far as possible.
- Try to lift your back ankle slightly off the ground and hold this contraction for 10 seconds. You should feel this on the side of your back hip.
- Return to the starting position.
- Perform 6 repetitions per side.
3. Kneeling Dorsiflexion End-Range Stretch Isometrics
- Start in a half-kneeling position with your left leg bent at a 90-degree angle and your right knee on the ground.
- Move your left knee directly over the middle of your left foot as far as possible while keeping your left heel down on the ground.
- Once you feel a maximal stretch in the back of your lower left leg and ankle, contract the lower leg muscles by pressing the ball of your left foot and toes down into the ground. Hold for 20 seconds.
- Release the contraction (while staying in the stretch) and perform the opposite contraction by trying to lift the ball of your left foot off the ground by contracting the muscles on the front of your lower left leg and ankle. Note: Your foot will not actually move as your ankle is stretched to the max.
- Hold this contraction for 20 seconds, making sure your heel stays on the ground the entire time.
- That’s one rep. Perform 3 repetitions per ankle.
4. Calf Muscle and Fascia Release With Foam Roller
- Start by placing the back of your lower left leg on top of a foam roller, 2 inches above the back of your heel, and press your leg down into the roller.
- Cross you right leg on top of your left. You can use it to gently press down on your left leg to create more pressure.
- Flex your left ankle upward, bringing the top of your foot closer to your shin bone. Hold this position throughout the entire muscle release.
- Roll the back of your leg up and down the foam roller in 2- to 3-inch intervals.
- After rolling up and down five times in one spot, move the foam roller up about 5 inches toward the back of your knee, finding a new spot. Roll up and down on this new spot, and then move up again until you are 2 inches below the back of your knee and repeat.
- To ensure you are exploring your entire calf muscle, make sure to rotate your lower leg on the foam roller so that you roll the inside, middle and outside of your lower leg.
- Perform for 2 minutes per leg.