Pull-ups are one of the best upper-body strengthening exercises out there, working your arms, back, shoulders and even your core. And you don't need to be at a gym to do them.
Look a little harder at your surroundings and you'll see there are hidden pull-up bars everywhere. From doorways to stairs to neighborhood playgrounds, the opportunities to pull are endless.
Video of the Day
But if you prefer to build a legit pull-bar to use at home, it's relatively easy to do and requires minimal supplies and equipment — many of which you might already have.
Follow these steps, courtesy of Ben Uyeda, home designer and founder of HomeMadeModern, to build a pull-up bar, using wooden boards and a steel bar. Plus, we share alternative pull-up exercises you can do without a bar to help you perfect your form.
How to Build Your Own Pull-Up Bar
Things You'll Need
Circular saw
Drill
Sander
4-foot long 3/4" steel pipe (1)
Pipe flanges (2)
8-foot long 2" x 6" board (4)
4-foot 2" x 4" board (6)
2.5" screws (8)
3" deck screws
Rusty metal primer spray
Protective enamel spray
Exterior house paint
1. Align the Boards
- Start by aligning two 8-foot 2" x 6" boards to form a triangle.
- Align the 4-foot 2" x 4" board at the base of the triangle.
- Use a sharpie to draw lines on the corners of the joined 2" x 6" boards. Also draw a line on the excess portion of the bottom of the 2" x 6" board, which will be covered by the 2" x 4". This will show you what you need to cut off.
2. Trim the Boards
- Use a circular saw to carefully trim the excess wood, according to the lines you drew.
- Once you finish cutting the first set of 2"x 6" boards, use them to trace lines onto the other set.
- Cut the second set identical to the first.
Warning
Be extremely careful while using power tools, especially if you don't have much experience. Wear proper safety gear and follow the tools' instructions and warning labels very carefully, Uyeda says.
3. Trim and Attach the Base Boards
- Drill two 2.5" screws at the top of the 2" x 6" boards to hold the top of the triangle together.
- Align a 2" x 4" board at the base of the triangle and outline the extra edges.
- Using the circular saw, trim off the excess wood at the base of the triangle.
- Then, use the trimmed 2" x 4" to replicate the size for the other side.
- Attach the trimmed 2" x 4" to the base of the triangle using two 2.5" screws on each side. Repeat this step to make the second frame.
4. Prep the Bar
- Sand down the pipe using your sander.
- Attach a pipe flange on either side of the pipe.
- Measure the length of the bar from the outer edge of each pipe flange.
5. Make the Bottom Spacers
- Take that measurement of the pipe with the flanges and cut two pieces of 2" x 4" that same length to make the bottom spacers.
- Then, cut two additional pieces of 2" x 4" that same length with 6 inches added.
- Screw the shorter piece of wood onto the longer piece with the deck screws, keeping each end of the shorter board equidistant from the end of the longer piece (about 3 inches).
Tip
Since you want your bar to be strong, add screws from both sides of the two 2" x 4" blocks.
6. Spray the Bar and Paint
- Spray the bar with rusty metal primer evenly across the entire pipe.
- Add two thick base coats of primer.
- Follow up with a protective enamel.
- Paint all the wooden pieces with exterior house paint to protect the wood from weather damage.
7. Put the Pieces Together
- Using the deck screws, screw the 2" x 4" bottom spacer pieces to one of the 2" x 6" triangle frames, creating the base of the frame.
- Using the holes of the pipe flange, screw the pipe to the top part of the triangular frame.
- Screw the second 2" x 6" triangle frame to the base, adding screws at angles, too, to make sure the structure is secure.
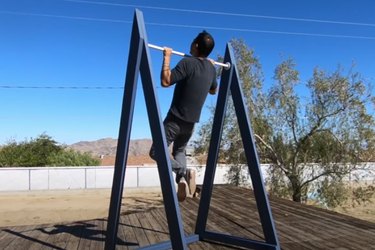
- Stand the structure up with the tip of each triangle facing up, bar up toward the sky.
- Use a level to ensure the bar is straight.
- Add additional screws to the pipe flange as needed.
Warning
While this structure is safe for traditional pull-ups or chin-ups, you'll want to avoid swinging on the bar. Instead, leave the butterfly pull-ups and muscle-ups for the gym or the playground.
Alternative Pull-Up Options
If you don't have the space or time to create your own pull-up bar, there are a few substitutes you can use. A doorway pull-up bar is a great in-home option to consider, suggests Noam Tamir, a certified strength and conditioning specialist (CSCS) and founder of TS Fitness. You can find affordable options right online and most of them are quick to install.
Doorway Pull-Up Bars
- Iron Age Pull Up Bar ($80, Amazon.com)
- HANDSONIC Pull Up Bar ($60, Amazon.com)
- Komsurf Pull Up Bar ($60, Amazon.com)
Or, you can try re-creating the pull-up exercise with these simple exercise, which work your arms, back and core the same way the traditional exercise does.
Lying Pull-Up
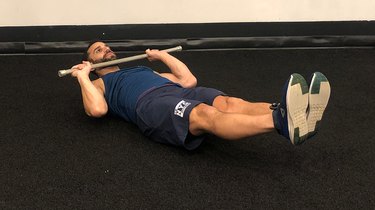
- Start lying on the ground with your lower back rooted in the floor.
- Hold a broomstick or PVC pipe overhead, elbows alongside your ears.
- Keeping your lower back planted, raise your head, arms, shoulder blades and feet a few inches off the ground.
- On an exhale, pull the bar down to chest height, imitating a pull-up motion.
- With control, reverse the motion back to the starting position.
Chair Pull-Up
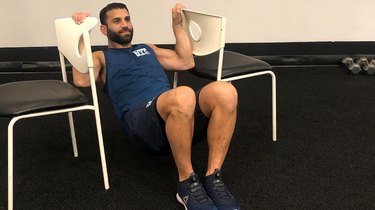
- Align two sturdy chairs back-to-back, a few feet apart.
- Sit down between the two chairs with your back tall, knees bent and feet flat on the floor.
- Grasp the top of each chair.
- On an exhale, pull your body up until your chest lines up with the top of the chairs.
- Reverse the motion with control.
More Workouts for Stronger Pull-Ups