
Squats and lunges have a reputation for slimming your thighs, but have you tried yoga? The practice can help you shrink your legs, but probably not in the way you'd expect.
Yoga poses that require strong legs, such as Warrior I and Eagle, don't directly target the fat in your thighs. No exercise can do that, no matter how spiritual. Fat loss just doesn't work like that.
Video of the Day
Video of the Day
To thin your thighs, you have to lose fat all over. As you slim down, your thighs will shrink. Unfortunately, it can take time. The thighs are one of the most stubborn areas for losing fat, especially in women, and may be the last place you really notice results.
What yoga can do is help create a little more muscle definition in your legs as the fat falls away. It can also help you burn calories, learn patience and reduce stress eating.
Dietary Focus
The best way to lose fat is to create a smart caloric deficit, meaning you take in fewer calories than you burn. What makes it smart is that the calories you do consume come from whole, mostly unprocessed foods such as lean chicken, fish, vegetables, fresh fruits and whole grains. You're eating fewer calories, but keeping up with the quality.
Yoga can help you stick to a quality diet by making you more mindful of your eating habits. It also raises your awareness level, so you are more likely to recognize sensations of fullness before you gorge. A regular yoga practice can also calm the stresses in your life, so you're less likely to drown your sorrow in a pint of ice cream or bag of chips.
More Activity
A deficit of 3,500 calories leads to a pound lost. Exercise helps you achieve this deficit by raising your calorie burn. A yoga practice can burn between 175 and 600 calories per hour, depending on your size, the intensity of the class and your comfort level with the poses.
Read More: Calories Burned During Vinyasa Flow Yoga
If you're sedentary, a gentle practice -- such as Hatha -- can ease you into movement, even though it's not a huge calorie-scorcher. As you become more fit, join a Power or vinyasa-style class, which moves swiftly with the breath and really torches calories.
To rev fat loss to its maximum, you'll want to add a little extra cardiovascular exercise during the week, such as walking or jogging, and a couple total-body strength-training routines. Yoga can help develop strength in your muscles, but with weighted resistance, you aren't limited to your body weight.
Yoga Poses
Certain poses are more likely to help your thighs develop shape that you'll reveal once that fat comes off. The most leg-intensive poses include:
- Warrior I, II and III
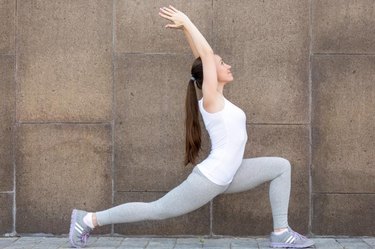
- Crescent Lunge
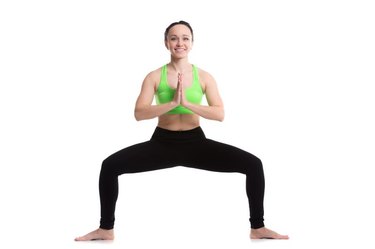
- Goddess pose
- Skandasana, or Side Lunge
- Eagle
- Airplane
- Dancer
- Chair
Really, any pose that requires you to bear your weight by balancing on one leg or in a lunge is going to challenge your thighs.
Just because a pose doesn't directly target your thighs doesn't mean it won't offer value to your fat-loss goals. Remember that even a restorative practice, consisting mostly of prop-supported reclined and seated postures, can change your mindset, making your diet easier to follow. Yoga may also have one last positive effect: It'll change your mindset, so you have greater self acceptance even if you don't develop a thigh gap.