While there's no way to guarantee preventing diastasis recti (separation of the abdominal muscles). Doing certain core and ab exercises to prevent diastasis recti can help reduce the severity of the condition while minimizing back pain and discomfort throughout pregnancy.
"Between 35 percent and 60 percent of pregnant people have diastasis rectus abdominis (DRA), with the highest incidence being within the first six weeks postpartum," Kasia Gondek, DPT, CSCS, a women's health physical therapist at Femina Physical Therapy, tells LIVESTRONG.com.
Video of the Day
As your uterus and baby grow, there's more and more pressure pushing on your abdominal wall. This pressure causes the linea alba — a line of soft tissue that connects both sides of the rectus abdominis (the "six-pack muscles") and runs right down the center of your stomach — to stretch.
When the linea alba stretches, you end up with a gap or separation between the two sides of your rectus abdominis.
Can You Prevent Diastasis Recti?
Not completely. Some amount of abdominal separation is bound to happen — it's just a natural part of pregnancy, Gondek says. However, you can definitely do some things to minimize how much separation occurs.
"Deep core strengthening has been shown to be the most effective way to lessen the severity of DRA symptoms and help you manage abdominal pressures effectively," Gondek says. Your "deep core" muscles include your diaphragm, transverse abdominis, multifidus and pelvic floor muscles.
"The diaphragm is our main breathing muscle; the transverse abdominis muscle wraps around our trunk like a corset providing support for your spine and connects to the linea alba, rib cage and pelvis," Gondek says.
"The multifidi are deep spine stabilizers that connect from one vertebra of our spine to the next. The pelvic floor muscles provide support to the bones of the pelvis and are also involved with bladder, bowel and sexual functions."
During pregnancy, these muscles all work overtime to help you maintain good posture, regulate abdominal pressure and support your growing baby, Gondek says.
By doing pregnancy-safe core exercises, you'll help all these muscles function better, which helps minimize some common pregnancy complaints, like low-back pain. It can also lessen how much separation occurs by the end of your pregnancy.
Here, Gondek and Kristie Alicea, CPT, a pre/postnatal fitness specialist and founder of ABC Fit Collective, share a few ab exercises to help prevent diastasis recti during pregnancy.
Warning
If you notice coning — when the center of the stomach protrudes or bulges — stop the movement you're doing. This is a sign that the movement isn't appropriate for you right now and will likely only worsen diastasis recti. Find a modification or different exercise that doesn't cause coning.
6 Exercises to Prevent Diastasis Recti
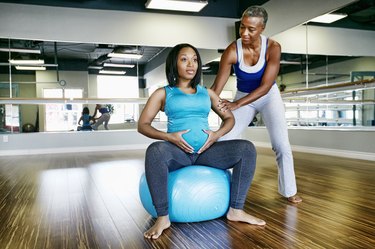
1. Abdominal and Pelvic Bracing on Swiss Ball
Gondek recommends beginning with this exercise to warm up your deep core muscles and learn how to use them. It's an important skill to use in all your workouts throughout pregnancy.
"For the best results, do this every day," Gondek says. Sitting upright with good posture on a Swiss ball allows you to feel the sensation of bracing better, she says.
- Sit on a Swiss ball and place one hand on your lower belly and the other on the side of your rib cage.
- Inhale through your belly and sides of your rib cage.
- As you exhale, purse your lips, squeeze your pelvic floor muscles (the muscles you use to stop your flow of urine) and draw your bellybutton in and up. You should feel tension develop underneath your fingertips at the abdominal region.
- Maintain this level of muscle activation for 5 seconds, then slowly let it go.
- As you breathe out, relax all your muscles, including the pelvic floor muscles.
- Remember to keep breathing normally the entire time.
2. Sahrmann Lower Abdominal Progression
"This exercise is great to perform before other dynamic/standing exercises after the abdominal and pelvic brace," Gondek says. "This series strengthens your deep core muscles — mainly the transverse abdominis, diaphragm, pelvic floor and multifidus."
If you're 20 weeks or more, she recommends performing these moves on a wedge or with a pillow behind your lower back so that you're propped up a bit and not lying completely flat on your back. Gondek also suggests exhaling through whatever phase of the exercise is most challenging for you.
- Lie on a wedge or on your back, arms gently pressing into the mat.
- Lift your knees toward your chest one at a time.
- Then, bring them back down to the floor one at a time, starting with the one you lifted off the floor first.
- With each rep, alternate which leg initiates the movement.
- Remember to breathe throughout the movement and perform your pelvic and abdominal brace.
Progressions
Here's how the progression works: "Start with level 1a exercise, and then progress to the next levels of difficulty only when you can maintain a level and still pelvis, and keep your back in a neutral position," Gondek says. You should not be able to slide your hand between your low back and the floor or feel any strain in your neck or shoulders.
- Level 1a: hips bent to greater than 90 degrees, opposite leg march
- Level 1b: hips at 90 degrees, opposite leg march
- Level 2: hips at 90 degrees, opposite heel slides
- Level 3: hips at 90 degrees, opposite leg straightens (feet don’t touch the mat)
- Level 4: hips at 90 degrees, double leg heel slides leg straightens
Perform 1 to 3 sets of up to 20 reps, three to four times a week.
3. Plank or Modified Plank
The plank is a classic core strength and stability exercise that targets the deep core muscles — which need a lot of love at this time. In addition to your deep core muscles, planks work your shoulders, arms and glutes.
"Deep core strengthening during pregnancy can help reduce back pain by strengthening the muscles needed to support the growing baby and combat common postural changes that occur, like increased lumbar lordosis (excessive curving of the lower back), for example," Gondek says.
So, are planks safe during pregnancy? "To date, there are no conclusive scientific studies that indicate that modified plank or full plank is harmful during pregnancy," Gondek says. "In general, with any exercise program, you want to be cleared by your doctor for exercise, and exercise should not cause or increase any existing pain."
Perform 2 to 4 sets, three to four times a week.
- Place your palms on the floor underneath your shoulders, knees resting on the mat for the modified version or knees off the ground for the full plank.
- Perform your pelvic and abdominal brace to engage your core. Tighten your glutes.
- Look at the floor between your hands to keep your head in a neutral alignment, and breathe normally.
- Hold until you feel muscle fatigue but not pain.
- At first, you may find that holding for 5 seconds may be challenging enough. Progress to longer holds over time as you're able.
Tip
In your first trimester (and maybe even second), planks will likely feel good, but once your belly gets larger, they might be uncomfortable. The biggest concern is that they may create too much intra-abdominal pressure, which can worsen DR.
To avoid that, Gondek says to make sure you're performing a pelvic brace while also using your abdominal and back muscles to hold the move and manage pressure.
If you feel like you can't breathe normally during a plank, have a lot of pressure in your abdominal area, notice coning of your abdominals or are just plain uncomfortable, change to a plank on your knees or an elevated plank (hands on a step, chair or wall).
If this doesn't help, skip planks altogether and focus on other deep core-strengthening moves instead.
4. Glute Kickback
In an all-fours position, your transverse abdominis has to work against gravity. At the same time, your multifidus muscles are stabilizing your spine, Gondek says. It also works your gluteus maximus, shoulders, arms and deep core muscles.
"This exercise incorporates elements of pelvic stabilization and hip strengthening and is a progression from the previous exercises," she says. Start with 1 set of 8 to 10 reps and work up to 4 sets. Practice three to four times a week.
- Start on all fours with your wrists below your shoulders and your knees below your hips.
- Perform a pelvic and abdominal brace throughout this exercise and maintain normal breathing throughout.
- Keeping your hips square to the ground, extend your left leg out behind you.
- Lift the leg up toward the ceiling, keeping your knee straight and lifting from your glutes. Only lift as high as you can without arching your low back.
- Pause for a moment, then bend the knee and lower the leg back down.
- Repeat on the other leg. Continue, alternating sides.
5. Farmer's Carry
"The farmer's carry is a great ab exercise to not only help diastasis recti but also prepare a mother for her new activities of daily life such as holding the baby on one side or holding a car seat," Alicea says.
This exercise is also a great one to do postpartum when you're focused on re-strengthening the core and closing any abdominal separation that occurred during pregnancy.
- Start by standing with one heavy weight on one side of your body.
- With your shoulders directly over your hips, keep both sides of your core engaged and walk slowly with a focus on maintaining neutral alignment. Avoid allowing the weight to touch your outer thigh and keep your hips squared forward throughout the movement.
- Once you get to one side of your mat or your room, switch the weight to the other hand and slowly walk back to the starting point.
6. Standing March
The key to making the standing march work for you (and your midsection) is to make sure you're maintaining neutral alignment and breathing deeply as you do it. To better connect mind to muscle, Alicea recommends placing your hands over your belly.
In addition to building core stability, this move helps you work on improving posture and balance in a safe way. If you're feeling particularly wobbly, hold onto a countertop, railing or sturdy chair for support.
- Stand tall and inhale, allowing your belly to expand.
- As you exhale, draw one knee up toward your chest while maintaining neutral alignment (shoulders over hips).
- Return your foot to the floor and repeat with the other leg.
- Continue marching, alternating sides.