The windmill exercise is one of the oldest (ahem, most underrated) moves around. Thankfully, it's making a comeback.
Why? Because this core strengthener does so much more than chisel your abs... although it does that too. Whether you're trying to relieve nagging back pain, shore up your shoulder health, build your glutes or improve your total-body joint mobility — the windmill abs exercise has got you covered.
Video of the Day
Here's everything you need to try this stretching, strengthening, muscle-building move.
- What is the windmill exercise? It's a total-body move that involves bending your body over sideways while holding a weight overhead.
- What muscles does the windmill work? It improves stability in your core, shoulders and wrists. Meanwhile, get a hamstrings stretch as you bend over and your glutes work to help you stand back up.
- Who can do the windmill? It's a moderate-to-advanced exercise. To do the base kettlebell or dumbbell versions, you must be able to press a weight straight overhead and hold it there — which requires shoulder mobility and stability. If you can't press a weight overhead in this way, you can do the windmill exercise with no weights or with the weight down at your side. These variations are nice and beginner-friendly. (See below for how-tos.)
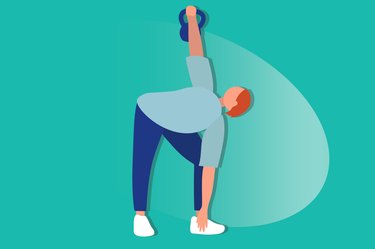
How to Do the Windmill Exercise With Perfect Form
- Stand with your feet slightly wider than shoulder-width apart. Hold a kettlebell by the handle in your right hand with your arms hanging at your sides.
- Turn your left foot out 90 degrees.
- Press the kettlebell straight overhead and let the ball of the kettlebell hang over your wrist. The handle of the weight will now be in the heel of your hand, hung over your thumb. Keep you wrist in line with your forearm. Your left arm should still be at your side.
- Look up at the weight. Keep looking up for the rest of the exercise.
- Brace your core, and push your hips to the right side as you slide your left arm down your left leg. You can bend either knee a little as you lower. Keep your left arm perpendicular to the floor the entire time, and your right arm should still be straight up over your shoulder. Keep your spine straight throughout the move.
- Keep lowering as far as you can without putting pressure on your front leg or bending your spine, reaching your left arm towards your left ankle. You should feel a stretch in the hamstring of your left leg.
- When you’ve lowered as far as you can, squeeze your glutes to stand back up.
- Do all of your repetitions on this side, then switch arms and do the move to the other side.
Can You Do the Windmill Exercise at Home?
Yes! You can do a windmill with no weights or equipment at all. Or you can do it holding a household item like a jug of water or can of soup. Just make sure that the ceiling is high enough that you won't hit it!
Watch the Full Tutorial
5 Windmill Exercise Benefits and Muscles Worked
1. It Stretches and Strengthens at the Same Time
The kettlebell windmill is a great "bang for your buck" exercise because it does so much at once: It works lots of muscles simultaneously, but it also works them in different ways. The move challenges the strength and stability in your shoulder and core while also stretching the hamstrings and strengthening the glutes.
2. It Improves Shoulder Stability
More than 250,000 Americans have rotator cuff surgery each year, according to a June 2019 Journal of Bone and Joint Surgery study. Fortunately, this move helps build and maintain the stability of your shoulder in a variety of positions as you do the move. You've got to keep a stable, strong shoulder when the weight is directly above your head, out to your side and every position in between.
3. It Works the Obliques
The often-ignored side body takes center stage as you slide down into position. Your obliques work to keep your spine from bending to the side as you lower and stand back up.
4. It Trains Balance and Coordination
There's a lot of things to keep straight during the exercise: looking up at the weight, pushing your hip out, standing up — all while keeping your arms in a vertical line, shoulder stable, core braced and spine rigid.
All those moving pieces get your body's parts and systems working together in a way they might not otherwise. You've got to maintain balance and improve your coordination to keep proper windmill form.
5. It Can Help You Master Other Impressive Moves
As complicated as this core exercise is, there are even more complex functional fitness moves out there. The Turkish get-up, for instance, is another exercise that has lots of steps, involves lots of different muscles and movements and challenges your balance and stability.
FYI: The half-kneeling KB windmill (below) is actually one of the steps in the get-up.
6 Tips for Better Results
1. Set Your Raised Shoulder Down and Back
After you press the KB or other weight overhead, set your shoulder blade down and back before you start bending over.
Imagine that your shoulder blade is coming toward the center of your spine, then sliding down your back into the back pocket of a pair of jeans. Once it's there, start bending.
2. Hinge at Your Hips, Not Your Waist
When you bend at the waist, your spine bends — that's a no-no here. To make sure you're using your hip and not your waist, make that hip sassy: After twisting the foot of your other leg out to 90 degrees, pop the hip on the side of your raised arm out with some attitude. Then keep that hip moving out to the side of your waist as you lower.
If your hip stops moving out, that's as far as you can go for now. Any farther, and you'll start using your spine to compensate.
3. Create a Vertical Line With Both Arms
This is the wind-blowing part of the move: Your arms should resemble two of the vanes or blades of a windmill. Your bottom arm should remain perpendicular to the ground the entire time — and so should your top arm. In this way, you'll create a vertical line with both arms, and keep the weight centered over your body so your shoulder can be stable.
4. Try It Without Shoes
Many training and running sneakers can make you wobbly during this exercise. But it's already challenging enough for your balance!
Try the move in your bare feet or with barefoot lifting shoes so you have a flatter base to work with.
5. Don’t Force Yourself Down
As you lower, you should feel a stretch in the glutes, hamstrings and torso of your weighted side. You should also feel a stretch in the hamstrings of your unweighted side.
What you shouldn't feel is pain, and you shouldn't feel your spine starting to bend. If you reach a point where you can't lower further without bending your spine to the side, stop there. That's your range of motion for now — and it's OK!
6. Let Your Weaker Side Decide Your Weight and Reps
You may find that one side of your body is better or stronger in this move as you start out. That's OK! Choose a weight, rep scheme and range of motion that works for that side, and use it for the other side until you even out. This will keep you from becoming more imbalanced.
3 Modifications to Make It Easier
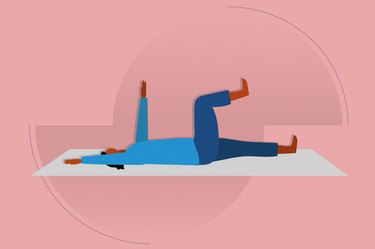
Move 1: Body-Weight Windmill
Performing this exercise without weights a great way to practice this movement and get the lower-body stretch of the exercise without needing to stabilize your top shoulder.
- Stand with your feet slightly wider than shoulder-width apart with your arms hanging at your sides.
- Turn your left foot out 90 degrees.
- Raise your right arm straight overhead. Keep you wrist in line with your forearm. Your left arm should still be at your side.
- Look up at your raised hand. Keep looking up for the rest of the exercise.
- Brace your core, and push your hips to the right side as you slide your left arm down your left leg. Keep your right leg straight; you can bend your left knee a little as you lower. Keep your left arm perpendicular to the floor the entire time, and your right arm should still be straight up over your shoulder. Keep your spine straight throughout the move.
- Keep lowering as far as you can without putting pressure on your front leg or bending your spine, reaching your left arm towards your left ankle. You should feel a stretch in the hamstring of your left leg.
- When you’ve lowered as far as you can, squeeze your glutes to stand back up.
- Do all of your repetitions on this side, then switch arms and do the move to the other side.
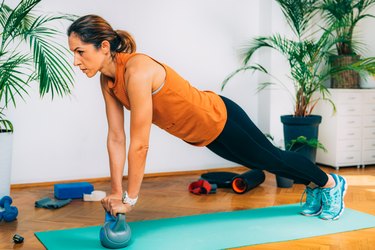
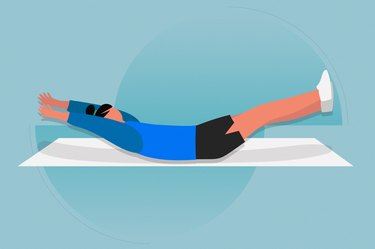
Move 2: Bottom-Loaded Windmill
Holding a weight with your lower arm removes the shoulder stability requirements of the main move, much like the body-weight version. But holding the weight down at your side may make you feel more stable and grounded as you do this move. It may even feel slightly easier as you lower than doing the exercise without any weight at all.
This bottom-loaded position does provide a little more resistance as you stand back up, though — so it's not all easy!
- Stand with your feet slightly wider than shoulder-width apart. Hold a kettlebell by the handle in your left hand with your arms hanging at your sides.
- Turn your left foot out 90 degrees.
- Raise your right arm straight overhead. Keep you wrist in line with your forearm. Your left arm, holding the kettlebell, should still be at your side.
- Look up at your right hand. Keep looking up for the rest of the exercise.
- Brace your core, and push your hips to the right side as you slide your left arm and the kettlebell down your left leg. Keep your right leg straight; you can bend your left knee a little as you lower. Keep your left arm perpendicular to the floor the entire time, and your right arm should still be straight up over your shoulder. Keep your spine straight throughout the move.
- Keep lowering as far as you can without putting pressure on your front leg or bending your spine, reaching your left arm towards your left ankle and the kettlebell towards the ground. You should feel a stretch in the hamstring of your left leg.
- When you’ve lowered as far as you can, squeeze your glutes to stand back up.
- Do all of your repetitions on this side, then switch arms and do the move to the other side.
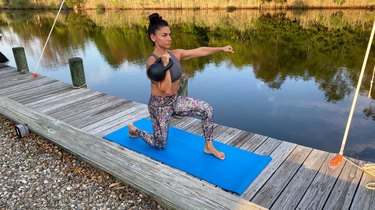
Move 3: Half-Kneeling Windmill
Any time you lower on one knee to do an exercise, it's harder to bend your lower back. You lock in that bit of core stability, so you can concentrate on stabilizing your top shoulder.
- Kneel on your left knee with your knees around shoulder-width apart. Your right foot should be flat on the floor. Both of your knees should form 90-degree angles. Hold a kettlebell in your right hand by the handle, and hang both of your arms by your sides.
- Press the kettlebell straight overhead and let the ball of the kettlebell hang over your wrist. The handle of the weight will now be in the heel of your hand, hung over your thumb. Keep you wrist in line with your forearm. Your left arm should still be at your side.
- Look up at the weight. Keep looking up for the rest of the exercise.
- Brace your core, and push your hips to the right side as you slide your left arm down your left leg towards the floor. Keep your left arm perpendicular to the floor the entire time, and your right arm should still be straight up over your shoulder. Keep your spine straight throughout the move.
- Keep lowering as far as you can without bending your spine, reaching your left arm towards your left knee on the floor.
- When you’ve lowered as far as you can, squeeze your glutes to return to the starting position with the weight overhead.
- Do all of your repetitions on this side, then switch arms and knees, and do the move to the other side.
3 Progressions to Make It Harder
Move 1: Dumbbell Windmill
Doing the windmill exercise with a dumbbell will challenge your wrist stability more than a kettlebell, as the weight tries to rock your hand to the sides or forward and back.
- Stand with your feet slightly wider than shoulder-width apart. Hold a dumbbell in your right hand with your arms hanging at your sides.
- Turn your left foot out 90 degrees.
- Press the dumbbell straight overhead. Keep you wrist in line with your forearm. Your left arm should still be at your side.
- Look up at the weight. Keep looking up for the rest of the exercise.
- Brace your core, and push your hips to the right side as you slide your left arm down your left leg. Keep your right leg straight; you can bend your left knee a little as you lower. Keep your left arm perpendicular to the floor the entire time, and your right arm should still be straight up over your shoulder. Keep your spine straight throughout the move.
- Keep lowering as far as you can without putting pressure on your front leg or bending your spine, reaching your left arm towards your left ankle. You should feel a stretch in the hamstring of your left leg.
- When you’ve lowered as far as you can, squeeze your glutes to stand back up.
- Do all of your repetitions on this side, then switch arms and do the move to the other side.
Move 2: Bottoms-Up KB Windmill
This will challenge your wrist even more — the kettlebell will try to swing forward and back, and pull your hands to the sides. Use a lighter weight to start.
- Stand with your feet slightly wider than shoulder-width apart. Hold a kettlebell by the handle in your right hand with your arms hanging at your sides.
- Turn your left foot out 90 degrees.
- Press the kettlebell straight overhead into a “bottoms-up” position: The bottom of the ball of the kettlebell will point towards the ceiling, with the entire ball above your hand. Keep you wrist in line with your forearm. Your left arm should still be at your side.
- Look up at the weight. Keep looking up for the rest of the exercise.
- Brace your core, and push your hips to the right side as you slide your left arm down your left leg. Keep your right leg straight; you can bend your left knee a little as you lower. Keep your left arm perpendicular to the floor the entire time, and your right arm should still be straight up over your shoulder. Keep your spine straight throughout the move.
- Keep lowering as far as you can without putting pressure on your front leg or bending your spine, reaching your left arm towards your left ankle. You should feel a stretch in the hamstring of your left leg.
- When you’ve lowered as far as you can, squeeze your glutes to stand back up.
- Do all of your repetitions on this side, then switch arms and do the move to the other side.
Move 3: Double Kettlebell Windmill
It's a double whammy: The weight on the bottom adds more resistance as you stand back up… all while you're still balancing the top weight overhead.
- Stand with your feet slightly wider than shoulder-width apart. Hold a kettlebell by the handle in each hand with your arms hanging at your sides.
- Turn your left foot out 90 degrees.
- Press the kettlebell straight overhead and let the ball of the kettlebell hang over your wrist. The handle of the weight will now be in the heel of your hand, hung over your thumb. Keep you wrist in line with your forearm. Your left arm should still be at your side.
- Look up at the raised weight. Keep looking up for the rest of the exercise.
- Brace your core, and push your hips to the right side as you slide your left arm down your left leg. Keep your right leg straight; you can bend your left knee a little as you lower. Keep your left arm perpendicular to the floor the entire time, and your right arm should still be straight up over your shoulder. Keep your spine straight throughout the move.
- Keep lowering as far as you can without putting pressure on your front leg or bending your spine, reaching your left arm towards your left ankle. You should feel a stretch in the hamstring of your left leg.
- When you’ve lowered as far as you can, squeeze your glutes to stand back up.
- Do all of your repetitions on this side, then switch arms and do the move to the other side.
Was this article helpful?
150 Characters Max
0/150
Thank you for sharing!
Thank you for your feedback!