Some people consistently delay their trips to the dentist. Others allow unread emails to clog their inbox for weeks. But something we're all at least a little guilty of is skipping our mobility training.
But here's the thing: Mobility training can work wonders for your body, whether you have stiff joints or want to deepen your barbell squat. It teaches your body to work as a whole, preventing excessive stress on the individual joints, which can lead to discomfort or pain.
Video of the Day
If you've been pushing back your mobility sessions, it may be time for a complete overhaul. And although an overhaul may sound like a huge commitment, we've broken it down to a bite-sized mobility program.
To follow this mobility training plan, all you need to do is practice one move per day, four days per week. Each week focuses on a different area of the body, giving you a mobility refresh from head to toe. Plus, you can totally tailor this program to your own schedule, shifting the days around as needed.
After just four weeks, you'll feel less tight, more limber and your joint pain will be a part of the past.
Week 1: Hip Mobility
No matter how much time you devote to working out, you probably spend most of your day seated, especially if you have a desk job. Although sitting is inevitable, it's a recipe for tight hips, according to the American Council on Exercise (ACE).
In the short term, hip tightness can cause discomfort in your day-to-day activities, making your exercise routine or daily tasks a bigger challenge.
If left alone, tight muscles can harm your overall hip mobility, limiting your ability to move these joints properly in their full range of motion. Over time, this can cause (potentially painful) muscle imbalances, affecting your posture and your gait, according to Carolina Araujo, CPT, a California-based strength coach.
Day 1: Kneeling Hip Flexor Stretch
- Begin in a half-kneeling position with your right knee bent at 90-degrees and your foot flat on the ground.
- Place your left knee on the ground on top of a mat or cushion.
- With your hands at your sides, brace your core and tighten your glutes.
- Shift forward slightly until you feel a stretch across the front of your left hip and quad muscle.
- Hold here for 30 seconds and then switch sides.
This motion stretches the muscles and tendons across the front of your pelvis, which can get pinched after several hours of sitting, according to Araujo.
As you deepen the stretch, avoid over-extending through your low back by engaging your glutes, says Brad Whitley, DPT, California-based physical therapist.
Day 2: Active Hamstring Stretch
- Lie on your back with your legs extended in front of you and your arms at your sides.
- Raise your right leg up toward the ceiling, grasping your thigh below the knee joint.
- Straighten your knee and hold for a few seconds.
- Then bend the knee and hold for a few more moments.
- Continue to bend and straighten the knee for 30 seconds.
- Repeat on the opposite leg.
Tight hamstrings can actually cause your hip joints to become tense and immobile, Araujo says. This mobility exercise helps loosen the muscles in the back of your legs, in turn, alleviating tightness in your hips and improving your ability to move the joint in different directions.
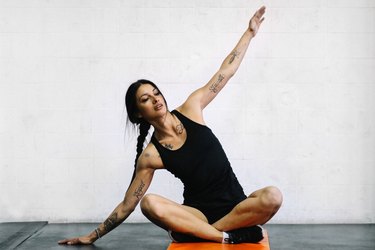
Day 3: World's Greatest Stretch
- Begin in a low lunge with your left leg bent at 90 degrees and your right leg extended straight behind you, toes tucked.
- Place your right palm on the ground on the right side of your left knee.
- Twist your torso to face the left side and raise your left arm straight up toward the ceiling.
- Focus on rotating through your spine (not your shoulders).
- Hold and repeat on the opposite side.
There's a reason this move is dubbed the world's greatest stretch. It works both sides of your hips at once, Araujo says. And as you sit in the low lunge, you stretch your hip flexors on your rear leg. At the same time, you loosen the outer part of your hip on the opposite side by rotating your upper body in that direction.
Day 4: Hip 90-90
- Sit on the ground facing the left side and place your palms on the ground behind your body.
- Bend your left leg at 90 degrees in front of your torso with the inside of the leg facing up.
- Then, bend your right leg to 90 degrees with the outside of your leg facing up.
- Then, rotate your body to the right, flipping your legs over while maintaining the 90-degree bend. Now, the inside of your right leg and the outside of your left leg should face up.
- Alternate between left and right sides for 60 seconds.
Your hips are a ball and socket joint and they can spin and rotate more than other joints in your body. But when your hips aren't sufficiently mobile, this movement is limited. The 90-90 hip stretch helps to improve this natural rotational movement.
Week 2: Back Mobility
Poor posture is also one of the most common culprits of a stiff back, according to the ACE. Sitting with slouched shoulders and in a hunched-over position is not only uncomfortable but can hinder your spinal movement.
Over time, this can cause lower back pain, as this part of your spine tends to compensate for the lack of mobility in the rest of your back.
Day 1: Child's Pose
- Start kneeling with your glutes and hips resting lightly on your heels.
- Keeping your lower body in place, walk your hands forward above your head and bend your torso across the ground, letting your forehead rest on your mat or floor.
Child's pose decompresses your lower back and targets the muscles under your armpits, aka your lats. These back muscles can get compressed when they sit in a tucked position for long periods of time (like when you're typing), Araujo says.
You can walk your hands out to the right or left to intensify the stretch in your lats, Whitley says. Make sure to keep your breathing even as you move from side to side.
Day 2: Prone Press-Up
- Lie on your stomach with your legs extended behind you. Place your palms under your shoulders.
- On an exhale, press into your palms and bring your shoulder blades down and back to raise your chest and torso off the ground. As you rise up, keep your lower body stable.
- Pause for a moment here, then lower back down.
- Pause for 30 seconds between each set.
This mobility move helps counteract the effects of a rounded back by opening up your chest and aligning your entire spine, Araujo says.
"Instead of using your spinal erectors (muscles along your spine) to extend, try to use your arms to actively gain extension," Whitley says. Throughout this movement, keep your neck long and eyes facing down.
Day 3: Cat-Cow
- Begin on all fours with your knees in line with your hips and your shoulders stacked over your palms.
- Slowly arch your back, raising your chin up toward the ceiling. Pause here for a moment.
- Then, round your upper back, drawing your bellybutton into the spine and raising your back toward the ceiling.
- Alternate between these two motions for 60 seconds.
The cat-cow focuses on your back from the very top (around your neck) to the bottom (your tailbone). Moving through cat-cow relieves tension from your neck and helps take pressure off your lower spine, Araujo says.
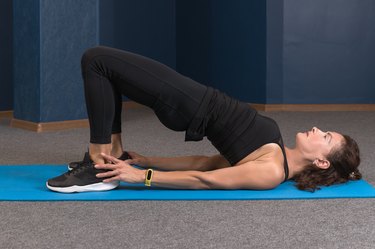
Day 4: Supine Lumbar Rotation
- Lie on your back with your arms out at your sides and knees bent, feet flat on the ground.
- Keeping your arms out, rotate your knees to the left side. Press on your right knee with your right hand to bring it closer to the ground.
- Pause here for a moment, then switch sides, rotating to the right.
- Continue to alternate sides for 60 seconds.
Spinal rotations help improve the overall flexibility and movement of your back, Araujo says. This mobility exercise can help you move pain-free when you twist and rotate your body in daily life.
"Try to keep both shoulders on the ground and focus on rotating through the low back," Whitley says.
Week 3: Upper Back and Neck Mobility
"A hunched back and neck tightness is the most common thing I see in clients," Araujo says. "And I'm a victim, too!"
In modern life, most of the activities you do happen in front of your body, especially those involving technology. As a result, your upper back starts to round and your chin juts forward, putting pressure on your neck and upper back.
Day 1: Thoracic Extension
- Sit on the ground with either your legs bent in front of you or crossed.
- Sit with your back against either a couch or chair.
- Place your hands behind your head, elbows along the sides of your head.
- Reach your elbows toward the ceiling, extending your upper back across the back of the chair or couch.
- Pause for a moment, then return to the starting position.
Sitting at your computer or steering wheel pulls your body forward, but this move does the exact opposite, Araujo says. Here, you open up your chest and pull your neck and upper spine backward, taking some pressure and tension off these joints.
Day 2: Supine Twist
- Lie on your left side with your knees bent and hips stacked.
- Bring your arms out straight in front of you, palms on top of one another.
- Keeping your hips, legs and left arm in place, bring your right arm up and across your body, extending it straight out to the right.
- Simultaneously, rotate your torso to face the ceiling and gaze over to your right.
- Reverse the motion and return to the starting position on your left.
- After a minute, switch sides and continue to alternate.
"I absolutely love this move for relieving pressure and increasing mobility in the neck," Araujo says. By tilting your chin all the way to your right and left, you loosen your trap muscles, which gives your neck a little more range of motion.
Day 3: T-Spine Rotation
- Begin on all fours with your hips stacked over your knees and your shoulders over your palms. Your spine should be neutral.
- Place your right hand behind your head, bending at the elbow.
- Bring your right elbow up toward the ceiling, opening up your chest toward the right.
- Then, bring the elbow back down to face the ground.
- Switch sides and continue to alternate for 60 seconds.
This rotating exercise opens up your chest, which helps put your upper spine back into its proper alignment, Araujo says. You also loosen up the muscles in the neck by twisting your chin in the direction of your moving elbow.
Day 4: Thread the Needle
- Begin on all fours with your hips stacked over your knees and your shoulders directly over your palms. Keep your spine in a neutral position
- Raise your right hand up toward the ceiling, rotating your chest to the right.
- Then loop your right arm under your left armpit.
- Move your left palm a foot forward to deepen the stretch.
- Bring your right arm back up and then return to the starting position.
- After the time is up, repeat on the left side.
Thread the needle opens up your chest and shoulders to help stretch your spine along your neck and upper back, according to Araujo. It also helps increase mobility in your upper back by twisting and rotating your spine.
"Try working in postures other than the standard sitting and standing positions," says Cameron Yuen, DPT, a physical therapist at Bespoke Treatments in New York. "Try sitting on the floor with your legs crossed or straight out in front of you. Adopting different postures throughout the day adds up and can help with both maintaining and improving mobility."
Week 4: Shoulder and Wrist Mobility
Although your back and hips are bigger joints, you don't want to neglect your shoulder and wrist mobility either, Araujo says. When you type on a computer, your shoulders round forward and your wrists sit in a locked position, which can lead to inflammation over time.
These mobility moves focus on opening up your shoulders and increasing blood flow to your wrists to help relieve tension.
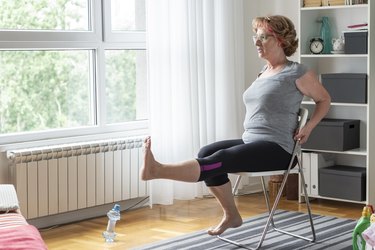
Day 1: Shoulder CAR
- Sit in a half-kneeling position with your left leg bent at 90 degrees and your right knee on the floor.
- Keep your neck in a neutral position and brace your core.
- With your right arm straight, begin to rotate your shoulder up and around as if your arm were a large compass drawing a circle.
- Continue this motion for 60 seconds, then switch sides.
If you struggle to lift your arms overhead, this shoulder mobility exercise moves your joint through its full range of motion. "It may feel challenging at first but over time, this movement can help you in your day-to-day activities, like putting on a sweatshirt or lifting something up over your head," Araujo says.
"Make sure to keep your torso still," says Samuel Chan, DPT, a physical therapist at Bespoke Treatments in New York. "Do not let your back arch or rotate while you move through this exercise."
Day 2: Cross-Body Shoulder Stretch
- Kneel or sit cross-legged on the ground.
- Raise your left arm straight out in front of your body and hook your right arm under the left elbow.
- With your right arm, draw your left across your body, keeping your back flat.
- Pause for a few moments and then bring your left arm straight in front of you.
- Repeat this motion for 60 seconds, then switch sides.
When your shoulders hunch forward, your rear shoulder muscles sit in a compromised position, causing tightness. By pulling your shoulder across your body, this stretch gives your posterior delts some much-needed attention, according to Araujo.
Day 3: Wrist Flexor Stretch
- Start in a seated or kneeling position.
- Extend your right arm straight in front of you, keeping a neutral back.
- With your palm facing away from your body, grasp your right fingers with your left hand.
- Gently, pull the fingers back toward your body
- Release your fingers back to face the ground.
- Do this motion for a full minute, then switch sides.
When you look at your wrists on a keyboard, your palms sit tilted forward, compressing the little tendons in the bottom of your wrist. This stretch helps take some pressure off those tendons while improving your wrist movement.
Day 4: Wrist Extensor Stretch
- Start in a seated or kneeling position.
- Extend your right arm straight in front of you, keeping a neutral back.
- Tilt your wrist until your fingers face the floor.
- Grasp the top of your right fingers with your left hand.
- Gently press your fingers down for a moment and release.
The wrist extensor stretch is the opposite of the wrist flexor movement above. This one focuses on the muscles and tendons on the top of your wrist, giving the joints a well-rounded stretch, Araujo says.
The Benefits of Mobility Training
While many of us understand mobility in a sense, it can be tough to nail down what exactly mobility training entails. Mobility is your joints' ability to move freely through their full range of motion, according to the National Academy of Sports Medicine (NASM). This includes your ankles, hips, thoracic spine, shoulders and wrists.
A lot of our day-to-day activities put our joints in uncomfortable or compromised positions. In the short term, this is no big deal. But when you add up the hours, months and years, your joints lose some of their natural range of motion, according to Araujo.
When you don't rotate your joints through their natural range of motion, they become stiff and pinched, affecting your ability to move pain-free in your daily life, according to Jereme Schumacher, DPT. That's why it's so important to make mobility a part of your daily routine.
"Improving your overall mobility doesn't happen overnight, it is something that takes consistency and practice over a period of time," Schumacher says. "[When] people have more time on their hands, it will be easier to develop good day-to-day mobility habits."
Working on your mobility can also promote blood flow through the joints and improve your posture over time, Schumacher says. Plus, it can improve your movement in the gym, helping you squat deeper and overhead press properly.