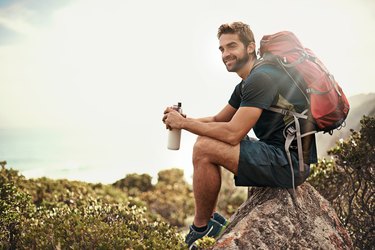
Embarking even just on a day hike can take some serious planning and organizing. Between the essentials, emergency gear and snacks, it can start to feel like you're packing for a week-long adventure.
But it's always better to be prepared: Your phone might be completely useless for navigating if you don't have service, or you could encounter unpredictable weather. It's important to pack a compass, a map and plenty of layers of the right clothing to arm you against nature's curveballs.
Video of the Day
Video of the Day
To help you have a successful and safe hike, we tapped hiking and outdoor experts for the ultimate list of hiking gear you'll need for your next adventure.
1. Proper Footwear
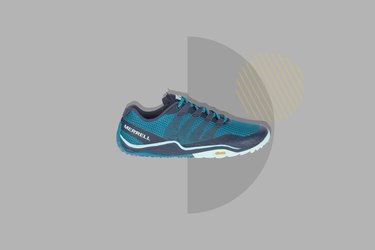
Newsflash: Your regular running shoes aren't going to cut it for hiking. But you can conquer many hikes with a high-quality pair of trail running shoes.
Still, for technical, rocky terrain or lots of water, hiking boots provide more ankle support and have grippier soles and waterproof material.
"Proper footwear is really the foundation of the hiking experience," says Wesley Trimble, hiking expert and program outreach and communications manager for the American Hiking Society (AHS). "Having a good-fitting shoe is so important, because without that, you'll end up with blisters and pain, and that doesn't really make the hiking experience very fun or enjoyable."
Keep in mind the season and the climate in which you're hiking. For example, when hiking during the colder months, your feet might appreciate a pair of boots with fur lining, while warmer weather calls for more ventilation.
To determine the best pair for your feet, Trimble encourages hikers to try on different types of boots and trail running sneakers at a local outdoors retailer.
Shop These Trail Shoes
- Salomon XA Pro 3D Trail-Running Shoes ($95.73, REI)
- Merrell Trail Glove 5 Trail Running Shoes ($49.83, REI)
- New Balance 410V6 Trail Running Shoe ($34.98, Dick's Sporting Goods)
- New Balance T410V6 Trail Running Shoes ($49.99, Academy Sports + Outdoors)

If you have a smartphone, there's a good chance you rely on its navigation system to get you to trailheads and back to your car. That's all fine and dandy, Trimble says, but be aware that technology can fail at any given time.
If you get lost in an area with spotty service (or your phone dies), you're kind of out of luck — unless you're really good at using the sun as your compass.
"When you're out in backcountry environments, [technology] can be a major issue," Trimble says. "Paper maps and compasses are still recommended, especially if you're new to an area or are on a low-trafficked trail. Personally, I use a variety of apps for finding trails and navigating, but I always take a paper map, too," he says.
Your best bet is to print out an area map that includes the trail you're going on. You can usually print directly from a website when you search for a trail. Or, you can stop by a visitor center in the area and pick up a trail map — they're often free or cost less than a dollar, especially at national parks and similar places.
Shop These Compasses and Map Guides
3. Water (and a Way to Carry It)
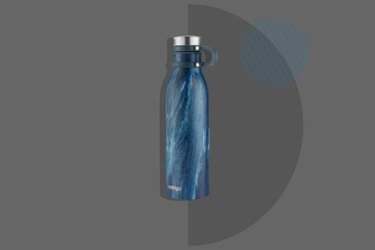
You should always bring water on a hike, even if you're just going out for an hour or two. "You never know when you might be delayed," Trimble warns, and find yourself in dire need of fresh water.
Of course, carrying H2O requires a water vessel — and you have many options, Trimble says. You can carry water in a bottle, a bladder (such as a CamelBak) or a hydration vest. Some hiking packs also come with a built-in hydration system.
For longer hikes, especially multi-day hikes, you might consider a water purification method so you can drink directly from lakes and streams.
Shop These Water Bottles and Hydration Packs
- Contigo Thermalock Vacuum-Insulated Stainless Steel Water Bottle ($19.99, Contigo)
- Hydro Flask Standard Mouth Stainless Steel Water Bottle ($34.95, Hydro Flask)
- BCG 50-ounce Hydration Pack ($19.99, Academy Sports + Outdoors)
- RapidPure Universal Purifier Bottle Adapter ($44.99, Rapid Pure)
4. Food

When you're out hiking, you're burning lots of calories, so you should pack some calorie-dense foods, Trimble says.
Like with water, "it's best to have something just in case, even if you're only going out for a few hours," Trimble says. If you sprain an ankle, get lost or run into other issues, you may find yourself out on the trail for much longer than you expected.
Trimble says a few small snacks should suffice for short hikes, but take more food for longer treks. A good goal, especially for long-distance hikes, is to have 120 calories per ounce of food. This means your foods are calorie-dense, so they don't take up a lot of space in your pack.
"Things like nuts, trail mix and energy bars are ideal," Trimble says.
Shop These Hiking Snacks
5. Layers of Clothing
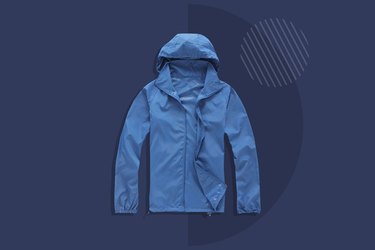
Even on hot days, dressing in layers (or at least keeping an extra layer in your bag) is a smart move, Trimble says.
"Mountain and desert weather patterns can change extremely quickly," he says. "Dress in layers even if you look at the forecast before you go," he says.
The reasoning: You can easily take some clothes off if you get hot, but you can't make extra clothes appear out of thin air if it gets cold or starts raining. Make sure to bring along some rainwear, such as a jacket or poncho, and a thicker outer layer like a fleece jacket if you're going someplace with cooler temperatures or that has drastic temperature swings.
And don't forget to bring an extra pair of socks, in case the ones you're wearing gets wet.
Shop These Hiking Clothes
6. Safety Items
You should always take some "just in case" items when you set out on a hike, Trimble says, like an emergency light, a way to start a fire (such as flint packs) and a whistle.
"I always carry a lightweight LED headlamp, which is great to have in case you're ever delayed," Trimble says, noting that this is particularly important when it gets dark earlier.
If you're hiking through bear country, you'll want to keep your distance. "The main protection against bears is to avoid an encounter all together," says Jaime Purinton, founder of Hike It Off magazine. "Not surprising a bear is the most important thing you can do to protect yourself. Never put yourself in between a bear and her cubs."
Bear spray can be a protective last line of defense if an encounter with a bear turns into an attack, Purinton says, but knowing how to use the bear spray properly is a must. "When carrying bear spray, make sure it is allowed in the area you will be hiking in. It is considered a weapon and prohibited in some places, including Yosemite National Park," Purinton says.
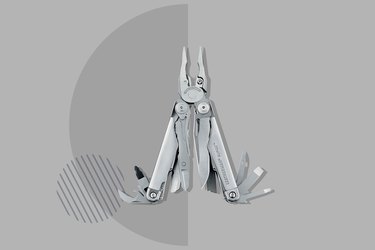
You might also want to stash a small multi-tool in your bag, "in the case you need to repair gear, cut something or work with first aid supplies, like if you're cutting moleskin to cover a blister," Trimble says.
"A small Swiss Army Knife should do the trick; you don't need anything fancy, although I like the ones that also have scissors and tweezers to help with splinters," he says. Some multi-tools also come with a fire starter and lanyard rings to make tying things easier.
Shop These Hiking Safety Essentials
- Survival Spark Magnesium Survival Fire Starter with Compass and Whistle ($9.99, Amazon)
- Petzl Tikka Classic Headlamp ($29.95, Petzl)
- Counter Assault Bear Deterrent Spray ($49.95, Counter Assault)
- Leatherman Surge Heavy Duty Multi-Tool ($129.95, Amazon)
7. First Aid Kit
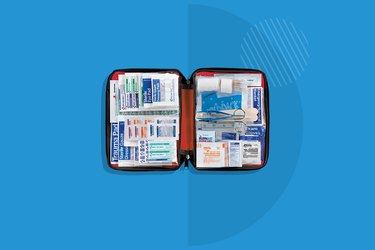
You might think a first aid kit should fall under safety items, and it could. But, Trimble clarifies, a first aid kit usually contains things like pain medication, bandages, gauze and other in-case-of-emergency items that involve your physical health.
"You can easily pick up a first aid kit from a store or buy one online, but I like to build my own because I know what kinds of items I like and often use, and what kinds I don't," Trimble says.
Like footwear, the "best" first aid kit varies from person to person. But Trimble offers a list of essentials that everyone should have:
- Over-the-counter pain relievers, such as acetaminophen or ibuprofen
- Allergy medication, such as Benadryl
- An EpiPen if someone in your group has severe allergies
- Anti-diarrheal medication in case of gastrointestinal issues (diarrhea can cause severe dehydration, which you want to avoid on trails, Trimble says)
- Band-Aids, moleskin or other adhesives to cover wounds
- Gauze to stop bleeding
- Emergency blanket for heat and protection
Tip
"Emergency blankets should be carried on every hike, regardless of the length or difficulty," Purinton says. "If you are injured on the trail and need rescue, it can take several hours for you to be reached by emergency personnel."
Lying on the ground injured can be dangerous, and if the weather is cold, it can put you at risk for hypothermia. An emergency blanket will keep you warm while you wait.
Shop These Emergency Must-Haves
- Adventure Medical Kits Adventure First Aid Kit ($22.99, Adventure Medical Kits)
- Red Cross Deluxe All-Purpose First Aid Kit ($25.99, Red Cross)
- All-Purpose First Aid Kit ($21.96, Amazon)
- Emergency Blanket ($4.99, Survive Outdoors Longer)
8. Sun and Bug Protection
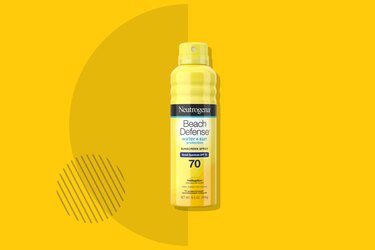
Any time you go outside, you should take care to protect your skin. It's important to block harmful UV rays from penetrating your skin to reduce your risk of skin cancer and other health effects. Sun protection can come in many forms, Trimble says, including sunscreen, protective clothing, hats and UV-blocking sunglasses.
"Any time of year, regardless of cloud cover, you can still get sunburned," Trimble says. "Sun protection is extremely important year-round, but especially when the sun is out longer."
As for what type of sunscreen to buy, the American Academy of Dermatology recommends an SPF of 30 or higher. "Personally, I like sweat-resistant, waterproof sunscreen so that it stays effective longer," Trimble says.
Your bug protection needs will vary based on your surroundings. "The highest concentrations of bugs are generally found mid-summer, on warmer days, mid-day, at lower elevations and near water sources," Purinton says. "Avoiding these conditions is ideal."
If that isn't possible, that's where bug spray comes in. Purinton also recommends wearing light and loose clothing with long sleeves, long pants and socks. Tuck your shirt into your pants (and your pants into your socks) if you're in an area that's prone to ticks.
Shop These Sunscreens and Bug Sprays
- Neutrogena Beach Defense Oil-Free Spray Sunscreen ($17.22 per pack of 2, Walmart)
- Supergoop! 100% Mineral Prep Set ($80, Supergoop)
- Banana Boat Ultra Sport Lotion Sunscreen ($6.97, Amazon)
- Sawyer Permethrin Insect Repellant for Clothes ($14.99, Amazon)
- Repel Plant-Based Lemon Eucalyptus Insect Repellant ($7, Amazon)
9. Backpack
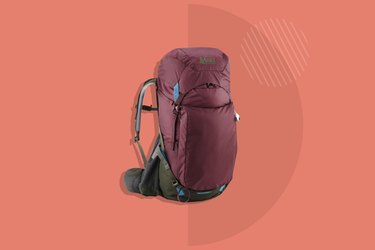
While considered a nonessential item by the AHS, Trimble says it's still rather helpful to have a hiking or backpacking backpack. Where else are you going to put all this hiking gear?
The type you'll need depends on how long your hike is: For day hikes of a few hours, you can get away with using a school bag or even a hydration pack with extra pockets. For a hike longer than four hours, you'll need more room to store extra food and water.
Related Reading