Pickled veggies are a great way to add brightness to your plate. Just imagine roughly chopping some pickled carrots or ginger and mixing them into a dish — suddenly what you're tasting feels new and interesting.
Pickled vegetables are preserved with salt and acidity, typically in the form of vinegar or through fermentation. They keep for a long time, so there's no reason to not have a jar on hand. Plus, they're a cinch to make. Before getting to the basics of how to pickle, let's talk about the difference between pickling and fermenting.
Pickling vs. Fermenting: What's the Difference?
Both are methods to naturally preserve food; however, pickling uses an acidic liquid to create a sour flavor while fermented foods have a sour flavor resulting from the chemical reaction between the natural sugars in a food and bacteria, called lacto-fermentation.
As a result of this process, fermented foods contain a variety of beneficial B vitamins, enzymes and good bacteria known as probiotics, according to Harvard Health Publishing. Pickling is quicker and simpler than fermenting but does not produce the probiotics or enzymes found in fermented foods.
Bottom line: Fermented foods may also be pickled, but pickled foods generally are not fermented.
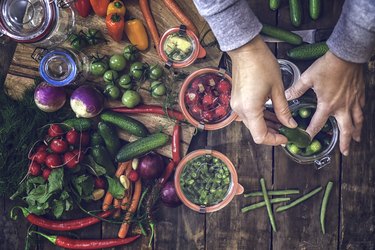
So how do we pickle different vegetables? Almost any vegetable (or fruit!) can be pickled, and all you need is vinegar, water, salt and whatever flavoring components you like.
Vinegar: Generally speaking, pickling uses a basic brine that is equal parts water and vinegar plus spices and herbs. The vinegar should be simple, such as apple cider vinegar, white wine vinegar, red wine vinegar or rice vinegar, rather than an aged vinegar like balsamic.
Herbs and spices: Herbs and spices can be any combination based on your flavor preference. Fresh herbs like rosemary, dill and thyme hold up well as do whole spices such as peppercorns, coriander seeds or mustard seeds or ground spices like turmeric or paprika. Smashed garlic cloves or sliced garlic are also great additions to add complexity to the pickles.
Cutting the veggies: The shape you choose can be entirely up to you; for example, carrots and cucumbers can be cut into rounds or matchsticks.
Let's take a closer look at how to pickle five of your favorite veggies: red onions, cucumbers, beets, carrots and ginger.
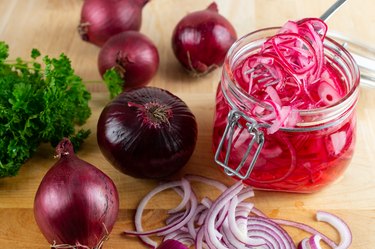
1. How to Pickle Red Onions
What You'll Need
- 2 pint-sized jars
- 1 pound red onions
- 4 sprigs fresh herbs (optional)
- 2 teaspoons whole spices (optional)
- 1 teaspoon ground spices (optional)
- 2 cloves garlic, smashed or sliced (optional)
- 1 cup vinegar
- 1 cup water
- 1 tablespoon kosher salt
How to Do It
- Wash the pint jars, lids and rings in warm, soapy water and rinse well. Dry completely.
- Thinly slice red onions into half-moons, or julienne them.
- Divide whatever herbs, spices and garlic you are using into the two jars.
- Add the onions into the jars, leaving approximately one-half inch of space from the top of the vegetables to the rim of the jar.
- In a small pan over high heat, add vinegar, water and salt and bring to a boil. Stir occasionally to dissolve the salt.
- Pour the brine mixture over the onions, filling each jar within a half-inch to the top of the jar.
- Gently tap each jar on a table or counter to remove any air bubbles. Top off with more brine mixture if necessary.
- Place lids on jars and close tightly. Allow to cool to room temperature; then store pickled red onion in the refrigerator. Wait at least 48 hours to let the flavors develop prior to opening.
Storage
Pickled red onions can be stored in the refrigerator for up to two months.
How to Use Pickled Onions
Pickled onions add brightness to pretty much anything. Ideas include:
- Mix into a vegetable or grain salad.
- Sprinkle on steak, lamb or burgers.
- Place in a sandwich, pita or wrap.
- Use as a topping for nachos or tacos.
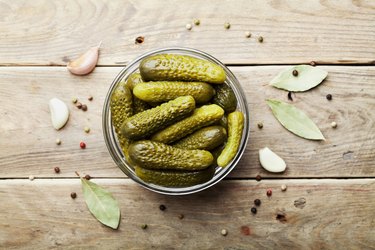
2. How to Pickle Cucumbers
What You'll Need
- 2 pint-sized jars
- 1 pound cucumbers
- 4 sprigs fresh herbs (optional)
- 2 teaspoons whole spices (optional)
- 1 teaspoon ground spices (optional)
- 2 cloves garlic, smashed or sliced (optional)
- 1 cup vinegar
- 1 cup water
- 1 tablespoon kosher salt
How to Do It
- Wash the pint jars, lids and rings in warm, soapy water and rinse well. Dry completely.
- Remove a thin slice from the blossom end of the cucumbers.
- Slice cucumbers into rounds or matchsticks.
- Divide whatever herbs, spices and garlic you are using into the two jars.
- Add the cucumbers into the jars, leaving approximately a half-inch of space from the top of the vegetables to the rim of the jar.
- In a small pan over high heat, add vinegar, water and salt and bring to a boil. Stir occasionally to dissolve the salt.
- Pour the brine mixture over the cucumbers, filling each jar within a half-inch to the top of the jar.
- Gently tap each jar on a table or counter to remove any air bubbles. Top off with more brine mixture if necessary.
- Place lids on jars and close tightly. Allow to cool to room temperature; then store pickled cucumbers in the refrigerator. Wait at least 48 hours to let the flavors develop prior to opening.
Storage
Pickled cucumbers can be stored in the refrigerator for up to two months.
How to Use Pickles
The universal "pickle" is generally pickled cucumbers. Here are some delicious ways to enjoy them.
- Enjoy them on their own as a side dish.
- Chop and mix into potato salad, egg salad, chicken salad or tuna salad.
- Place in a burger, sandwich, pita or wrap.
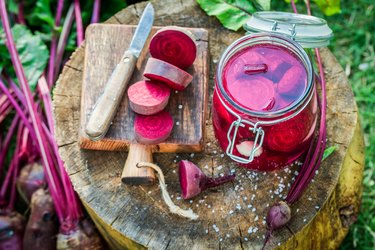
3. How to Pickle Beets
What You'll Need
- 2 pint-sized jars
- 1 pound beets, scrubbed and cleaned with 1-inch stem remaining
- 4 sprigs fresh herbs (optional)
- 2 teaspoons whole spices (optional)
- 1 teaspoon ground spices (optional)
- 2 cloves garlic, smashed or sliced (optional)
- 1 cup vinegar
- 1 cup water
- 1 tablespoon kosher salt
- 1/2 cup sugar (optional)
How to Do It
- Preheat oven to 400 degrees Fahrenheit. Wrap each beet in foil and then place on a baking sheet. Roast in the oven for 45 minutes.
- Once roasted, unwrap beets, hold under cold running water and gently use your fingers to remove skin.
- Wash the pint jars, lids and rings in warm, soapy water and rinse well. Dry completely.
- Cut beets into thin slices or wedges.
- Divide whatever herbs, spices and garlic you are using into the two jars.
- Add the beets into the jars, leaving approximately a half-inch of space from the top of the vegetables to the rim of the jar.
- In a small pan over high heat, add vinegar, water, salt and sugar and bring to a boil. Stir occasionally to dissolve the salt and sugar.
- Pour the brine mixture over the beets, filling each jar within a half-inch to the top of the jar.
- Gently tap each jar on a table or counter to remove any air bubbles. Top off with more brine mixture if necessary.
- Place lids on jars and close tightly. Allow to cool to room temperature; then store pickled beets in the refrigerator. Wait at least 3 days to let flavors develop prior to opening.
Storage
Pickled beets can be stored in the refrigerator for up to two months.
How to Use Pickled Beets
Pickled beets add a pop of flavor and acid to dishes and are especially delicious when paired with rich flavors. Here are some ideas to get you started.
- Add to a salad with greens, goat cheese and toasted walnuts.
- Chop up and mix into a yogurt or cream cheese-based dip with dill.
- Add to a cobb salad or chef's salad.
- Add to pasta salad.
4. How to Pickle Carrots

What You'll Need
- 2 pint-sized jars
- 1 pound carrots
- 4 sprigs fresh herbs (optional)
- 2 teaspoons whole spices (optional)
- 1 teaspoon ground spices (optional)
- 2 cloves garlic, smashed or sliced (optional)
- 1 cup vinegar
- 1 cup water
- 1 tablespoon kosher salt
How to Do It
- Wash the pint jars, lids and rings in warm, soapy water and rinse well. Dry completely.
- Slice carrots into rounds or matchsticks.
- Divide whatever herbs, spices and garlic you are using into the two jars.
- Add the carrots into the jars, leaving approximately a half-inch of space from the top of the vegetables to the rim of the jar.
- In a small pan over high heat, add vinegar, water and salt and bring to a boil. Stir occasionally to dissolve the salt.
- Pour the brine mixture over the carrots, filling each jar within a half-inch to the top of the jar.
- Gently tap each jar on a table or counter to remove any air bubbles. Top off with more brine mixture if necessary.
- Place lids on jars and close tightly. Allow to cool to room temperature; then store pickled carrots in the refrigerator. Wait at least 48 hours to let flavors develop prior to opening.
Storage
Pickled carrots can be stored in the refrigerator for up to two months.
How to Use Pickled Carrots
Pickled carrots are a tangy treat. Here are some ideas on how to eat them.
- Enjoy them on their own as a side dish.
- Chop and add to hummus or bean dip.
- Add to sandwiches, pita or wraps.
- Chop and use as a topper for grilled meat or lamb.
- Use as a topping for nachos or tacos.
5. How to Pickle Ginger
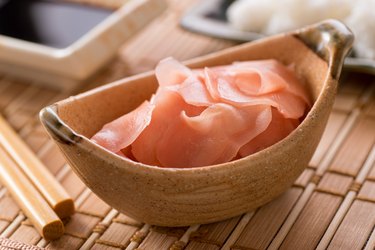
What You'll Need
- 1 pint-sized jar
- 1 red radish (optional, but it will add a nice pink hue to your pickled ginger)
- 12 ounces ginger
- 1 ½ tablespoons kosher salt
- 1/2 cup rice vinegar
- 1 cup water
- 1 ½ tablespoons sugar (optional)
How to Do It
- Wash the pint jars, lids and rings in warm, soapy water and rinse well. Dry completely.
- Thinly slice radish by hand or with a mandoline.
- Peel ginger and thinly slice it by hand or with a mandoline.
- Add the radish, ginger and salt into the jars, mixing well and leaving approximately a half-inch of space from the top of the vegetables to the rim of the jar.
- In a small pan over high heat, add vinegar, water, and sugar and bring to a boil. Stir occasionally to dissolve the sugar.
- Pour the brine mixture over the radish and ginger, filling each jar within a half-inch to the top of the jar.
- Gently tap each jar on a table or counter to remove any air bubbles. Top off with more brine mixture if necessary.
- Place lid on jar and close tightly. Allow to cool to room temperature; then store pickled ginger in the refrigerator. Wait at least 48 hours to let flavors develop prior to opening.
Storage
Pickled ginger can be stored in the refrigerator for up to two months.
How to Use Pickled Ginger
The most familiar and popular use of pickled ginger is with sushi and sashimi. Other great ways to use pickled ginger include the following:
- Add to lemonade or citrus-based cocktails or mocktails.
- Add to stir-fries.
- Chop and add to salads or salad dressings.
- Chop and add to meat, poultry and pork marinades.