
If you've been thinking about learning to bake your own bread, now's the time to try it. Homemade bread can be healthier, tastier and it will make your kitchen smell like your favorite bakery.
"Homemade bread has a fresh taste that you just can't get in commercial products," says Heather Reid, owner of the Eat Like A Mother microbakery in Chicago.
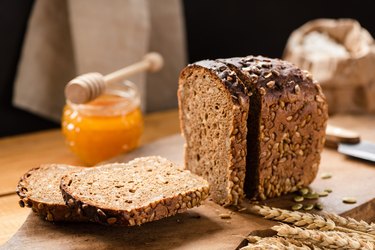
"You can taste the nutty, rich flavor of the wheat, the slight sweetness of honey — even the butter or jam you put on it isn't muted by additives in the bread."
Homemade bread also doesn't have any of the preservatives or added sugar you'll often find in the store-bought variety.
Plus, the act of baking bread in itself has benefits. "Actually making something real, special and delicious is a thrill," Reid says.
"Kneading bread is a zen experience for me. Not only does it require my full attention for 10 consecutive minutes (no phones, no keyboards), but the sensory aspect is so relaxing."
Here, Reid shares how to make bread in a few easy steps (no bread machine required) and her go-to whole-wheat bread recipe that features a touch of honey.
What Do You Need to Make Bread?
The basic ingredients for bread are simple: Flour, water, yeast and salt.
Best Type of Flour
You can buy bread flour, which is higher in protein than all-purpose flour and will give you the chewy texture and structure you want in your homemade loaf.
But if it isn't readily available, you can make bread with all-purpose flour (just convert all-purpose to bread flour by adding vital wheat gluten, an ingredient you can buy at health-food stores, or on Amazon.com for $14.79).
If you make bread with all-purpose flour, you can substitute it in a 1:1 ratio for bread flour, Reid says.
"The bread is not going to have the same kind of chew or bite, and it's going to be a bit softer and less spongy without the protein from the bread flour. But you can do it with success."
Whether you use bread or all-purpose flour, Reid recommends going for the unbleached variety. "I think the yeast reacts better to it."
"The freshest flour is the best flour for bread. Fresh flour has more nutrients intact, which feeds the yeast in a much more robust way. It will rise higher and it will taste better."
One thing to make sure of no matter what kind of flour you use is that it's fresh.
"The freshest flour is the best flour for bread," Reid notes. "Fresh flour has more nutrients intact, which feeds the yeast in a much more robust way. It will rise higher and it will taste better."
Most flour comes with an expiration date on the package; check that before you start baking, and replace the flour if it's past its prime.
To keep it fresh, store it in an airtight container in a cool place, such as the back of your pantry (away from sunlight) or keep it in the freezer.
Although you can use different types of flour for bread, self-rising flour is not one of them, Reid warns.
"Self-rising flour has a leavener like baking powder in it and sometimes salt," she says. "It's made with a lower protein version of all-purpose flour, so what you get is a really tender result. You would use it for baking things where you're not looking for gluten development, like in biscuits."
Tip
Always measure carefully: Weighing ingredients is the most accurate way to go, Reid notes. “If you’re going to get into bread-baking, invest in a kitchen scale — even an inexpensive one,” she says.
“People tend to put too much flour in because they pack it in, and the correct way to measure flour is to make it very light. When you pack the flour down, you can end up with up to 30 percent more flour in the cup. Over 2 or 3 cups of flour in a recipe is substantially more flour, and your loaf can come out heavy or dense."
By weighing, you avoid this pitfall.
What You Need to Know About Yeast
Freshness is also key when it comes to yeast, Reid says.
Check the expiration date on the packet to make sure it's fresh. If you don't see a date, you can test the yeast in just a few minutes (here's how).
If you find yourself without active dry yeast and your local store has run out, all is not lost. You can make your own yeast, though it takes several days.
All you need is a couple of dried dates, a little bit of sugar, filtered water and a clean jar, according to chef Pablo Puluke Giet. As he demonstrates in this video, you combine all the ingredients in the jar, shake, cover and store in a cool, dark place for four days.
The natural yeast in the dates ferments, and you can use the resulting water in place of dry yeast. Be warned, though: If you use the yeast water, your dough may take longer to rise than with packaged yeast, Giet says.
The final ingredient that you need to make good bread is time.
"I always include time in the list of key ingredients because people are often in an 'instant-rice mode' when they're cooking, but you just can't rush bread. Bread takes as long as it takes."
Tip
Knead it well: It can take 8 to 10 minutes of kneading to develop the gluten and get the dough into the shape you want it, Reid says. When your dough is ready, you should be able to stretch it really thin without it breaking. This is known as the windowpane test or gluten test.
“Don’t rush it; think of it as a stress reliever,” Reid says. “Putting a little more love and kindness into your bread gives you a good result. I really believe that.”
A Honey Whole-Wheat Bread Recipe
Yields: 1 loaf
Ingredients
- 3 tbsp honey
- 1 ¾ cups warm water (about 110 degrees Fahrenheit)
- ¼ oz (1 packet or 2 ¼ tsp) active dry yeast
- 3 ½ cups white whole-wheat bread flour or whole-wheat flour, plus more for dusting
- 1 cup bread flour or all-purpose flour
- 1 tbsp coarse salt
- 3 tbsp unsalted butter, melted, plus more for bowl and pan
Instructions
- In a small bowl, stir honey into warm water and then sprinkle with yeast. Let stand until foamy, about 5 minutes.
- In another bowl, stir together flour and salt, and then stir in yeast mixture and melted butter just until the dough forms. Gently knead on a lightly floured surface until smooth, 5 to 10 minutes. Transfer to a large buttered bowl, drape with plastic wrap, and let rise in a warm spot until dough doubles in bulk, about 45 minutes.
- Preheat oven to 375 degrees Fahrenheit. Butter a 9-by-5-inch loaf pan. Punch down dough. Shape into an 8-inch square, about 1 inch thick. Fold in two opposite sides to meet in the middle. Press seam to seal. Place dough seam-side-down in prepared pan. Sprinkle with flour. Drape with plastic wrap and let rise in a warm spot to 3⁄4 inch above top of pan, 30 to 45 minutes.
- Just before baking, you can lightly brush the top with an egg wash (one whole egg beaten with a little water) and top with seeds or oatmeal. This gives it a nice shine and allows the toppings to stick to the bread. You can also get creative when it comes to topping your bread — try nuts or seeds (like black and white sesame seeds or poppy seeds).
- Transfer pan to oven and immediately reduce heat to 350 degrees Fahrenheit. Bake, rotating halfway through, until top is golden brown and bottom sounds hollow when tapped, 35 to 40 minutes.
- The inside temperature of the bread will be around 195 to 200 degrees Fahrenheit when ready. Let cool in pan on wire rack for 20 minutes, then turn out bread onto rack and let cool completely.
Bread can be tightly wrapped and kept at room temperature up to three days or frozen up to three months.
Tip
Watch your oven temperature: Residential ovens are typically not well-calibrated, Reid says. Wait an extra 10 or 15 minutes after you hear the beep indicating that the oven has reached temperature to make sure it’s truly hot enough.
Also, use an oven thermometer to double-check the temperature, and know your oven’s hot spots by observing how things cook so you can be sure to rotate between a higher or lower shelf or turn the bread around during baking so it bakes evenly, she advises.
Love this recipe? You'll also want to read up on Sourdough 101: What It Is and How to Make It at Home.