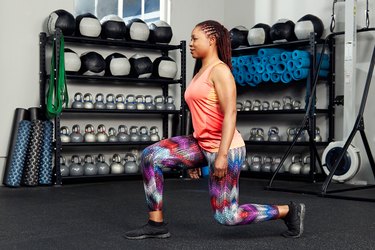
Lunges: You either love 'em or hate 'em. It seems there's no in between. That's probably because they straight-up hurt — usually in a hurt-so-good kind of way, but occasionally in the wrong way. But since they're one of the best lower-body exercises, it's worth getting your form right.
Seriously, it's tough to beat the collective benefits of lunges: increased strength in the quads, glutes, hips and hamstrings; core stability; unilateral movement capacity; muscular endurance. The list goes on!
Video of the Day
Video of the Day
Unfortunately, if you do lunges wrong, you won't enjoy those fitness rewards. Instead, you might just be wasting your time (at best) or putting yourself at risk for an injury (at worst). Because it can be hard to tell if you're doing lunges right, LIVESTRONG.com talked to three fitness and movement experts to break down the most common — and most dangerous — lunge mistakes.
Here, learn how to identify and fix them.
1. Your Foot Turns Outward
Called pronation, this occurs when your weight shifts toward the inside of the foot while lunging, says Joshua Honore, certified personal trainer and fitness coach at Row House. The arch of your foot collapses and your knee buckles inward, toward the midline of your body.
The primary cause of this pronation is improper function of the muscles along the arches of your feet, Honore says. It can also happen when your ankles are weak or unstable.
"Sometimes, this is simply a result of genetics or even injury," Honore says, "but it is more commonly caused by tissues that are stressed too often [without proper recovery]."
Fix It
Minor pronation or flattened arches can improve “with just a bit of tender love and care,” Honore says. He recommends foam rolling your calves, ankles, arches, bottoms of your feet and even your thighs (the impact on your legs can extend all the way to your feet).
Add in some calf stretches, too: “Perform a soleus stretch by placing your hands on a wall while in a lunge position," Honore says. "Drive your knee toward the wall, keeping your heel in contact with the ground. Look to feel a deep stretch just above the achilles tendon."
2. Your Foot Turns Inward
The opposite of pronation is supination: When your feet supinate, they turn inward, which means you roll onto the outer edges of your feet. This leads to destabilization of the knee and the potential collapse of the kinetic chain, Honore says.
"Supination is often a result of tightness in the muscles of the bottom of the foot, calf and ankle," he says. "Though far less common than pronation, supination can often be a result of similar causes."
Like pronation, supination can be harmful, as "joints and muscles work together to move and stabilize the entire body," Honore says. "We call this the kinetic chain." Pronation and supination compromise the kinetic chain and can lead to pain in the foot, ankle, knee, hip and back.
Additionally, Honore says, these conditions lead to poor glute activation and diminish the efficiency of lunges as an exercise.
Fix It
Honore recommends a few different drills for supination (these can work for pronation, too).
- Towel grabs: Place a towel flat on the floor and, with bare feet, use your toes to scrunch the towel under your feet. Just 2 to 3 reps of these daily can dramatically improve foot function and proprioception, Honore says.
- Toe yoga: With bare feet, point your toes forward, plant your little toes into the floor, and lift your big toe. Then, raise the little toes while pressing down the big toe. Practice this move in the shower or when you’re cooking dinner to build a daily habit that helps strengthen your feet.
- Tibialis anterior stretch: Using a wall or chair to stabilize yourself, step one foot behind you as if you were doing a reverse lunge. Turn the rear foot top-down, soles to the ceiling. Slowly lower into lunge until you feel a light stretch in the front of your calf and ankle joint.
3. Your Knee Doesn’t Stay in Line With Your Toes
A lunge is a high-level activity that requires a great deal of stability in your hip abductors and quadriceps, says Theresa Marko, DPT, board-certified orthopaedic clinical specialist in physical therapy and owner of Marko Physical Therapy.
"If your hip abductors are weak, they will fail to hold your thigh outward as the knee bends, causing the knee to collapse inwards toward the other knee," she says. And if your quads are weak, the same will happen.
Things get really messy when both your hip abductors and quads lack strength, Marko says, and "the knee will be really unstable and it will shimmy in and outside of the straight plane as the knee bends."
In the best-case scenario, this causes movement of your kneecap and some pain. Worst case scenario? A torn medial collateral ligament (MCL). Yikes! Better get to strengthening those hips and thighs.
Fix It
This common lunge mistake requires a careful progression of strength exercises, Marko says. She recommends performing the following movements, mastering each one before moving onto the next.
- Stand on one leg and test your stability. “We want to see that you can hold this position and not drop the hip of the stance leg, which would indicate hip abductor weakness,” Marko says.
- Place a resistance loop around your thighs and walk sideways. Do a few laps back and forth, making sure your feet face forward and not outward, “which is what will happen when someone is weak and they want to cheat to make it easier,” Marko says.
- Perform a single-leg quarter squat in front of a mirror. “Here, we can really watch the knee joint and be sure that, as we bend the knee, the knee is tracking straight over the foot. We want to watch to be sure the knee is not deviating towards the other knee,” Marko says.
- After mastering those three exercises, you can move into a split squat, which is a stationary version of the lunge.
4. You Don’t Step Far Enough Apart
Everyone has a different stride depending on their height and the length of their legs, Marko says. The most important thing is that you step far enough apart that when you're in the bottom of the lunge, your hips and knees make 90-degree angles.
Some people step too far or not far enough because of a lack of familiarity with how a lunge should feel, she says. Either way, an improper step length (too long or too short) can put stress on the anterior cruciate ligament (ACL), which can lead to possible pain at the knee or even the lumbar spine, she says.
Fix It
Stand sideways in front of a mirror, step one foot in front of the other and lower down into a lunge. Check to see if your hips and knees make 90-degree angles. Adjust your stance as needed. Repeat this a few more times. “This is a position you can teach yourself to feel inherently so you don't need the mirror,” Marko says.
5. Your Front Foot Wobbles
This lunge mistake can happen for a variety of reasons, but generally speaking, the big challenge is halting the momentum that comes with the lunge, says Gerren Liles, founding trainer at MIRROR and founder of VizFit Apparel.
"The ability to both balance and decelerate is a task for some, especially when holding weights," Liles says. This instability can catch you off-balance, which may cause you to twist an ankle, fall or hurt your back if your core isn't properly engaged during the movement, he says.
"There is also the possibility of tight or weak inner and outer thigh muscles that affect your ability to stabilize during the lunge," Liles says. "Ankle mobility can also play a role, depending on the type of lunge."
Fix It
For the most part, mobility and stability drills can fix this lunge mistake, Liles says. For example, place the ball of your foot against a wall and lean into it to stretch the Achilles tendon. And percussive massage guns (like the Hypervolt) and foam rollers can help loosen up any tough tissue in the foot and ankle, too.
Besides mobility drills, Liles recommends performing split squats in place of dynamic lunges to test your ability to stabilize. If all’s well, you can progress into lunges.
6. Your Knee Goes Too Far Past Your Toes
It's not always automatically a problem for your knees to extend past your toes in a lunge (or in a squat). For many people, this position is perfectly comfortable and actually allows them to reach a healthy range of motion in these exercises.
However, if your knee extends very far beyond your toes, it could be a sign of hypermobility in the ankle or that you're not properly driving down your heel in the lunge, Liles says. The first factor — hypermobility — isn't necessarily an issue. Lack of a heel drive, however, typically is.
If you're not keeping your heel flat on the ground during a lunge, you might be rolling up onto the balls of your feet, which can put unnecessary stress on your knee and shin. Also, this makes the lunge more quad-dominant, rather than glute-dominant, and you'll miss out on important strength gains.
Fix It
To fix this, Liles says he would cue a client to focus on bending the back knee toward the floor. “That would subconsciously make them focus on their posterior chain and likely put more weight on the heels, which could minimize the forward drive of the knee.”
For more physical or visual assistance, try doing lunges with your toes against a wall or a large box. As you do the reverse lunge, the wall limits how far forward your knees can go, Liles says.