Pregnancy is an exciting time for many moms-to-be, but what's not so great? The annoying symptoms that come with growing a baby, like nausea, fatigue, achy joints and back pain (thanks to your budding bump).
While many moms might think that dialing back on their workout routine and laying low will help them feel better, staying active throughout those nine months will actually help relieve many of the pesky pregnancy symptoms you're experiencing.
Video of the Day
Video of the Day
In fact, the American College of Obstetricians and Gynecologists (ACOG) encourages healthy pregnant people to exercise to prevent unhealthy weight gain, constipation, back pain and gestational diabetes. As always, it's best to get the green light from your doctor before starting a new workout routine or making adjustments to an existing one.
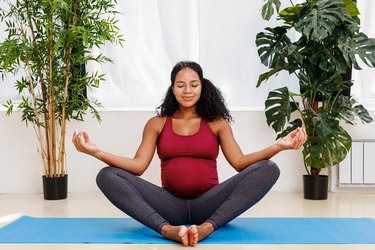
The Benefits of Yoga During Pregnancy
If you're looking for a gentle, low-impact exercise to keep you moving throughout your pregnancy, consider yoga. There are many styles of yoga to try, but the best one during pregnancy is prenatal yoga because instructors can provide appropriate stretches and modifications for expecting mothers.
"Physically, yoga can help us maintain any muscle endurance or strength that we have built up to this point, such as helping prepare the body for the birthing process, including strengthening the pelvic floor," says Liz Bendele, a San Antonio-based prenatal yoga instructor.
"On the other end of the spectrum, the mental benefits of a regular yoga practice can help develop healthy coping habits when the body and mind are pushed into intense situations, as well as inherit breathing techniques, both which can be used to aid mothers during prenatal sensations, such as contractions and birth," Bendele says.
And if you're worried that exercising during pregnancy may increase the risks of preterm birth and miscarriage, research actually shows that yoga during pregnancy can be beneficial.
According to a November 2015 study published in Obstetrics & Gynecology, which included 25 healthy pregnant people in their third trimester, doing yoga showed no negative effects on the mother's and fetus' physical health.
"The biggest thing to remember when practicing yoga during your pregnancy is to listen to your body that day, as every day will feel different, even in the slightest ways," Bendele says. "Tuning into how you are physically, mentally and emotionally before practicing is a sure way to have an enjoyable and safe practice."
Ready to get your started on your prenatal yoga journey? Bendele designed this 20-minute yoga flow for mothers-to-be in all trimesters to help you reduce stress and cultivate inner peace. Remember to breathe and go at your own pace. If you experience any pain or discomfort during any of the poses, stop doing the exercise and talk to your doctor before you start up your fitness routine again.
Check out more of our 20-minute workouts here — we've got something for everyone.
Move 1: Bound Angle Pose (Baddha Konasana)
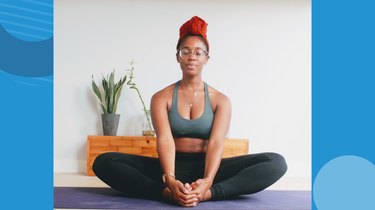
- Sit up tall with your legs extended in front of you and your shoulders relaxed.
- Bring your knees toward your chest with your feet flat on the floor.
- Exhale and open your hips, drawing your thighs to the floor. Use your hands to press your feet together and keep the outsides of your feet on the floor.
- Focus on keeping your spine in a neutral position. Your weight should be placed evenly on your sit bones. Allow your hips to open further and your thighs to drop to the floor.
Move 2: Cat Pose (Marjaryasana)
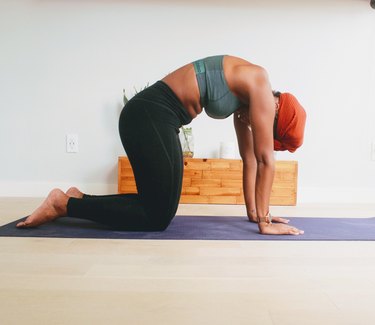
- Start in a tabletop position with your wrists directly below your shoulders and your knees directly below your hips. Your fingertips should be facing the front of your mat. Keep your gaze on the floor with your head in a neutral position.
- Exhale and round your spine up toward the ceiling, dropping your head. Draw your abdominals in toward your spine. Keep your hips lifted and your shoulders in the same position.
- Inhale and uncurl your spine. Remain on your hands and knees.
Move 3: Cow Pose (Bitilasana)
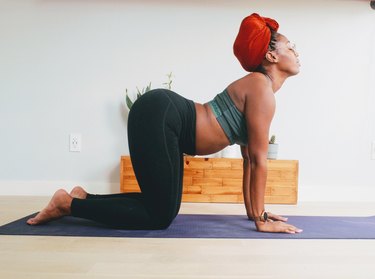
1. From Cat pose, inhale and arch your spine, lifting your chest forward and your sit bones up toward the ceiling. Set your gaze forward.
Move 4: Gate Pose (Parighasana)
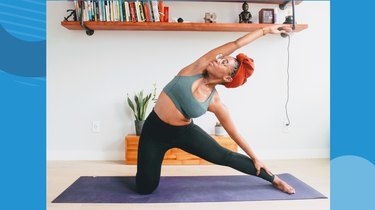
- Kneel on the mat and stretch your left leg out to the left side and press your left foot on the floor.
- Keep your right knee directly below your right hip so the thigh is perpendicular to the floor, and align your left heel with the left knee.
- Inhale and bring your arms out to your sides, parallel to the floor, palms down. Bend to the left side over your left leg and place your left hand on your shin, ankle or the floor outside the left leg.
- Hold for 30 seconds and then switch sides.
Move 5: Garland Pose (Malasana)
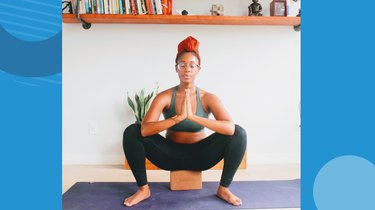
- From Mountain pose, inhale and place your hands on your hips as you slowly pull your tailbone down toward the floor. Bring your torso up.
- Walk your feet in toward your body and keep them about hip-width distance apart.
- On an exhale, begin to lean your torso forward and fit it snugly between your thighs as you press the weight of your body into your heels.
- Press your elbows against the insides of your knees, bringing your palms together in Anjali Mudra, or Prayer pose.
Tip
You can use a yoga block to help you balance in this pose.
Move 6: Goddess Pose (Utkata Konasana)
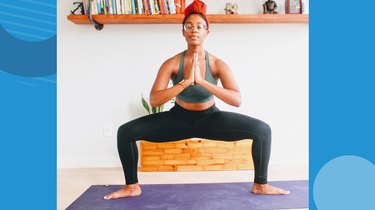
- From Mountain pose, turn to face the long edge of your yoga mat and step your feet out wide and parallel to each other.
- Turn your toes out and your heels in. On an exhale, take a deep bend in your knees, lowering into a squat until your thighs parallel to the ground and your hips are aligned with your knees.
- Keep your shoulders stacked over your hips, activate your core and press down evenly through the soles of both feet.
- You can bring your hands into Prayer pose or extend your arms out at shoulder height and bend your elbows to 90 degrees with your palms facing away from you. Spread your fingers wide and draw your shoulder blades into your back.
Move 7: Tree Pose (Vrksasana)
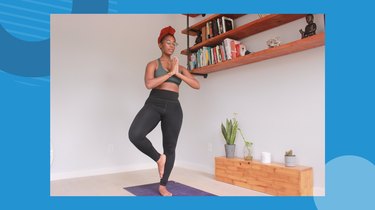
- Starting in Mountain pose, shift your weight slightly onto your left foot, keeping your inner foot firmly on the ground.
- Bend your right knee, draw your right foot up and place the sole against the inside of your left calf, pointing your toes down toward the floor.
- Make sure your pelvis is in a neutral position as you lengthen your tailbone toward the floor.
- Press your hands together and gaze at a fixed point in front of you on the floor, about 4 to 5 feet away from you.
Move 8: Legs Up the Wall Pose (Viparita Karani)
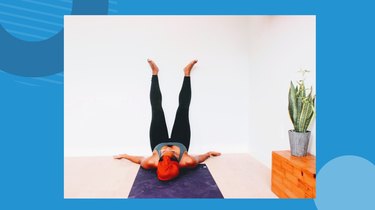
- Sit with your left side against a wall. Your lower back should rest against a bolster if you’re using one.
- Gently turn your body to the left and bring your legs up onto the wall. If you are using a bolster, shift your lower back onto the bolster before bringing your legs up the wall. Use your hands for balance as you shift your weight.
- Lower your back to the floor and lie down. Rest your shoulders and head on the floor.
- Shift your weight from side to side and scoot your sit bones close to the wall. Let your arms rest open at your sides, palms facing up. If you’re using a bolster, your lower back should now be fully supported by it.
- Let the heads of your thigh bones (the part of the bone that connects the hip socket) release and relax, dropping toward the back of your pelvis.
- Close your eyes and stay in this pose for the remainder of your practice, about 5 to 10 minutes.
- To come out of this pose, slowly push yourself away from the wall and slide your legs down to the right side. Use your hands to press yourself back up into a seated position.
Tip
As you transition into the late phases of your second trimester or third trimester, it may be more comfortable to use the support of a bolster or firm, long pillow on the floor against the wall.