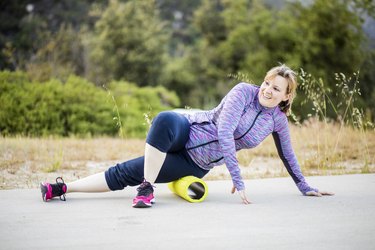
From athletes to weekend warriors to all us "regular folks," people of all ages and fitness levels are experiencing the benefits of using a foam roller. This versatile piece of equipment uses self massage to roll out the tight spots before and after exercise to leave you feeling relaxed and energized.
"Foam rolling, in many cases, is the first step to decreasing your tight muscles and joints, therefore alleviating pain and helping you move better," Grayson Wickham, DPT, CSCS, founder of Movement Vault, tells LIVESTRONG.com.
Video of the Day
Video of the Day
"Tight muscles cause compensations in other joints in your body. The stress on these joints can lead to wear and tear and eventually pain and injury," he says.
Foam rollers are used for self-myofascial release (SMR), which is effective in decreasing muscle soreness and adhesions, improving blood flow and range of motion, as well as promoting a feeling of relaxation after treatment, according to the American Council on Exercise (ACE).
Tip
Many people love foam rolling because they feel better after one treatment, however, Wickham says the results will last for only a short period of time unless you also perform stretches after.
“When you follow up foam rolling with active stretching, the changes last much longer, and with consistency, can last forever.”
Try These 5 Foam Rolling Exercises
Here's the basics of foam rolling: You lay the intended body part on top of the roller and move in a slow and controlled matter. "Roll about an inch a second, until you find that tight knot, and hold on that spot for 30 to 60 seconds until you feel a relief in the adhesion," kuudose founder Joey Thurman, CPT, tells LIVESTRONG.com.
Foam rolling can be uncomfortable initially, which is why it's important to listen to your body. "I tell my clients that intensity can be good, but pain is not," says Jonathan Jordan, certified massage therapist and certified personal trainer for Bay Club in San Francisco, tells LIVESTRONG.com.
"I give clients a scale — no more than 7 out of 10." If it's painful, decrease the amount of pressure or switch to a softer foam roller. If pain continues, stop and talk to a doctor.
The following five foam rolling exercises will hit all your major muscle groups. If your goal is to decrease tight muscles and improve mobility, perform foam rolling before exercising, says Wickham. If your goal is to prevent exercise induced muscle soreness, perform foam rolling after a workout or on your recovery days.
Tip
A December 2019 study in the International Journal of Sports Physical Therapy found that a minimum of 90 seconds per muscle group was the ideal duration to achieve optimal short term reduction in muscle pain and soreness. If you can’t tolerate that, start with 30 to 60 seconds and work your way up.
1. Hamstring Roll
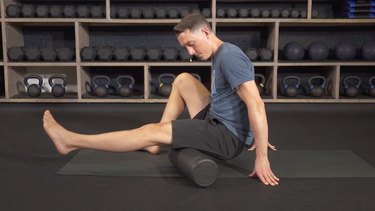
- Start by sitting on the ground with the back of your upper leg resting on a foam roller.
- Starting two inches above your knee, roll up and down on the foam roller in two- to three-inch intervals. Make sure to explore the inside, middle and outside of your hamstrings.
- Move the foam roller up the back of your upper leg toward your hips. Repeat the above in this new spot.
- Continue to move up your hamstrings toward your hips until you get to your gluteus muscles (butt).
- Perform for about 2 to 3 minutes per side.
Tip
“To fix your tight hamstring problem, foam rolling is the first step to solve the problem,” Wickham says. “Once you correctly foam roll and decrease your neurological hamstring tightness, you need to follow up with active stretching immediately afterward.”
Try a forward fold (seated or standing) and contract your quads as you stretch your hamstrings.
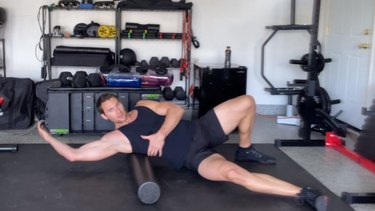
2. IT Band Roll
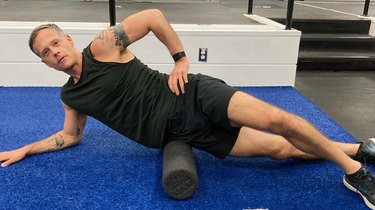
- Lie on one side with the outside of your upper thigh resting on the foam roller.
- Keep your bottom leg straight, while the top leg helps support and control the amount of pressure.
- Start up at the hip, then roll down toward the knee, two inches at a time.
- Use your arms to help provide stability.
- Perform 2 to 3 minutes on each side.
Tip
“The iliotibial band (IT band) isn’t actually a muscle, it’s connective tissue,” says Jordan. It runs along the outside of your leg from your hip to your knee and shinbone and helps move your hips.
3. Quad Roll
- Lie on your stomach with your legs extended out and your arms supporting you in front. Place the foam roller above your knees.
- Use your arms for support as you roll the foam roller up and down the front of your legs along your quads.
- If you want more pressure, you can cross one leg over the other to foam roll one leg at a time.
- Perform for about 2 to 3 minutes per side.
Tip
"Our hip flexors are prone to getting shortened and tight. Forgetting about the rectus femoris, which is the middle part of the quad, as a hip flexor can lead to future pain and dysfunction," Thurman says.
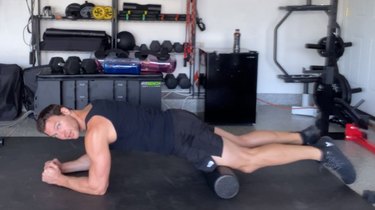
4. Latissimus Dorsi Roll
- Lie on your side with your arm flexed overhead.
- Place the foam roller on your side near your armpit.
- Roll up and down on your side toward your armpit.
- Perform for 2 to 3 minutes per side.
Tip
"Our lats are responsible for a number of movements and can really get tight when overworked," Thurman says. "You will often feel a shoulder release from doing this as well."
5. Thoracic Roll
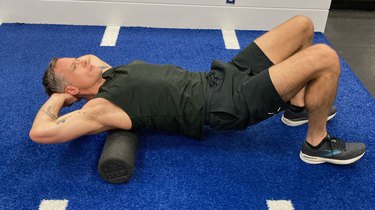
- Lie on your back with the foam roller placed under your upper back.
- Bring your hands behind your head and keep your knees bent in front.
- Bridge up as you roll the foam roller between your mid and upper back.
- Perform 2 to 3 minutes, resting as needed.
Tip
“Whether you are a desk worker or a champion cyclist, every human I’ve encountered in the last 10 years could benefit from better thoracic extension,” Jordan says. "If you only have one minute a day to work on your mobility, then do this."
Was this article helpful?
150 Characters Max
0/150
Thank you for sharing!
Thank you for your feedback!