Queen of compound movements. Granddaddy of all lifts. Healthlift. No exercise has quite as many boastful nicknames as the deadlift. But that's because it's hard to out-shine the full-body muscle-building movement.
"The deadlift strengthens almost every muscle in the body including the hamstrings, quads, calves, glutes, core, shoulders, traps, back, lats, forearms and grip," says physical therapist Grayson Wickham, DPT, CSCS, founder of Movement Vault, a digital movement education platform.
Video of the Day
The compound movement has also been linked to increased bone density, decreased lower back pain and even improved brain health. Impressive, right? To reap the benefits of this big-bang-for-your-buck movement, however, you have to do it correctly. Do it incorrectly and you'll be nursing your back for weeks (maybe even years) to come.
That's why trainers have developed a host of cues designed to help exercisers nail the perfect deadlift form. From the obvious to the silly, read on for a breakdown of the most common deadlift cues — ordered, start to finish.
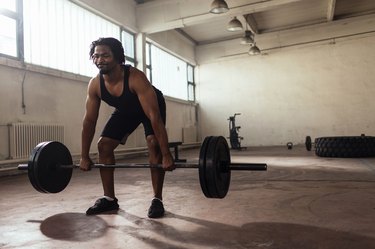
How to Do a Deadlift
- Fix the weight plates on your barbell and position it on the floor in front of you. If needed, position it on an elevated platform to allow for a reduced range of motion.
- Step up to the bar, shins almost against it, feet planted firmly hip-width apart. Keep your spine straight, chest up and shoulders back and down.
- Hinge from the hips, softening your knees as your hips sink low enough to let you grasp the bar with your hands shoulder-width apart.
- Check your posture: Your spine should be straight and long, chest up and open, shoulders back.
- Engage all the muscles of your core to maintain this position as you push your feet into the floor, as if you were trying to push the floor away from you, and lift the bar.
- Finish the motion by lifting your chest and engaging your lats to stabilize the bar in front of your hips.
- Return the bar by reversing the motion, pushing your weight back into your hips and softening your knees, letting the bar travel in a controlled path back down to the floor along your body.
1. 'Screw Your Feet Into the Ground'
A fave among CrossFit coaches, this cue makes it sound like you need fancy shoes or a trip to the hardware store to deadlift properly. You don't; you can crush this cue wearing whatever pair you normally wear to sweat (even if that's no shoes at all!).
Here's how to do it: Stand with your feet hip-width apart about a foot away from the bar. Now, ignore the bar and think about screwing both of your heels into the ground so that your toes turn out 3 to 10 degrees. "Another way to think of it is as if you're spreading the floor with your toes," Wickham says. When done correctly, you should feel all the muscles in your legs fire up.
"This motion helps activate all of the muscles in the arch in your foot, as well as those up to the hip abductors and pelvic floor," says Laura Miranda, DPT, CSCS, creator of PURSUIT, a training program dedicated to turning your city into your gym. "Ultimately, it puts you in a more supported position." And the more supported you are before you grab the bar, the more supported you'll be when you do.
2. 'Brace Your Core'
The muscles that make up your core — your internal and external obliques, pelvic floor, rectus abdominis and back muscles — were designed to safeguard your spine. Contracting them allows them to do that job more effectively, which is what the cue "brace your core" is trying to achieve.
"Tightening the muscles in your core protects your spine and allows it to maintain the same position throughout the lift," Miranda says. Fail to do so, and your back will round while you're pulling the weight off the floor, she says. The result? At best a pulled muscle, at worst a herniated disc.
So, how do you brace your core, exactly? Now that your feet are "screwed into the floor" and hip-width apart, squeeze your glutes to engage your pelvic floor muscles. Then, stack your ribs so that they're directly over your pelvis.
"Exhale and drop your ribcage down," Miranda says. As you learn how to brace your mid-section, she recommends putting your hands on your ribs in order to feel the two-inch drop that will happen when you exhale. Other common cues designed to elicit the same response include:
- Zip up your middle
- Pretend you're putting on a tight pair of jeans
- Switch on your abs
3. 'Press Your Butt Against an Imaginary Wall Behind You'
This, as well as, "stick your butt out like you're closing a drawer," "make a butt mark on the wall" and "hips back" are all designed to get you to the same thing: hip hinge properly. This is a movement pattern that involves maintaining a neutral spine while you shift your butt back and micro-bend your knees.
"Whether it's a bag of cat litter, a book or barbell, the hip hinge puts you in the most optimal position to lift something," Wickham says. It's also the position that most ensures the safety of your back while you lift, he says.
It's common for exercisers to confuse the hip hinge with the squat, which involves sitting your butt back as if you're sitting on a chair. "Squatting down to pull the bar doesn't give you proper leverage to pull the bar up," Miranda says. You'll also boink your knee caps if you try to pull the bar your body from a squat position. (No thanks!)
The above cues are designed to encourage athletes to push their butts back (hip hinge), as opposed to back and down (squat).
4. 'Hands Are Hooks, Arms Are Chains'
As you hip hinge, keep your arms straight and reach for the bar. (Most important word here: straight!).
Most lifters will grab the barbell using a double overhand grip, palms facing body. "It's classic and an excellent way to build forearm strength, fast," Wickham says. However, if you're lifting super heavy, it's possible for your grip strength to fail before your hamstrings do.
When this happens you'll be able to feel the bar rolling out of your hands as you try to pull it up. Here, it's best to opt for a mix-grip, which involves holding one hand in an overhand position and another hand in an underhand position, with your palm facing out.
"If you use a mixed-grip, just be sure to switch up which hand assumes which grip position every other set," Wickham says. Otherwise, you risk developing a muscle imbalance between the two sides.
Regardless of which grip you use, this cue is intended to remind you that your arms need to remain locked out for the duration of the lift.
"Bending your arms will take the work out of your super-strong legs and put it into your less-strong arms," Wickham says. "It also creates more work for you because you have to pull the barbell a greater distance when your arms are bent." Additionally, there's a greater risk of tearing your biceps muscle.
5. 'Squeeze Grapefruits Under Your Armpits'
Spoiler alert: Once you get your hands on the bar, you can't just yank the bar up. "You need to engage your back muscles so that your spine stays supported as you pull the bar off the ground," Miranda says.
To do so, she recommends envisioning that you're juicing citrus under your armpits. "Basically, what you're trying to do is pull your arms in toward your ribcage to engage your lats," she says. That helps you pull the bar straight up alongside your body. If your lats are loose, the bar could drift away from your body which could put your back in an unsafe position. (More on this below).
Other cues that accomplish this would be:
- Flex your armpits
- Pull your lats down
- Squeeze a walnut with the middle of your back
Sometimes trainers will also use cues like "give me gorilla chest," "make a proud chest" or "chest up." If you hear a trainer say one of these, make sure you're actually engaging your back and not just throwing your chest forward while arching your lower back, which Miranda says is a common response to cues that emphasize the chest.
6. 'Scrape Your Shins'
At this point in the lift, the bar should be no more than one inch away from your shins and your lats and mid-section should be engaged. If this isn't the case, bring the bar closer before getting back into position.
Ready? Keeping your arms straight, lats engaged and core tight, "pull the bar up alongside your body as you unbend your knees and return to standing," Wickham says.
The further away from your body the bar is, the harder it is going to be to pull up — and more specifically, pull up with good form, he says. Again, if the bar drifts away from the body, it can pull your back into a compromising position.
"You don't literally need to cut up your shins, but the bar should never travel more than an inch away from your body," he says.
- CrossFit Journal: The Deadlift By Greg Glassman
- Journal of Strength Conditioning Research: Changes in bone mineral density in response to 24 weeks of resistance training in college-age men and women
- Journal of Strength Conditioning Research: Which Patients With Low Back Pain Benefit From Deadlift Training?
- Gerontology: Kicking Back Cognitive Ageing: Leg Power Predicts Cognitive Ageing after Ten Years in Older Female Twins