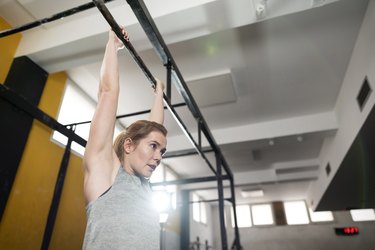
You know what's fun? Hanging from things. Sadly, most adults haven't done any hanging since they were kids playing on the monkey bars. It's time to change that. Adding the dead hang exercise and its variations to your workout routine can help you reduce aches and pains, build strength and prepare for more challenging exercises like chin-ups and pull-ups.
- What is a dead hang? It's an exercise that involves holding onto something overhead and hanging from it with your arms fully extended.
- What muscles does the dead hang work? A passive hang primarily works your forearm flexors in the inside of your forearms, which help you hold on tight to the bar. It also provides a great stretch for your lats, biceps, pecs and shoulders. Active hangs, which involve intentionally creating more tension throughout your body, also work your lower trapezius, shoulders, lats, glutes and core muscles.
- Who can do the dead hang? If you have no history of shoulder pain or injuries, you can start hanging right away. If you have a preexisting shoulder injury, talk to your doctor or physical therapist to be sure you're cleared for this type of overhead work before adding this exercise to your routine.
Video of the Day
How to Perform a Dead Hang With Perfect Form
There are actually two types of dead hangs out there: passive and active. I use both with my clients in my work as a trainer. There is a time and place to use each of them. And the right one for you depends on your injury history, your overall training goals and what you're hoping to get out of the hang, specifically.
In the passive version, you literally just hang. Your body stays loose as you dangle. The passive hang is great for stretching, decompressing the spinal discs and opening up the shoulder capsules.
With the active version, however, you pull your shoulder blades down and back, fire up your lats and squeeze your core and glutes. The active hang is best for building back and core strength, which translates to pull-up and chin-up performance. Both active and passive hangs improve your grip strength.
Here's how to do each type of hang:
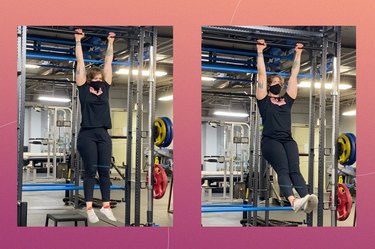
Passive Dead Hang
- Choose a pull-up bar or stable surface that’s high enough for you to hang from with your legs straight and feet off the ground. Shorter trainees should use a box to help them safely get up to the bar.
- Select your hand position and grip the bar tightly.
- Allow yourself to drop into a full hang. Your arms should be completely straight overhead. Because this is a passive hang, gravity will pull your body down toward the floor. Allow your shoulders to travel up to your ears and your legs to hang straight beneath you. You will likely feel a lot of stretching throughout your entire upper body.
- Hold the passive hang for a predetermined time interval or for as long as you can. When you are finished, place your feet on the floor or box and carefully release your hands from the bar.
Tip
Try to keep your head and neck in a neutral alignment as you hang. Don’t allow your head to push forward through your arms.
Active Dead Hang
- Choose a pull-up bar or stable surface that’s high enough for you to hang from with your egs straight and feet off the ground. Shorter trainees should use a box to help them safely get up to the bar.
- Select your hand position and grip the bar tightly.
- Allow yourself to drop into a full passive hang. From here, you will transition into an active hang by pulling your shoulder blades back and down. There may be some slight bending in the elbows as you do this.
- To help get your core activated, imagine you are wearing a large belt buckle and try to point it toward your chin. This will posteriorly tilt your pelvis and bring your legs out in front of your body.
- Squeeze your butt and press your legs together. Your entire body should feel tense and activated.
- Hold the active hang for a predetermined time interval or for as long as you can. When you are finished, place your feet on the floor or box and carefully release your hands from the bar.
8 Dead Hang Benefits
1. Shoulder Health and Mobility
Most of us spend a lot of time sitting in front of our computers and smartphones. Constantly hunching over can lead to postural issues such as upper crossed syndrome, where our necks, chests and shoulders become chronically tight. Over time, the bones around our shoulders can actually become remodeled so there's less space for tendons to move. This can lead to pinching, pain, movement restrictions like impingement and injuries.
Thankfully, you can mitigate some of this damage by regularly hanging from a bar. The force of gravity pulls your shoulders into proper alignment, reduces the risk of shoulder impingement and can counteract this remodeling process.
Spending time in an overhead position also helps maintain your ability to move your arms through a full range of motion. This becomes especially important as you get older and lose any mobility you don't use on a regular basis.
2. Spinal Decompression
Lifting weights puts pressure on the discs that live between each individual vertebrae of your spine. In the barbell back squat, for example, the heavy bar you place directly on top of your spine sends high compression forces into your discs. Although some compression of the discs is normal, you need to regularly release some of this pressure to avoid back pain and potentially serious injuries.
Hanging from a bar is a great way to decompress your spinal discs. As gravity pulls down on your body, it creates more space between the vertebrae and releases some of the pressure.
3. Upper-Body Stretching
Hanging is one of the best ways to stretch and loosen up your upper body. The force of gravity naturally stretches your muscles as it pulls you toward the ground.
The hanging position also helps you break out of the hunched-over posture that's common among those who work desk jobs.
4. Good Posture
By combining spinal decompression, opening up the shoulders and stretching the upper body, hanging can dramatically improve your posture.
Even just a few short intervals of hanging each day can have you walking taller and feeling more confident.
5. Grip Strength
A strong grip can make all the difference in your strength training workouts. It helps you perform rows, deadlifts, loaded carries, pull downs and chin-ups. A weak grip leads to faster fatigue and can also make it harder to target certain muscles. For example, if you're trying to perform dumbbell lunges and you can't hold onto the weights, your leg workout will suffer.
But the importance of grip strength goes far beyond the gym. According to an August 2019 article in Clinical Interventions in Aging, grip strength is an accurate predictor of overall strength, function, bone mineral density, mental health, sleep health, overall disease status and cognition through the years. " In short, a strong grip strongly correlates with a fit, functional and healthy body as you age.
Enter, dead hangs for forearm strength.
6. Core Strength
Performing active hangs is a great way to build core strength. Think of the exercise as a hollow-body hold, just from a hanging position.
FYI, a strong core is essential if you want to nail pull-ups and chin-ups. If you can't keep your body tight on the bar, you'll leak lots of energy by swinging around and potentially put your joints in vulnerable positions.
7. Pull-Up and Chin-Up Performance
I often see trainees who want to master pull-ups and chin-ups struggle to get in and out of the active hang position. So, instead of lowering all the way with each chin-up, they cut their reps short.
Unfortunately, half pull-ups and chin-ups will hurt your strength gains — along with your elbows and shoulders.
A great pull-up or chin-up always starts and ends with a dead hang. Active hangs are especially useful because they teach you how to effectively use your core to keep your body tight.
8. Fun
Hanging can be humbling at first. But if you take the time to practice and build up your strength, you will quickly get to a point where you can actually reap significant benefits. It feels great to hang from a bar as you stretch out and decompress after a long day or a hard workout.
And in time, hanging can even be a fun way to play around with your body's natural movement just like it was when you were a kid.
Test Your Readiness to Work Out
Grip strength is a great measure of the fatigue of your nervous system.
Your nervous system is crucial for strength training because lifting weights isn't just about working your muscles, it's also a skill that requires coordination between your brain and body. When your nervous system is fatigued, you won't be able to execute lifts efficiently or with good form.
Want to test your readiness for a tough lifting workout? Hop on a pull-up bar and see how it feels to hang for 30 to 60 seconds at the end of your warm-up.
If your hang feels easy, it's a sign that you're ready to push yourself that day. If the hang feels really tough or you aren't able to hang for as long as usual, you may want to use lighter weights or reduce the intensity on that day.
3 Dead Hang Form Tips
1. Position Your Arms
For passive hangs, your arms should be completely straight overhead. Active hangs may create a very slightly bend in your elbows as you pull your shoulder blades back and down.
2. Brace Everything
In both passive and active hangs, it's important to not let your lower back over arch. But, in active hangs, to really activate your core, you need to brace everything you've got.
Focus on connecting your upper back, core muscles and glutes by pulling your shoulder blades back and down, pointing your belt buckle to your chin and squeezing your legs together in front of your body.
3. Know Where Your Legs Are
Speaking of legs, try to let your legs hang directly beneath (passive) or slightly in front of your body (active).
When that's not possible (because you're using a lower bar), you can bend your knees and cross your lower legs behind your body.
3 Dead Hang FAQs
1. How Long Should You Hang?
If you're brand new to hanging, it's best to start with short intervals of 10 to 30 seconds of dead hang time. More experienced trainees can hang for up to 60 to 90 seconds at a time. Working up to 3 to 5 cumulative minutes of hanging per day is a great long-term goal.
2. What Equipment Do You Need?
You can hang from anything that's sturdy enough to support your weight. Most people hang using a traditional pull-up or chin-up bar. You can also hang from gymnastic rings, monkey bars and even tree branches. Get creative!
3. When in Your Workout Should You Hang?
Hanging is a great addition to your strength training warmup because it helps prepare your nervous system for heavy lifting. It works well to prepare for any type of workout — upper, lower and full body.
You can also hang as part of a cool down to decompress your spine and open up your shoulders after you finish your workout.
If you have a doorway pull-up bar or a home gym, try hanging first thing in the morning and interspersing small intervals of hanging throughout your day.
How to Hold On: Try These 8 Different Hand Positions
There are many different ways you can position your hands while hanging. You might select a different hand position based on your joint health, what type of surface you're hanging from, what muscles you want to target and whether or not you're using the dead hang or active hang to prepare for other exercises.
Both active and passive hangs can be performed with all of these hand positions. And whichever one you use, hold on tight. By actively squeezing the bar, you better activate muscles throughout your arms and upper body.
1. Overhand (Pronated)
Grab the bar with both palms facing away from you. This hand position is traditionally used for pull-ups. I suggest starting with an overhand grip unless you have been instructed to avoid it due to a preexisting shoulder injury.
2. Underhand (Supinated)
Grab the bar with both palms facing you. This position recruits the biceps more than an overhand position and is traditionally used for chin-ups. Some trainees may want to avoid the supinated position because it bothers their elbows.
3. Neutral
Grab the bar with both palms facing in toward each other. You'll need to hang from monkey bars (facing sideways) or a chin-up station with neutral handholds. The neutral position is ideal for those with cranky shoulders who may not be able to hang from a straight bar without pain.
4. Mixed
Grab the bar with one hand pronated (facing away from you) and one hand supinated (facing toward you.) If you use this position, be sure to do at least two sets so you can switch the direction of your hands.
5. Wide
The wider apart you place your hands, the more you will recruit your lats and upper back muscles. Widening your grip is a great way to make traditional overhead hangs more challenging. Wide grips work well with overhand and neutral hand positions.
6. False Grip
This hand position is used for advanced calisthenic exercises like muscle ups and front levers. Instead of wrapping your fingers all the way around the bar or rings, you will hang from the palm of your hand. The rings or bar will be supported by the base of your palm close to your wrists.
7. Single Hang
If you really want to challenge your hanging skills, try working up to a single-arm hang. Use your legs to support you when you first start working on these. As you get stronger, you can gradually use less and less support until you're doing a full single arm hang.
8. Fingertips
Hanging from your fingertips is an advanced skill that won't be necessary for most people. However, it can be valuable if you're interested in rock climbing or simply want to take your hanging skills to the next level. Fingertip hanging is best done from a hang board specifically designed for this purpose. To protect the tendons in your fingers, you should always perform an active hang when using a hang board.
3 Modifications to Make It Easier
Move 1: Side Hang
- Grab onto a TRX handle or another stable surface with one hand.
- Slowly lean to the side until the grabbing hand is straight. You can either keep your shoulder blade pulled back and down or allow it extend away from the body. Allow gravity to pull your body toward the floor.
- Hold the hang for a predetermined time interval or for as long as you can. When you are finished, carefully pull yourself back up to standing.
The side hang is a great option for trainees who are not able to perform overhead hangs for whatever reason. You won't get the same decompression of the spine or opening up of the shoulder capsule, but you can still get the stretching and strengthening benefits of a traditional hang.
You can perform a side hang using a bar, doorframe or TRX rings. Experiment with different surfaces and heights to find something that feels good on your shoulders. The steeper your body angle relative to the ground, the more challenging this will be.
Move 2: Leg-Supported Hang
- Choose a pull-up bar or stable surface. Since you'll be partially supporting your weight with your feet, it's okay for the bar to be closer to the ground (chest height works great). If you're using a high bar, stand on a box positioned beneath you.
- Select your hand position and grip the bar tightly.
- Allow yourself to drop into a hang. Your arms should be completely straight overhead. However, your feet should remain at least partially in contact with the floor or box. This may require you to bend your knees or place your feet on the floor in front of you. Use as much leg support as necessary to allow you to maintain a relaxed upper body position.
- Hold the hang for a predetermined time interval or for as long as you can. When you are finished, shift your entire weight to the floor or box and carefully release the bar.
If you aren't yet able to support your entire body weight, practice your hangs using support from your legs. You can either use a lower bar (so your feet can stay on the ground) or place a box underneath the bar. Use as much leg support as you need to hang without pain. As you get stronger, you can gradually use your legs less and less.
Move 3: Ring Squat Hang
- Set up gymnastics rings at about chin height while standing. You may need to adjust the height of the rings depending on the length of your arms and legs. You want your arms to be fully extended overhead once you're in the bottom of your deep squat.
- Start in a standing position. Grab the rings tightly and place your feet about hip width apart.
- Allow yourself to drop into a deep squat. Lower yourself until your arms are straight overhead. Allow your shoulders to travel up to your ears as you sink into the deep squat position. You will likely feel a lot of stretching throughout your entire upper body. Your feet should stay firmly planted on the ground.
- Hold the hang for a predetermined time interval or for as long as you can. When you are finished, drive your legs into the floor, pull yourself up with your arms and return to your standing start position.
The ring squat hang is another variation that allows you to get assistance from your legs. If you don't have access to rings, you can also use a TRX or another suspension trainer.
Tip: The ring /TRX squat is a great exercise to introduce modified ring chin-ups. Instead of simply hanging in the bottom of your squat, practice squatting down and then using your arms to pull yourself back up to standing. Focus on driving your elbows down to your sides and squeezing your armpits hard at the top.
3 Progressions to Make It Harder
Move 1: Scapular Pull-Up
- Choose a pull-up bar or stable surface that’s high enough for you to hang from with your legs straight and feet off the ground. Shorter trainees should use a box to help them safely get up to the bar.
- Select your hand position and grip the bar tightly.
- Allow yourself to drop into a full passive hang. From here, you will transition into an active hang by pulling your shoulder blades back and down, tilting your belt buckle to your chin and squeezing your legs in front of you. Hold this for 1-2 seconds.
- Relax back into a passive hang by letting gravity pull your body down. Then move back into the active hang. Keep moving between passive and active hangs for the desired number of reps.
The scapular pull-up is a great way to progress from a hang to the pull-up. Each rep teaches you how to transition from the passive to the active hang, building strength that will help you move in and out of the bottom of your pull-up.
Move 2: Hang Rotation and Swing
Once you're comfortable with static hangs, experiment with adding in swings and rotations. There are no rules here; play around with the movements and directions that feel best for you. Even though you are swinging your body and moving around on the bar, try to move slowly and maintain control of your body. Initiate all movement from your core, hips and glutes.
Move 3: Monkey Bars
- Begin with both hands on one bar and your body hanging beneath you.
- Carefully release one hand and grab the next bar in front of you. You can use your hips to generate some rotation in order to reach the bar.
- Release the back hand and grab the next bar in front of you. This hand will be skipping the bar that's already being grabbed by your other hand.
- Keep moving forward in this alternating fashion until your grip needs a break or until you've reached the end of the bars.
I love using the monkey bars as a goal for my clients because it makes training the hang a lot more fun. Remember how easy the monkey bars used to be when you were a kid?
Prepare to be humbled if you haven't tried to use them in years. Reaching from bar to bar requires a great deal of strength because you will have periods where you're supporting your body weight with just one hand.