No matter where you are in your fitness journey, learning how to do a proper hip hinge is essential for staying strong and safe in your daily functional activities and sports. If you want to prevent injury and boost your performance, hip hinging is where it's at.
That said, it takes some practice to make the hip hinge click. Here, we break down how to do a hip hinge and some drills to help you nail down the perfect hinge.
Video of the Day
What's the Difference Between a Squat and a Hip Hinge?
A simple way to identify the difference between a squat versus a hip hinge: "A squat involves maximal bending at your hips, knees and ankles. By contrast, a hip hinge requires almost no bending at the ankles or only a little at the knees. Nearly all of the movement comes from bending your hips," Caroline Juster, CPT, CFS, a Chicago-based certified functional strength coach.
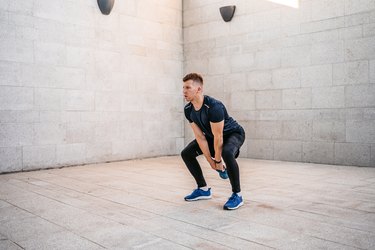
How to Do a Hip Hinge With Proper Form
A strong hip hinge starts with reaching your hips back before you bend your knees at all, says Zach Ray, DPT, SCS, a physical therapist and founder of Live Athletics. Then, you want to focus on keeping your back flat and prevent it from rounding.
"We normally try to start with pelvis control. One cue is to draw a short string between your bellybutton and the bottom of your ribs. We keep the string short to keep your ribs down and prevent arching your lower back," he says. "You also want to tuck your pelvis to take the stress out of your lumbar spine and activate your core."
- Stand with your feet slightly wider than hip-width apart and hold a kettlebell between your legs.
- Keeping your back flat and bracing your core, push your hips back and bend your knees slightly, lowering the kettlebell toward the floor. Think about moving your hips toward the wall behind you with your spine completely flat. Your shoulders should be above your hips and your hips over your knees.
- Drive your hips forward to stand back up and squeeze your glutes.
Tip
Doing this movement with a kettlebell or dumbbell can actually feel a little easier, as the weight provides counterbalance. But as you're learning how to hip hinge properly, be sure to start with a light weight to keep your body injury-free. Then, once you feel confident in your form, you can add more load.
Hip Hinge Benefits
1. Enhanced Performance
Your glutes are the main driver in producing power so if you want to enhance your sports performance, strengthening these backside muscles is key. A solid hip hinge activates your glutes and hamstrings.
"Most people tend to be squat heavy, or we call it quad-loaded. And that causes a lot of excessive wear on the knee. Whereas if we can get people more into the glutes with a proper hip hinge, it tends to make people feel better and avoid some injury," Ray says.
That's because squats tend to be vertical and load the muscles in the front of your legs more, namely, your quads, while hip-hinge movements, like deadlifts and kettlebell swings are more horizontal and emphasize the muscles in the back of your body, like your glutes and hamstrings, Ray says.
2. Injury Prevention
When it comes to injury prevention, strong glutes help provide more stability in your knees than your quads, Ray says. But with sedentary lifestyles becoming the norm, many people have glute inhibition. Essentially, that means that they have a hard time activating their glutes.
"If you don't have good glute activation or glute control and coordination, you're going to set yourself up for back and lower-limb leg issues," Ray says.
But by strengthening and targeting your rear muscles, you can build your mind-muscle connection, helping your glutes fire properly during your workouts.
Common Hip Hinge Mistakes
1. You Arch Your Lower Back
One of the most common mistakes with the hip hinge is arching the lower back, which can lead to injury. "People arch their lower back because they don't know how to tuck their pelvis so that they're not putting stress on their low back," Ray says.
To fix this, tuck your pelvis slightly to help activate your core and keep it braced throughout the exercise. You should be able to maintain a back flat as you're doing an exercise when hip hinging. Remember to also pack your shoulders back and down to engage your lats and prevent your shoulders from rounding forward.
2. You Start by Bending Your Knees
When hip hinging, you should initiate the movement by sending your butt back before you slightly bend your knees. Think about reaching your butt back to the wall behind you. This ensures that you're loading your glutes and hamstrings, Ray says.
Doing the hip-hinge drills below, such as the handcuff hip hinge and the broomstick hip hinge, can help you create the body awareness to send your hips behind you.
6 Hip-Hinge Drills to Help You Perfect the Movement
If your hip hinge needs some work, these helpful drills from Ray and Juster can help you build body awareness and coordination to do it correctly and get the most out of your exercises.
"The main challenges I see when clients learn to hip hinge are difficulty reaching the hips back and too much spinal rounding. It's not helpful to simply tell yourself to 'keep your back flat.' Instead, use drills that provide external physical context to retrain your brain and increase body awareness," Juster says.
1. Tall-Kneeling Hip Hinge
Ray likes this body-weight drill because it trains you to push your hips back toward your heels and pop back up into a tall-kneeling position.
- Place a pad under your knees on the ground. Position your knees directly under your hips and untuck your toes. Your torso should be upright and your hips extended.
- Keeping your chest tall, reach your hips back toward your heels as far as you can. You should feel a stretch in your hamstrings.
- Press your knees into the pad to return to the tall-kneeling position.
2. Tall-Kneeling Handcuff Hip Hinge
Juster recommends this drill for teaching you how to get your hips back behind you, and you simply do it by pushing your butt back into the weight.
"Holding a light kettlebell is ideal here because it helps you activate your hamstrings and provides a helpful physical cue so you know you're performing the movement correctly," Juster says.
- Place a pad or pillow on the floor beneath your knees. Position your knees on the ground directly under your hips and tuck your toes into the ground. Your torso should be upright and your hips fully extended.
- Hold a light kettlebell with both hands behind your back. If you don't have a kettlebell, grab onto one wrist with the other hand.
- Initiate the movement by pushing your hips back into the kettlebell. Reach your hips back as far as you can while keeping your chest tall. You should feel a stretch in your hamstrings.
- Drive your knees down into the pad to return to the tall-kneeling position.
3. Standing Handcuff Hip Hinge
If you're feeling good with the tall-kneeling handcuff hip hinge, you can progress to doing the movement standing. The setup is similar, but the main difference is that you need to bend your knees slightly to reach your hips back in the standing version, Juster says.
- Stand with your feet shoulder-width apart and hold a light kettlebell with both hands behind your back. If you don't have a kettlebell, grab onto one wrist with the other hand.
- Initiate the movement by bending your knees slightly and pushing your hips back into the kettlebell. Reach your hips back as far as you can while keeping your chest tall. You should feel a stretch in your hamstrings.
- Drive your legs down into the ground to return to the starting position.
4. Wall Tap Hip Hinge
The wall serves as a physical cue to help you reach your hips back as far as possible and load your glutes and activate your hamstrings.
"Stand a few inches in front of a wall, then perform a body-weight or lightly loaded hip hinge. The goal is to reach your hips back and tap your butt to the wall. It takes some experimentation to determine exactly where you should stand to get the most out of the exercise," Juster says.
- Stand upright with your heels 2 to 3 inches in front of a wall with your feet shoulder-width apart. You may need to adjust this position depending on your height and leg length.
- Initiate the movement by bending your knees slightly and reaching your hips back behind you. You should feel a stretch in your hamstrings as you reach your hips back. Keep your chest tall.
- Reach your hips back until you tap the wall behind you.
- Drive your legs into the ground to return to the starting position.
5. Glute Bridge to Cat-Cow
If you find it difficult to do hip-hinging exercises without rounding your back, Juster recommends doing a cat-cow and glute bridge drill to help you differentiate what it feels like to move through your spine versus your hips.
- Lie on your back with your knees bent and feet flat on the floor. Keep your arms by your sides on the ground.
- Drive your heels into the floor, squeeze your butt tight and lift your hips up into a bridge. Avoid hyperextending your hips or lower back at the top of the bridge. When viewed from the side, your body should form a straight line from your shoulders to your hips to your knees.
- Hold the bridge for 1 to 3 seconds before lowering your hips back to the floor.
- Next, get into a tabletop position with your hands directly under your shoulders and your knees under your hips.
- Initiate the movement by rounding your spine. Imagine that someone is pulling the middle of your back up toward the ceiling with a string. Look down and think about reaching your hands through the ground. Think about forming an upside-down “U” with your body.
- Then, slowly move into the arched position. Look up and try to pull your stomach toward the floor. This time, imagine that you are trying to form a “U” with your body.
- Move back and forth between a rounded and arched spine, trying to get as much range of motion in each position as possible.
6. Broomstick Hip Hinge
Using a PVC pipe or broomstick can help you prevent rounding your back while you hinge and strengthen your coordination, Ray says.
Make sure to keep the broomstick in one straight line from the back of your head to the space between your shoulder blades and down to your tailbone, and avoid moving it from these three points while hinging, Juster adds.
- Stand with your feet shoulder-width apart and hold a broomstick or PVC pipe vertically along your spine. The broomstick should touch the back of your head, the space between your shoulder blades and your tailbone.
- Initiate the movement by bending your knees slightly and reaching your hips back behind you. You should feel a stretch in your hamstrings as you reach your hips back. Remember to keep your chest tall. Avoid losing contact with any of the three points on the broomstick.
- Reach your hips back as far as you can without losing contact with the broomstick. Drive your legs into the ground to return to the starting position.