When you have your period, sometimes, the last thing you want to do is move your body. But if you're dealing with symptoms like cramps or an achey back, a few restorative yoga poses might be just the thing to help.
Restorative yoga poses are just what they sound like: more restorative and relaxing than active or "heating" ones. In a class, you'd likely spend the whole time on the floor, probably surrounded by cozy yoga props like blankets and bolsters.
Video of the Day
A growing body of research shows that yoga is an effective way to relieve period cramping and pain, according to a March 2019 meta-analysis in Complementary Therapies in Clinical Practice. Not to mention, it may even help improve your mood, according to Harvard Health Publishing.
The good news is, you don't have to work up a sweat to reap the benefits of yoga during your period. The poses below are meant to be relaxing, so put on some loose, comfy clothing, grab a small blanket or towel (or a few) and some pillows, and roll out your mat.
Tip
Feeling the floor underneath you often has a grounding effect during a yoga practice. That said, you can also practice any of these postures in bed if it’s more comfortable. The important thing here is prioritizing comfort.
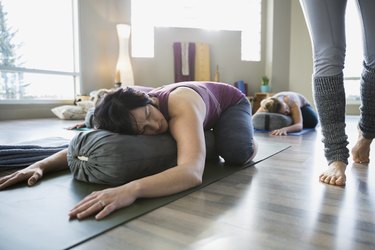
1. Supported Child’s Pose (Balasana)
Child's pose is a forward-folding posture, which is said to be more introspective and rejuvenating during times of stress. In this variation of the pose, you'll take your knees wide to encourage a gentle opening through your hips, and you'll place a pillow or bolster under you chest for a bit of comfort and extra support.
- Begin on all fours, taking your knees out wide (maybe as wide as your mat, if you’re using one and it feels comfortable).
- Sit back on your heels and place your pillow or bolster longways in front of you, drawing it between your knees.
- Take a deep inhale, filling up your entire lower belly and rib cage while keeping your shoulders relaxed and down.
- On your exhale, slowly lower your chest so it comes to rest on the pillow or bolster. Don’t worry if your butt is no longer touching your heels. As you breathe in the pose, your lower back will open up and create more length in your spine.
- Rest your arms down by your sides with your palms facing up next to your ankles or feet.
- Turn your head so one ear is resting on the pillow, and take 5 to 10 deep, full breaths.
- Gently use your hands to push yourself back up, then perform the posture again, this time with the opposite ear on the bolster or pillow.
2. Seated Head-to-Knee Pose (Janu Sirsasana)
Another forward-folding posture, you'll feel this one in your hamstrings, outer hips and lower back (all areas that may be looking for some attention during your period).
Remember when practicing this pose that the goal is not actually to get your head to your knee. Focus on the deep sensations in your legs, hips and back and breathe into them, without a goal of getting anywhere but to a place where your body feels relaxed and comfortable.
It may be helpful to place a pillow (or two) or a bolster on top of your knee to rest on.
- Begin seated with your legs out wide. Bend your right knee and bring your right foot in toward your groin.
- Inhale and stretch the crown of your head up toward the ceiling as you gently press your tailbone down to lengthen your entire spine.
- Turn to face your left leg, maybe pressing your fingertips into the ground to create even more length.
- On your exhale, lower your chest down as far as it will go. Use your hands to grab hold of your leg, ankle or foot for an added gentle stretch.
- Breathe deeply into the stretch for 5 to 10 full breath cycles. On your inhales, think about breathing space into your outer hips, hamstring and spine. On your exhales, see if you can reach your chest further forward (not down) toward your foot.
- Gently return to your starting position by lifting your chest, stretching your right leg out so you’re back in your wide-legged stance.
- Take a few breaths, then perform on the other side.
Tip
Do not pull yourself forward with your hands. If you are holding your breath or it feels choppy, it’s likely you’ve gone too far.
3. Pigeon Pose (Eka Pada Rajakapotasana)
Pigeon pose is a deep hip opener and will likely stir up a lot of sensation during your period. It works to compress the front of your hip flexors (encouraging fresh blood flow there after the pose is over) and opens up the muscles in your outer hips, glutes and lower back, which may feel particularly tight.
If pigeon pose isn't accessible to you and you know there's no way for you to get into it with a sense of ease or comfort, you can lie on your back and take a figure four stretch instead (you'll be stretching the same muscle groups, just in a gentler way).
- You can begin in downward dog or on all fours.
- Extend your left leg out long behind you.
- Then, bend your left knee and bring it up toward your left wrist. Lower your hip, shin and ankle to the ground.
- Square your hips (imagine that your hip bones have headlights and you’re trying to shine them both forward), and if your left hip is lifted, slip a pillow or block underneath it for some more support.
- Sit up tall, pressing your fingertips into the ground and extending the crown of your head up toward the ceiling.
- Lift your sternum and chest, keeping your shoulders down and back. Then, fold down over your left shin. You can place your hands or forearms under your forehead for support.
- Take 5 to 10 deep breaths into your lower back and hips. Feel the expansion on your inhales and see if you notice the little pockets of space being created as you exhale.
- To come out of the pose, inhale and use your hands to press yourself back up, then gently bring your left knee back to meet your right and take your downward dog or all fours position.
- Do it all again on the other side.
4. Supine Twist
Twisting postures indeed twist your spine, encouraging blood flow to a few key areas. This one in particular targets your lower back and abdomen, and will also release those tight areas in your outer hips, glutes and thighs with a gentle opening in your chest and shoulders, too.
- Lie flat on your back with your knees up and feet planted on the ground.
- Extend your right leg out long and rest it down.
- Inhale and pull your left knee into your chest.
- As you exhale, use your right hand to draw your left knee across your body down toward your right side. Keep both your shoulders on the floor.
- Your knee may touch the ground beside you, or it may not. Place your right hand on the outside of your left knee to add a little pressure and assist the stretch (don’t yank or push your knee down).
- Breathe deeply into your lower belly and rib cage. On your inhales, expand through your chest and see if you notice any space opening in your hips and lower back. On your exhale, see if you notice your left knee getting closer to the ground (or sinking more deeply into the ground).
- To come out of the pose, use your hands to bring your left knee back to center, then extend it long onto the ground.
- Then, draw your right knee in and perform the twist on the other side.
5. Reclined Cobbler's Pose (Supta Baddha Konasana)
In this pose, as your knees fall out to the sides and your heels touch, you'll feel an opening through your inner thighs and groin all the way up into your pelvis. It also help relax your lower back.
If you want to, stack two firm pillows or a bolster underneath your upper back to relax onto, which will gently open up your shoulders and chest. When people experiencing cramps, they have a tendency to hunch forward, leading to tightness in these areas.
- Lie on your back (either flat or with a bolster or pillows supporting your upper body) with your knees up and feet planted on the ground near your butt.
- Draw the bottoms of your feet together and slowly allow your knees to fall out to the sides away from each other (imagine you’re opening a book). Add support under your knees if needed.
- Take your arms out beside you to a T or cactus shape for a shoulder opener.
- Breathe deeply into your lower belly and rib cage for 5 to 10 breath cycles.
Tip
If it feels like too much to let your knees hang at your sides, place two pillows or blocks underneath them for more support.
Was this article helpful?
150 Characters Max
0/150
Thank you for sharing!
Thank you for your feedback!