The sun salutation — or Surya Namaskar — is a common and popular yoga sequence and the foundation of the Vinyasa yoga practice. Sun salutations are often used as a warm up at the beginning of yoga classes, but they can also be practiced as a daily discipline all by themselves.
Despite their popularity, sun salutations can be hard to do depending on factors like limited mobility, strength and flexibility.
Video of the Day
However, one of the best things about yoga is that it can be adapted to the individual so that anyone can reap its benefits. Here are eight modifications for customizing the sun salutation for your body and unique practice.
A Quick Note About Breathing
In Vinyasa yoga, the invitation is to synchronize your breath with your movement as you “flow” from one posture to another. Sometimes it can be hard to keep pace in group classes, where the expectation is for everyone to move and breathe in unison.
Even if you’re in a group class, try going at your own, slow and mindful pace instead. If you need to take more than one breath to complete a particular movement, do that. Over time, you may build the stamina and lung capacity to keep pace in a Vinyasa class. However, your priority should always be for you to maintain your connection to your breath.
Mountain Pose Modifications
Equal Standing Pose (Samastitihi)
"Bring your big toes together and leave a little space between your heels."
This is a common alignment cue for mountain pose (Tadasana). The problem is that bringing your feet so close together can feel like a balance challenge. If standing with your feet together makes it hard for you to feel stable in mountain pose, try the equal standing pose (Samastitihi) with your feet hip-width apart.
- Start standing with your feet about hip-width apart.
- Lift and spread your toes, then place them lightly back on your mat.
- Keep a soft bend in your knees while pressing through your feet, firming through your legs and lengthening through the crown of your head.
- Press your palms together at your heart.
- Allow your shoulders to relax naturally away from your ears and down your back.
Upward Salute (Urdhva Hastasana)
Sometimes called mountain or extended mountain, upward salute (Urdhva Hastasana) is the classical name for mountain pose with your arms extended overhead.
The typical cues for lifting your arms is to circle sweep them around and up. It might seem like a simple movement, but lifting the arms can be challenging for people with limited shoulder mobility due to injury, impingement or even over-developed muscles.
If circle sweeping your arms causes you pain or discomfort in your shoulders, try starting in equal standing pose (demonstrated above) with your hands at your heart and reaching straight up.
- Start standing with your feet about hip-width apart and your palms pressed together at your heart.
- Keep a soft bend in your knees while pressing through your feet, firming through your legs and lengthening the crown of your head upward.
- Inhale to reach your arms straight up over your head. You can keep your hands together or open your arms so your biceps frame your ears.
- Allow your shoulders to relax away from your ears; this might mean taking your arms a little wider apart.
- Keep your gaze neutral or look up between your hands.
Forward Fold Modifications
Forward Fold (Uttanasana) With Bent Knees
You can touch your toes if you bend your knees. However, many people think they have to "lock" or hyperextend their knees when they fold forward. This is usually fine for people with lots of hamstring flexibility. For everyone else, though, locking the knees in the standing forward fold can result in dangling in space with a rounded back — which can cause strain on the lumbar spine.
Bending your knees a little releases your hamstrings so your pelvis can move, and it gives you more access to the fold with neutral spinal alignment.
- Start in upward salute (demonstrated above) with your feet pressing firmly into your foundation and your arms reaching overhead.
- Exhale to fold your torso over your thighs, bending your knees a little along the way.
- Relax your head at the bottom, press into your feet and extend your legs as much as you can while maintaining the torso-to-thigh connection.
- You can place your hands on yoga blocks, the floor or your feet, or you can wrap your arms around your legs — whatever is most accessible for you.
Vinyasa Flow Modifications
The Vinyasa flow is a three-pose sequence that includes high-to-low plank (Chaturanga Dandasana), upward dog (Urdhva Mukha Svanasana) and downward dog (Adho Mukha Svanasana). This sequence often serves as a transition space in the sun salute and helps build strength and heat in your body.
While it can feel exhilarating and powerful, this sequence isn't so accessible for those with injury or limited mobility in their wrists, shoulders and back. If this is the case for you, there are some options for adapting this flow for your body.
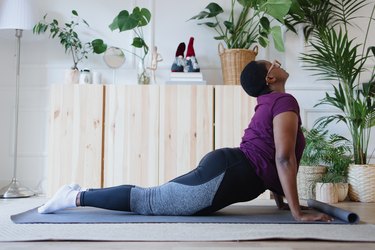
Diagonal Chaturanga to Cobra Pose (Bhujangasana) to Downward Dog (Adho Mukha Shvanasana)
The easiest way to make a plank more accessible is to lower your knees to the ground, and the easiest way to make backbends, like cobra pose, accessible is to reduce the amount you extend your back. In this Vinyasa flow variation, you'll do both while still building strength in your upper body.
- Start from a half-lift position with your feet about hip-width apart, a soft bend in your knees and your hands on your shins.
- Exhale to place your hands on your mat, then step back and lower your knees, pelvis, belly and chest (in that order) to the floor.
- Slide your hands forward so your elbows are under your shoulders. Inhale to lift your chest away from the floor while pressing the tops of your feet and your pubic bone down into the mat.
- Exhale to lower your chest, slide your hands back under your shoulders and press back through tabletop position to downward dog by curling your toes under and pressing through your hands and toes to lift your knees away from the mat or floor. Extend your arms while lifting your hips up and back. Your body should form an inverted “V.”
Tabletop Pose (Bharmanasana) to Cat-Cow Pose (Marjaryasana-Bitilasana) to Puppy Pose (Uttana Shishosana)
This variation is ideal for those who would prefer an even gentler backbend and to skip the high-to-low plank altogether. It provides all the benefits of spinal mobility poses but with the support of your knees. It's also good place to practice bearing weight on your arms.
- Start from a half-lift position with your feet about hip-width apart and your hands on your shins.
- Exhale to place your hands on your mat and step your feet back to a tabletop position with your knees under your hips and your toes tucked under.
- Inhale as you release one segment of your spine at a time, starting at your tailbone, relaxing through the lumbar spine, thoracic spine (mid-back) and finally, your cervical spine, as you lift your chin upward into full flexion. Let your belly go soft toward the floor, draw your shoulders back and your chest forward.
- Lift your gaze upward as is comfortable and natural for your neck.
- Exhale to engage your low belly and find a neutral spine; walk your hands forward until your arms are extended in front of you, allowing your chest to lower toward the floor.
- Keep your palms flat on the mat and actively press into your hands, maintaining an elevated position of your elbows from the floor.
- Look down toward the floor, keeping your neck in line with the rest of your spine and your hips stacked over your knees.
Step Forward to Low Lunge Modification
It's not easy for everyone to step forward into a lunge from a downward dog. Many people find their foot gets stuck in the middle of their mat rather than actually making it to the top of their mat and between their hands, as is usually the cue.
The fix for this is to lower your opposite knee and move that foot more forward so your ankle is under your knee. Alternately, you can start from tabletop position and move into your lunge from there.
- Start in tabletop position on your hands and knees with your wrists under your shoulders and your knees under your hips.
- Shift your weight slightly into your left hand as you step your right foot toward your right wrist.
- If your knee extends beyond your toes, move your foot forward until your ankle is under your knee. Feel free to help your foot forward using your hand.
- Frame your front foot with your hands.
Crescent Lunge (Anjaneyasana) Modification
In the traditional sun salutation, you'd move to warrior I pose (Virabhadrasana I) from your low lunge. The standard cues for getting there are to release your back heel, turn your toes to a 45- degree angle, lift your torso and square your hips to the front of your mat. Here's the problem: If your toes are at a 45-degree angle and you turn your hips forward, you're basically forcing your knee into a twist. And your knees are a hinge joint, not meant for twisting.
Certified yoga teacher Sadie Nardini, E-RYT 500, who created Core Strength Vinyasa Yoga, recommends keeping your hips open a bit and only turning to square your chest forward.
Alternatively, you can skip the knee-compromising warrior I altogether and try this crescent lunge variation instead.
- Start from a low lunge with your right foot forward and your hands framing your front foot.
- Bend your left knee and shift your weight back so it’s evenly distributed through your feet and you find your center of gravity.
- From this centered place, inhale to lift your torso and extend your arms upward. Extend your back leg as much as you can while keeping your pelvis in vertical alignment.
- Keep your gaze neutral or look up between your hands.
Hopping to the Top of Your Mat Modification
Hopping to the top of your mat is basically a prep for a handstand and floating your feet between your hands. It's an amazing feat of athleticism that requires developing a lot of shoulder stability, upper-body strength, hamstring flexibility and gymnastic-levels of coordination.
Sure, there are benefits to that kind of practice. But for a gentler, more accessible way to travel to the top of your mat, try walking your feet underneath you. This variation also helps develop some of the strength and stability you'll need if you want to practice other arm-support poses.
- Start in tabletop position on your hands and knees with your wrists under your shoulders and your knees under your hips.
- Exhale to engage your low belly, then press into your hands and toes to lift your knees an inch or so off of your mat.
- Walk your feet forward and under your hips. Allow your hands to lift away from your mat naturally as you find your forward fold.