Downward dog — or Adho Mukha Svanasana in Sanskrit — originated from the classical sun salutation, "Surya Namaskar," which is part of the Ashtanga yoga lineage codified and popularized by K. Pattabi Jois. This sun salutation is the basis for the modern Vinyasa practice, where you "flow" through a series of choreographed poses with synchronized breaths.
Downward dog is often considered a resting pose because it's the pose in a Vinyasa sequence where you stop moving for a moment and just breathe. Because of its connection to Vinyasa — one of the most popular styles of yoga — downward dog is one of the most common and foundational poses in most yoga classes.
Video of the Day
Whether or not downward dog is a resting pose is up for debate. It is, however, a pose that is accessible and familiar to many and offers a bit of a challenge. It's also a home-base posture that shifts your focus and requires you to support yourself while bearing your weight in your upper body.
Read on to learn more about downward dog, how to do it, benefits and variations.
- What is downward dog? It's common yoga pose where you turn your body into an inverted "V" using your upper body to support your weight. According toYoga Anatomy authors Leslie Kaminoff and Amy Matthews, downward dog is classified as a "symmetrical inverted arm support pose." The position of having your head below your heart is what makes downward dog an inversion, and supporting your body with both your arms and legs on the ground makes it a good way for beginners to prep for other arm-support poses.
Who can do downward dog? While it can be challenging, downward dog is a fairly accessible pose that most people can do, even if they're new to yoga. However, the pose is most accessible for people with healthy wrists and shoulders and flexible hamstrings. There are many variations and modifications to help make downward dog easier for those with limited mobility. - What muscles does downward dog work? Downward dog strengthens your arms, shoulders and upper back. Some of the muscles recruited to support you in downward dog include: serratus anterior, rotator cuff, deltoids, biceps, triceps, as well as various muscles in your hands and feet. Some of the muscles that might feel stretched include: hamstrings, calves, latissimus dorsi and deltoids.
- How long should you hold downward dog? There is no set duration for holding downward dog. If you're incorporating downward dog in your practice as part of a Vinyasa-style flow, holding the pose for 3 to 5 breaths should be sufficient.
How to Do Downward Dog With Proper Form
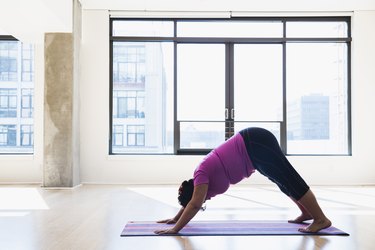
- Start from a tabletop position on your hands and knees with your wrists under your shoulders and your knees under your hips.
- Curl your toes under and press through your hands and toes to lift your knees away from the mat or floor.
- Extend your arms while lifting your hips up and back. Your body should form an inverted “V.”
- Let your head relax naturally toward the ground.
- Keep your knees soft to avoid shifting your weight too far forward.
- Distribute your weight as evenly as possible between your hands and feet.
- Prioritize finding length and extension in your spine over pressing your heels to the floor or straightening your knees all the way.
Downward Dog Benefits
Inversions increase your heart rate, boosts your metabolism and improves circulation. But there are also more subtle benefits to downward dog. Like all inversions downward dog is a mental and physical shift in perspective that challenges your balance, stability, coordination and focus.
It's typically not much of a challenge for most people to find stability and ease when standing upright in mountain pose (Tadasana). So, how is stability possible while upside down, folded in half and supporting your weight with only your upper body?
The answer:You can find stability and ease in any yoga pose one breath at a time. In this way, downward dog builds resilience through the challenge of maintaining your calm while doing the seemingly impossible.
Storme Sundberg, Phoenix-based yoga teacher with more than 20 years of experience, says the the exploration of this paradox is the primary benefit of downward dog — and practicing yoga in general. She recommends asking yourself these questions upon each return to downward dog:
- Where is the strength and where is the resistance?
- How can I give myself grace in this moment?
- How does my downward dog evolve throughout the session?
4 Downward Dog Form Tips
Downward dog requires stretching yourself in all directions while pressing down and lifting up at the same time. Here are a few tips for finding the physical alignment in your body,
1. Think About Standing Upright
Sundberg notes that establishing good alignment is key to maintaining healthy joints for a lifelong practice.
"The clearest way for me to do this is to find the alignment points from Tadasana and apply them in all poses," she tells LIVESTRONG.com. "When I'm upright, it's not so challenging to maintain good form. When I fold myself in half and stretch myself in eight directions, it's a little less straightforward."
What's the secret? Ground into your foundation, hug into your midline, lift and lengthen your spine and breathe.
2. Don't Hyperextend Your Joints
The instinct for many people when trying to support themselves in challenging yoga postures is to "lock" or hyperextend their joints. Locking your joints is easy and creates stability without recruiting any of the musculature around the joints, according to Kaminoff. While it creates stability, locking and stacking your joints also makes them less mobile, which can result in poor alignment. For example, locking your knees in downward dog often results in people pitching their weight too far forward, making it near impossible to press the weight back and extend fully through the arms.
Soft joints facilitate muscular stability while still allowing the joints to be mobile, so you can find extension and build strength in the upper body. The bear crawl is a good exercise for playing with this duality of soft joints supported by muscular stability. Bear crawls also warm up your arms in preparation for downward dog.
3. Settle into Your Center of Gravity
Just because downward dog is an arm-support pose doesn't mean all your weight should be in your upper body. Your feet are still part of your support and the pose is both more sustainable and accessible when you distribute your weight evenly into your foundation.
Play with bending your knees and shifting your weight around to find your center. Lengthen your knees from this centered place and notice if and where you move out of alignment, then back off just enough to reconnect to your center of gravity. You'll be working hard but you might also find yourself feeling light and strong.
4. Find Spinal Extension
In addition to being an inverted arm-support pose, downward dog is a backbend because of the extension through your upper back. If you experience tightness in your upper-middle back — the thoracic spine — you might find it especially hard to extend your arms and find spinal extension.
Warming up with a bit of breathing in cat-cow pose (Bitilasana Marjaryasana) or cobra pose (Bhujangasana) variations can help prepare your upper body for the backbend. If your hamstrings are tight, bending your knees will create space for even distribution of your weight so you can extend your arms and spine.
3 Ways to Make Downward Dog Easier
Bearing weight in the upper body is one of the biggest challenges of downward dog — it's not something most people are used to and it can put a lot of pressure on the wrists and shoulders. However, there are a few modifications you can try to relieve some of that pressure.
If you have broader shoulders, try placing your hands wider on your mat to give yourself a more stable base. If your wrists hurt when bearing weight and no amount of adjusting seems to help, try lowering onto your forearms. If you're not into bearing weight in your upper body at all, child's pose (Balasana) is a gentle downward dog alternative.
Here are some other modifications for building strength in your upper body while relieving some of the pressure from your joints.
Tip
There are some general alignment guidelines but every body is unique, and what your body looks like in the pose will be unique to you. Rather than approach downward dog — or any other yoga pose — from a set of rigid anatomical cues, treat your mat like a laboratory and all of your movements like an experiment to find what works for creating a sense of stability and ease for you.
1. Puppy Pose (Uttana Shishosana)
- Start in a tabletop position with your hips over your knees and shoulders over your wrists.
- Engage your abdominals by pulling your belly button in toward your spine and up toward your ribcage. It should be a gentle drawing in, not a full sucking in of your stomach.
- Walk your hands forward until your arms are outstretched in front of you, allowing your chest to lower between your shoulders.
- Keep your palms flat on the mat and actively press into your hands, maintaining an elevated position of your elbows from the floor.
- Look down toward the floor, keeping your neck in line with the rest of your spine and making sure your hips have remained stacked over your knees.
2. Downward Dog With Chair
- Start facing your chair, standing in mountain pose (Tadasana) with your arms by your sides.
- Place your hands on the seat at least shoulder-width apart.
- Take a step back so that both feet are under your hips about hip-width apart, your arms are fully extended and your chest lowers toward the floor.
- Press your hands down into the seat.
- Keep your knees a little soft, but press down into your feet while lifting your hips up and back.
3. Downward Dog Against Wall
- Start facing the wall, standing in mountain pose (Tadasana) with your arms by your sides.
- Place your hands on the wall about shoulder-width apart (wider if you have broader shoulders).
- Take a step back so that both feet are under your hips, your arms are fully extended and your chest lowers toward the floor.
- Keep your knees a little soft, but press down into your feet while lifting your hips up and back.
2 Ways to Make Downward Dog Harder
1. Three-Legged Downward Dog (Eka Pada Adho Mukha Svanasana)
Challenge your balance and core strength even more by lifting one of your legs behind you with this downward dog variation. This variation is also practiced commonly as a space-creating transition from downward dog to a low lunge posture in many Vinyasa-style classes.
- Start from a tabletop position on your hands and knees with your wrists under your shoulders and your knees under your hips.
- Curl your toes under and press through your hands and toes to lift your knees away from the mat or floor.
- Extend your arms while lifting your hips up and back. Your body should form an inverted “V.”
- Let your head relax naturally toward the ground.
- Keep your hips level and lift one leg up and back behind you.
- Think about creating one line of energy from your grounded hands through your lifted extended leg.
2. Dolphin Pose (Ardha Pincha Mayurasana)
This downward dog variation helps build strength and flexibility in your shoulder girdle without putting any pressure on your hands or wrists.
- Start from a tabletop position on your hands and knees.
- Lower onto your forearms with your elbows about shoulder-width apart; rest your palms to the floor naturally.
- Curl your toes under and press through your forearms and toes to lift your knees away from the mat or floor.
- Lift your hips up and back and extend through your shoulders.
- Let your head relax naturally toward the ground.
- Play around with alternate hand positions, such as interlacing your fingers, creating a diamond between your index fingers and thumbs or placing a yoga block between your hands as a guide for the approximate width of your hands and shoulders.