While the bones and soft tissues of your back are some of the strongest in your body, push-ups are a body-weight exercise that can cause lower back pain if done incorrectly.
With that being said, it's only natural to wonder: Why does my back hurt when I do push-ups?
Video of the Day
Here are three reasons you might experience back pain when performing push-ups — plus how to fix it.
1. You're Using Improper Form
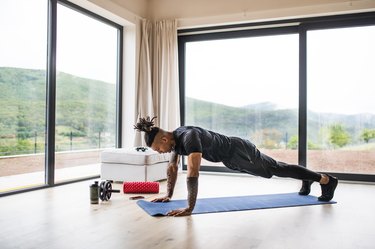
When done correctly, push-ups primarily work your chest, triceps and shoulders, which are all upper-body muscles. But can push-ups hurt your back?
One way you can develop lower back pain from doing push-ups is by using improper form, according to the Spine Institute of North America. More specifically, you may be letting your hips sag when lowering yourself down to the ground, which puts pressure on your spine and can cause lower back pain to flare up, per the Spine Institute of North America.
To prevent sagging hips during the down phase of a push-up, keep your abs and quads engaged as you lower yourself to the floor.
How to Do a Push-Up With Correct Form
- Position yourself on your hands and knees, hands under shoulders and knees under hips.
- Step your feet back and straighten your legs so that you're balanced on your palms and toes.
- Check your body and hand position: Your body should make a straight line from head to hips to heels, and your hands should be directly under your shoulders or slightly wider apart.
- Bend your elbows at a 45-degree angle to your body and lower your body to the floor.
- Make sure to keep your body in one straight line from the neck through the spine to the hips and down to the heels.
- Press into your palms and push the floor away from you to come back up to a high plank, still keeping your body in one straight line.
Tip
Doing knee push-ups or incline push-ups will put less pressure on your back.
2. You Have a Weak Core
While the push-up mainly targets your chest, triceps and shoulders, it's also a core exercise, according to the American Council on Exercise (ACE). Weak core muscles are major contributors to sagging hips during push-ups.
By strengthening your core, you'll not only improve your performance with push-ups, but you'll also keep your spine more stable throughout the day. This will help reduce the risk of lower back pain altogether.
This is because your core muscles include more than just your abdominals, according to Cary Orthopaedics. Your back muscles (along with your hip, glute and pelvic muscles) are part of your core, and the stronger they are, the more support your spine has.
Core Exercises to Improve Strength and Prevent Back Pain
Add the following moves to your exercise routine to strengthen your core, per Cary Orthopaedics.
1. Forearm Plank
- Lie face down with your forearms on the floor and your elbows directly beneath your shoulders. Keep your feet flexed with the bottoms of your toes on the floor.
- Keep your forearms parallel to each other and don't clasp your hands in front of you. Doing so puts your shoulders in a potentially vulnerable position.
- Press into your forearms and rise up on your toes so that only your forearms and toes touch the floor. Your body should hover a few inches off the floor in a straight line from shoulders to feet.
- Draw your navel toward your spine and tighten your glutes.
- Look at the floor to keep your head in a neutral alignment, and breathe normally.
- Hold for at least 10 seconds before lowering yourself to the floor.
2. Side Plank
- Lie on your right side with your feet stacked and your right elbow under your right shoulder, forearm along the floor.
- Press through your right forearm and lift your body up so that you're balancing on your right forearm and foot.
- Put your left hand on your hip or extend it toward the ceiling.
- Hold for at least 10 seconds before lowering yourself to the floor.
- Repeat on the other side.
3. Bird Dog
- Get on your hands and knees with your hands directly in line with your shoulder and knees in line with your hips.
- Look down at the floor and brace your core (tucking your tailbone just slightly) to create a straight line from the tip of your head to your tailbone.
- On an exhale, reach your left arm straight out in front of you until your upper arm is in line with your ear.
- Simultaneously reach your right leg straight behind you, fully extending your knee.
- Pause here for a moment.
- Reverse the motion and return to the starting position.
- Switch sides, reaching your right arm forward and raising your left leg back.
- Pause and then go back to the starting position.
4. Dead Bug
- Lie flat on your back with both arms reaching straight toward the ceiling.
- Lift your feet off the ground so your legs are bent at a 90-degree angle.
- Keep your lower back in contact with the floor through the entire duration of the exercise.
- Slowly and with control, extend your right arm and left leg away from each other.
- Lower your limbs as far as you can while keeping your lower back on the ground. Fight the impulse to arch your back by tightening your abs, pressing your bellybutton down to anchor your lower back to the floor.
- Exhale as you return your right arm and left leg to the starting position with the same slow, controlled movement.
- Repeat with your left arm and right leg, then return to center again. This counts as 1 rep.
5. Glute Bridge
- Lie on your back with your arms resting by your sides, knees bent and feet flat on the ground hip-width apart. Your feet should be close enough to your hips that if you reach one hand at a time toward each heel, you can just touch it with your fingertips.
- Relax your arms alongside your body. Think of your shoulders being "glued" to the floor to help keep your spine neutral.
- Squeeze your glutes and core, and press your heels into the ground to drive your hips up toward the ceiling until you form a diagonal line from knees to hips to chest. Resist the urge to arch your lower back as you raise your hips. Focus on keeping your spine in a neutral position throughout.
- Hold this position for a few seconds with your glutes engaged.
- Slowly lower your hips back down to the ground and reset in the starting position for a second before lifting back up.
6. Glute Bridge March
- Lie on your back with your arms resting by your sides, knees bent and feet flat on the ground hip-width apart. Your feet should be close enough to your hips that if you reach one hand at a time toward each heel, you can just touch it with your fingertips.
- Relax your arms alongside your body. Think of your shoulders being "glued" to the floor to help keep your spine neutral.
- Squeeze your glutes and core, and press your heels into the ground to drive your hips up toward the ceiling until you form a diagonal line from knees to hips to chest. Resist the urge to arch your lower back as you raise your hips. Focus on keeping your spine in a neutral position throughout.
- Lift your left foot off the ground, about 6 inches off the mat, while keeping your hips raised.
- Bring your left foot back down to the ground.
- Lift your right foot off the ground, about 6 inches off the mat, while keeping your hips raised.
- Bring your right foot back down to the ground.
- Continue alternating legs.
3. You're Doing Certain Push-Up Variations
You may experience lower back pain with push-up variations that increase activation in this area, per the Spine Institute of North America.
These variations include forward push-ups, where you place your hands around 8 inches in front of your shoulders, and backward push-ups, where you place your hands about 8 inches behind your shoulders.
If you've noticed back pain during or after performing these variations, you may want to take a break from them and chat with a personal trainer or physical therapist to narrow down the cause of your lower back pain.