You don't need a fully-equipped home gym to build strength or spike your heart rate. Whatever your fitness goal, body-weight training can help you reach it.
"Body-weight exercises can improve mobility and stability and increase muscle mass, strength, power, speed and cardiovascular performance," Grayson Wickham, DPT, CSCS, a physical therapist, strength and conditioning specialist and founder of Movement Vault, tells LIVESTRONG.com.
Video of the Day
With calisthenics, the greatest benefits come from compound body-weight exercises. Working multiple muscle groups and joints at once, these functional exercises improve how you move through day-to-day activities, he says.
And while you think they might just be for strength-training beginners, body-weight moves can be some of the hardest moves out there. Case in point: plyometric push-ups.
Convinced? No matter your fitness level, you're guaranteed to find something you love among these 50 best body-weight exercises. Do them at home, the gym, the park, wherever!
Best Body-Weight-Exercises for Your Chest and Triceps
1. Push-Up
- Position yourself on your hands and knees.
- Step your feet back and straighten your legs so that you're balanced on your palms and toes.
- Check your body and hand position: Your body should make a straight line from head to hips to heels, and your hands should be directly under your shoulders or slightly wider apart.
- From a high plank, bend your elbows at a 45-degree angle to your body and lower your chest toward the floor. Make sure to keep the body in one straight line.
- Pause, then press into your palms and push the floor away from you to come back up to a high plank.
Tip
Every body-weight chest workout can benefit from a push-up.
To get the most from your reps, think about the push-up as a moving plank: “Your entire body should stay in a perfectly straight line,” Wickham says. Don’t stick your hips up in the air or arch your lower back.
2. Close-Grip Push-Up
- Position yourself on your hands and knees. Position your hands together, thumbs and forefingers touching to form a diamond.
- Step your feet back and straighten your legs so that you're balanced on your palms and toes.
- Check your body and hand position: Your body should make a straight line from head to hips to heels, and your hands should be directly under your shoulders or slightly wider apart.
- From a high plank, bend your elbows at a 45-degree angle to your body and lower your chest to the floor. Make sure to keep the body in one straight line.
- Pause, then press into your palms and push the floor away from you to come back up to a high plank.
Tip
This push-up variation is an awesome body-weight arm exercise. “The key is to keep your elbows close to your rib cage the entire time” and focus on slow, controlled movements as you lower your chest to the floor, Wickham says.
3. Commando
- Start in a high plank, with your core braced and back straight. Your hands should be shoulder-width apart and directly below your shoulders.
- Lower your right forearm to the floor. Repeat with your left arm.
- Straighten your right arm to place your palm in the starting position. Repeat with your left arm.
- Rotate going up and down between a high and low plank, keeping your mid-section from twisting during the switch.
4. Divebomber Push-Up
- Start in down dog with your hips in the air and knees and elbows straight.
- Bend your elbows and lower your body slowly, leading with your head.
- Before your forehead hits the floor, start to lift your head up and drop your hips.
- Move forward and simultaneously straighten your elbows, ending in up dog.
- Reverse the movement back to down dog.
How Many Push-Ups Should You Do Each Day?
That mainly depends on your personal fitness goals. If you're looking to build strength, you want to gradually add more reps or variations (a process called progressive overload). If you want to build muscular endurance, higher rep ranges are best (more than 10).
But you certainly don't need to do push-ups each day and it may even lead to injuries down the line. Instead of doing one exercise every day, vary your movements to build more total-body strength.
5. Pike Push-Up
- Start in a high plank with your hands in line with your shoulders and your body in a straight line.
- Lift your hips toward the ceiling, lower your head and straighten your elbows. Walk your feet in a little bit if needed. You should be in an upside-down V shape.
- Bend your arms to lower the top of your head toward the floor.
- Press back up until your elbows are straight.
Tip
This compound body-weight exercise is ideal for working up to traditional push-ups. The more you walk your hands toward your feet, the more challenging the exercise will be on your shoulders, Wickham says.
6. Decline Push-Up
- Get into the top of a push-up position with your hands shoulder-width apart. Place your toes on an elevated surface behind you.
- Brace your core so you form a straight line from your heels to your shoulders.
- Bend your elbows at a 45-degree angle and lower your chest to almost touch the floor.
- Pause, then extend your arms to return to the starting position.
Tip
Try this body-weight chest exercise only once you've mastered traditional, feet-on-the-floor push-ups.
7. Plyo Push-Up on Bench
- Start in regular push-up position with your hands on a bench, body in a straight line from head to hips to heels.
- Lower down, then powerfully push up off of the bench releasing your hands from the bench.
- Land with slightly bent elbows and go straight into your next rep.
Tip
For the best results, do this movement near the beginning of your body-weight chest workout, right after your warm-up. That way, you will have plenty of power in the tank to do the explosive compound exercise with good form.
8. Diamond Push-Up
- Start in a high plank position, then move one hand forward a few inches.
- Bend your elbows to lower your chest to the floor, keeping your hips level.
- Press back up.
- Do all reps on one side, then switch. Or, if you want, alternate sides with each rep.
Best Body-Weight Exercises for Your Back and Biceps
9. Chin-Up
- Reach up and grab the bar with an underhand grip, your hands about shoulder-width apart. Your palms should face you. Brace your core and glutes.
- Squeeze your shoulder blades down and together, then pull through your arms to lift yourself up until your chin is above the bar.
- Pause, then slowly lower yourself back down to the starting position.
Tip
The difference between a pull-up and a chin-up is your grip position: With a pull-up, your palms face away from you. With a chin-up, your palms face toward you, Wickham explains. “This seems like a small detail, but this changes the position of your shoulders" and which back and biceps muscles you emphasize.
Because they involve holding the bar with an underhand grip, chin-ups act similarly to body-weight curls, working your biceps and forearms to a higher degree than pull-ups.
10. Pull-Up
- Reach up and grab a pull-up bar with an overhand grip, hands a little wider than shoulder-width apart. Your palms should face away from you. Brace your core and glutes.
- Squeeze your shoulder blades down and together, then pull through your arms to lift yourself up until your chin is level with the bar.
- Pause, then slowly lower yourself back down to the starting position.
This challenging calisthenics move focuses on your lats. And while still an effective body-weight forearm exercise, it places less stress on the biceps compared with the chin-up.
11. Eccentric (Negative) Pull-Up
- Step up on a bench or stool with a pull-up bar at chest height. Pin your elbows at your sides and grab the bar with an overhand grip, hands a little wider than shoulder-width apart. Your palms should face away from you. Brace your core and glutes.
- With control, slowly lower down on a three count to the bottom of your movement.
- Step back onto the stool and repeat.
Tip
Can't do pull-ups? Negative pull-ups are a great way to work up to them. With them, you focus on the eccentric (or lowering phase) of the exercise. Try lowering over 2 seconds, then build to 3 or even 5.
12. Inverted Row
- Grab a bar or table edge (be sure it’s sturdy) with your hands a little wider than your shoulders.
- Hang underneath the bar or table with your body straight, heels on the floor and arms fully extended.
- Flex your elbows, pulling the chest toward the bar or table with your shoulder blades retracted.
- Pause at the top of the motion, then slowly extended the elbows, returning to the starting position.
13. Superman
- Lie facedown on the floor with your legs together and your arms extended in front of you.
- Keeping your core braced, squeeze your back muscles to lift your arms, chest and legs off of the mat.
- Pause, then lower back down.
14. Prone Swimmer
- Lie facedown on the floor with your legs together and your arms extended in front of you.
- Keeping your core braced, squeeze your back muscles to lift your chest, one arm and the opposite leg off of the mat.
- Pause, then lower back down.
Best Body-Weight Exercises for Your Core
15. High Plank
- Start on your hands and knees with your shoulders stacked above your wrists and your hips directly above your knees.
- Step your right foot back and then your left foot to balance on your hands and toes. Your body should form a'postraight line from the top of your head to your heels. Squeeze your core and glutes to flatten your lower back.
- Hold this position while maintaining a neutral spine.
16. Low Plank
- Lie face down on the floor, with your forearms on the floor, elbows directly beneath your shoulders.
- Extend your legs straight behind you, toes tucked.
- With your core braced, press into your toes and forearms and raise your body up off the ground.
- Keep your back flat and your body in a straight line from head to hips to heels.
17. Mountain Climber
- Get in a high plank with your hands under your shoulders and your body in a straight line from your head to heels. Brace your core.
- Bring your right knee toward your chest.
- Quickly extend your right leg back out while bring your left knee toward your chest.
- Alternate legs as quickly as possible.
18. Side Plank
- Lie on your right side with your right arm bent and your elbow under your shoulder.
- Push through your feet and forearm to raise your hips off the floor so that you form a straight line from feet to shoulders.
- Hold, then switch sides.
Tip
Side planks work your obliques and side glutes, and are a great way train frontal-plane (side-to-side) movement, which a lot of people neglect, Wickham says.
They're also a great prehab exercise to keep your lower back stable and healthy.
19. Reverse Plank
- Sit with legs straight in front of you and place your hands slightly behind you, shoulder-width apart. Your fingers should point away from you body.
- Lift your hips to that your body forms a straight line from your heels to shoulders.
- Look up at the ceiling. Keep your chin off of your chest, but don't let your head fall behind you.
20. Bird Dog
- Get on your hands and knees.
- Squeeze your core to keep your back stable as you reach straight forward with your left arm.
- At the same time, extend your right leg straight back behind you. Both limbs should be parallel to the floor.
- Return to the starting position, then repeat the movement with your right arm and left leg.
Tip
“This demands ultimate stability from head to toe,” so keep your core tight and try not to allow your hips to fall to the floor, Wickham says.
21. Lying Leg Raise
- Lie on your back with your legs straight and arms along your sides. Press your lower back against the floor.
- Without allowing any part of your lower back to lose contact with the floor, slowly raise your legs, keeping them as straight and extended as comfortable.
- Pause, then slowly lower your legs to the floor.
Tip
There are a ton of leg lift variations for your lower abs. Pick the one that feels best to you!
22. Dead Bug
- Lie flat on your back (on the floor or any flat, stable surface) with both arms reaching straight toward the ceiling.
- Lift your feet off of the floor and bend your knees.
- With control, lower one arm and the opposite leg away from each other and toward the floor.
- Lower your limbs as far as you can while keeping the lower back on the floor.
- Exhale as you return your arm and leg to the starting position with the same controlled movement.
- Repeat with the other arm and leg, then return to the center again.
23. Hollow Hold
- Start lying on your back with your legs extended and knees together. Extend your arms overhead.
- Press your lower back into the floor. There should be no room between the floor and your lower back.
- Brace your core, squeeze your inner thighs together and lift your head a few inches off the floor. Arms will extend overhead and behind you and shoulders will be off the floor.
- Keep the knees together and raise your legs a few inches off the floor.
- Hold, making sure your lower back stays in contact with the floor.
24. Hollow Rock
- Lie on your back with your arms and legs extended and your core braced.
- Press your lower back into the floor. There should be no room between the floor and your lower back.
- Lift your arms and legs several inches off the floor until you're in a banana shape.
- Use your core to rock back and forth, keeping your whole body as tight as possible.
25. Bear Crawl
- Get on your hands and knee and brace your core.
- Lift your knees off of the floor and raise your hips toward the ceiling.
- Using your palms and feet, take several steps forward, moving your right hand and foot, then your left hand and foot.
26. Crab Walk
- Sit with your knees bent, feet on the floor and hands behind you.
- Press through your hands and feet to lift your hips until your body forms a straight line from your knees to your mid-back.
- Walk backward by stepping with your right hand and foot, then your left.
Best Body-Weight Exercises for Your Lower Body
27. Elevator Squat
- Stand with feet hip-width apart and brace your core.
- Sit your hips back and bend your knees to lower yourself as far as comfortable.
- Drive through your feet to raise a quarter of the way up.
- Lower yourself again, then come halfway up.
- Lower one more time, then come all of the way up.
Tip
You don't need dumbbells with body-weight squats to make them more challenging. Adding a pause at the bottom of your squat can help increase the difficulty.
28. Plie Squat
- Stand with your feet much wider than hip-distance apart, toes pointed out.
- Push your knees out and your hips back to lower into a squat until your legs form a 90-degree angle (or as low as you can go while maintaining good form).
- Press through your heels and use your hamstrings and inner thighs to raise back up to standing.
29. Bulgarian Split Squat
- Stand facing away from a bench, chair or step. Place one foot on top, the sole of your foot pointing up.
- Lower as far as comfortable or until your front knee is at a 90-degree angle and your back knee almost touches the floor.
- Push through your front foot to return to standing.
30. Jump Squat
- Stand with your feet a bit wider than shoulder-width apart. Brace your core,
- Sit down into a squat, then quickly explode into the air as high as possible. In mid-air, your body should form one straight line.
- Land with your knees slightly bent, then pause before repeating.
Plyometric body-weight exercises like this help you build power to boost your running speed, Wickham says.
31. Star Jump
- Start standing with your feet hip-width apart.
- Lower into a squat, bending the knees to roughly 90 degrees and keeping a flat back.
- Drive through your legs to explode up toward the ceiling.
- Spread your legs and arms away from your body to form a star shape in the air. Use your arms for momentum.
- As you hand, bend your hips and knees to immediately lower into the next rep.
The star jump exercise is a simple tool for getting in your cardio at home.
32. Jumping Jack
- Begin standing with your feet together, arms at your sides.
- Simultaneously jump your legs a few feet apart while sweeping your arms overhead.
- Quickly jump your feet back together, sweeping your arms back down.
- Continue jumping your feet together and apart, sweeping your arms at the same time.
33. Tuck Jump
- Begin with your legs slightly wider than hip-distance apart.
- With a slight bend in your knees, and using your arms for momentum, jump up as high as possible.
- Tuck your knees into your chest while in the air.
- Land lightly on your feet and go straight into your next rep.
34. Frog Jump
- Stand with your legs slightly wider than hip-distance apart, toes pointing slightly outward.
- Push your hips back and lower down into a squat until your thighs are parallel to the floor (or as low as you can go while maintaining good form).
- Tap the floor with your hands.
- Press through your heels to explode into a jump.
- Land softly back in the squat position and repeat.
35. Butt Kick
- Stand with your feet about hip-width apart, arms by your sides.
- Drive your right heel toward your glutes, bringing your left arm in front of you, as if you were running.
- Repeat on the other side, bringing your left heel up and your right arm forward.
- Alternate legs and arms as quickly as possible.
36. Reverse Lunge
- Start standing with your feet together.
- Take a large step backward with your left leg.
- Lower down into a lunge until as far as comfortable. Your left knee should be close to the floor but not touching it.
- Press through your right heel as you step your left foot forward to return to standing.
- Repeat, this time stepping backward with your right leg.
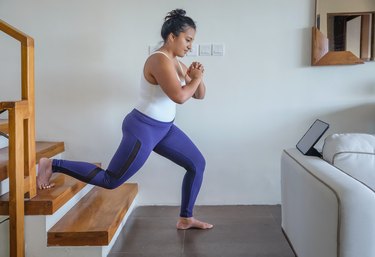
37. Forward Lunge
- Start with your feet together.
- Step forward with your right foot.
- Lower down into a lunge until as far as comfortable. Your left knee should be close to the floor but not touching it.
- Push through your right heel to return to standing.
- Repeat on the other leg.
38. Side Lunge
- Begin standing with your feet together.
- Keeping your left foot planted on the floor, take a big step to the right with your right leg.
- As you plant your right foot, sit your hips back and bend your knee to lower down as far as comfortable.
- Pause, then press through your right heel to step your legs back together.
- Repeat on the opposite leg.
39. Speed Skater
- Stand tall with your feet shoulder-width apart and toes slightly turned out. Keep your hands loose at your sides.
- Hop to the right side, landing with your right foot firmly on the floor and your left foot crossed behind your right leg. Bend over and reach your left hand toward your right foot.
- Hop to the left side and land with your left foot on the floor, crossing your right leg behind your left. Bend over a reach your right hand toward your left foot.
- Continue alternating legs.
40. Glute Bridge
- Lie on the floor with your knees bent, feet close to your hips and arms at your sides.
- Press into your feet and arms to raise your hips until your body forms a straight line from your knees to shoulders. Squeeze your glutes at the top.
- Pause, then lower back down to the floor
Tip
Nail this basic body-weight move before taking on other glute bridge variations.
41. Single-Leg Glute Bridge
- Lie on your back with your arms at your sides, feet flat on the floor and knees bent.
- Raise your left foot off the floor and straighten it. Keep your knees in line with each other. Hold this leg up throughout the exercise. (You can also keep your knee bent if it's more comfortable.)
- Press into your right heel and raise your hips up, squeezing your glutes.
- Reverse the motion and bring the hips back to the floor.
- Perform all your reps, then switch sides.
Tip
When doing single-leg glute bridges, keep your core nice and tight, Wickham says. Make sure your hips stay in line with each other.
42. Glute Bridge March
- Begin in a glute bridge, feet flat, knees bent, hips up.
- Keeping your hips raised and glutes tight, raise and lower one foot, then the other.
- Continue alternating.
43. Feet-Elevated Glute Bridge
- Start lying on your back with a chair, bench or couch a few inches from your feet.
- Place your heels onto the elevated surface.
- On an exhale, squeeze your glutes and lift into a bridge.
- Pause when you reach the top of the movement.
- Lower back to the floor with control.
Benefits of Body-weight Exercises
While weights have their advantages, you can get an effective strength workout using only your body weight. Body-weight exercises are adaptable and easy to modify or progress without any equipment at all, according to the American Council on Exercise (ACE). They're also efficient, considering they require little to no set up and can help improve your movement in day-to-day activities.
Was this article helpful?
150 Characters Max
0/150
Thank you for sharing!
Thank you for your feedback!