The reverse plank is a strength and mobility exercise that helps you build a strong core, legs and back. Reverse planks are the perfect move to help counteract the effects of pressing movements, such as push-ups.
- What is a reverse plank? A reverse plank is a body-weight strength and mobility exercise.
- What is a reverse plank good for? Reverse planks are great for building strength in your core and posterior chain (the muscles on the back of your body). They are also good for stretching muscles on the front side of your upper body.
- What muscles do reverse planks work? Reverse planks build strength in your core muscles, including your abdominals, obliques and erector spinae. They also build strength in muscles on the back side of your body, including your lats, glutes and hamstrings. Upper-body muscles on the front side of your body, such as your pectorals, biceps and anterior deltoids, are stretched when performing reverse planks.
- Do reverse planks burn fat? Reverse planks can aid in building muscle, which makes your body look leaner and more toned. They also help burn calories in the context of an overall workout routine. However, reverse planks cannot help you burn fat in a specific area (also known as spot reduction.) If you want to reduce body fat, your best bet is to increase your overall caloric expenditure and/or decrease your caloric intake.
- Who can do reverse planks? Reverse planks may not be appropriate for beginners. If you're new to the gym, you should first build strength with standard planks, then use the regressions listed below to work your way up to full reverse planks. Talk to your doctor before performing reverse planks if you have a history of hand, wrist, elbow, shoulder or collarbone injuries.
Video of the Day
Reverse Plank vs. Plank
Most people are familiar with the front plank, which is performed with your chest facing down and either your elbows or hands on the floor. Front planks primarily target your abdominals, obliques, glutes and erector spinae. They help you build the functional strength that enables you to perform standard gym exercises — as well as the activities of daily life — with more ease.
However, front planks do a have a few shortcomings. They are not very effective at building strength in your upper back. In order to truly target your lats, which are located in your upper back but are an essential part of your core, you need to progress to more advanced plank variations that involve some type of upper-body movement.
Furthermore, front planks are performed in the same body position as pressing exercises, such as push-ups and bench presses. Too much time spent pressing weights out in front of your body can lead to tightness in your chest, neck and shoulders. Working in front of a computer all day can also exacerbate this problem.
Reverse planks provide an ideal solution to both of these problems, because they effectively target your back and they provide a stretch to counteract the effects of high volumes of pressing. The benefits are similar to those of a front plank along with an extra boost for your back and shoulders.
You can certainly continue using front planks at every stage in your fitness journey. Adding in reverse planks, however, gives you more variety and additional training stimulus that you can't get from front planks alone.
Is a Reverse Plank Harder Than a Plank?
The answer depends on your unique body and your current fitness level. Nevertheless, most people find reverse planks to be more challenging than front planks due to the level of back strength and upper-body mobility required. Treat reverse planks as a harder progression of front planks, and don't rush to try them if you are new to strength training.
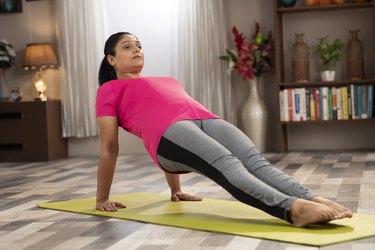
How to Perform a Reverse Plank With Good Form
- Sit on the ground with your legs extended. Place your hands on the ground slightly behind you. Point your fingers toward your feet.
- Drive your heels into the ground and lift your hips up into alignment with your legs and chest. Rest on your heels and palms, fingers spread.
- Your body should form a straight line from shoulders to hips to feet. Your hands should be directly under your shoulders.
- Gaze straight up toward the ceiling. Keep your chin off your chest, but make sure that your head isn’t collapsing toward the floor.
Reverse Plank Benefits
1. They Strengthen Your Core Muscles
Planks of all kinds are a foundational core exercise for good reason: They teach you how to create tension through the middle of your body, which supports and protects you as you lift heavy loads, move explosively or perform technically complex movements.
Reverse planks are very effective at building this type of core strength. Because they are more challenging than front planks, you can use reverse planks to continue getting stronger even after you've been training for some time.
2. They Strengthen Your Posterior Chain
The posterior chain includes all the muscles on the back side of your body. These are the muscles most responsible for good posture as well as producing power. Building a strong posterior chain is mandatory if you want to look, feel and perform at your best.
Unfortunately, many popular gym exercises focus exclusively on the muscles on the front side of your body. If you spend all your time doing biceps curls, bench press and leg extensions, you're likely to neglect posterior chain muscles such as your glutes, hamstrings and lats.
For best results, use reverse planks along with other upper-back, glute and hamstring exercises to build a strong posterior chain that will support you both in and out of the gym.
3. They Stretch Tight Upper-Body Muscles
It's no secret that lots of people love to press and curl heavy weights at the gym. Over time, lots of presses and curls combined with hours spent sitting in front of a computer can lead to tightness in your neck, shoulders, arms and chest.
Reverse planks provide a strong stretch for these commonly tight muscles. This makes them a great exercise to balance out the effects of pressing movements and biceps curls.
4. They Don't Require Any Equipment
Reverse planks are a body-weight exercise you can perform wherever you decide to train. You don't need any equipment to perform them.
People who train at home with minimal (or no) equipment may find it's difficult to effectively target posterior chain muscles, like the upper back and hamstrings. Reverse planks provide a great solution to this problem because they are one of the few truly body-weight movements that target these important muscles.
How to Make the Reverse Plank Easier
Reverse planks are not a beginner exercise. You need a foundation of upper-body and core strength, as well as a certain degree of shoulder and wrist mobility in order to perform reverse planks safely.
It's a good idea to practice front and side planks before adding reverse planks to the mix. When you're ready, use the exercises here as stepping stones to work up to full reverse planks.
1. Bench Reverse Plank
Elevating your hands on a bench, box or other sturdy surface reduces the difficulty of reverse planks because you're supporting less of your body weight. Start with a higher surface and gradually work your way down to the floor as you get stronger.
- Sit on a bench with your legs extended. Place your hands on the edge of the bench. Point your fingers toward your feet.
- Drive your heels into the ground and lift your hips up into alignment with your legs and chest. Rest on your heels and palms, fingers spread.
- Your body should form a straight line from shoulders to hips to feet. Your hands should be directly under your shoulders.
- Gaze straight up toward the ceiling. Keep your chin off your chest, but make sure that your head isn’t collapsing toward the floor.
2. Reverse Batwing Hold
The reverse batwing hold is a body-weight exercise that targets your upper back muscles. It's easier for your lower body than full reverse planks because your legs remain on the ground. But don't underestimate this exercise, as it can still be challenging for your lats and core.
- Lie flat on your back with your legs extended. Bend your elbows and position your forearms perpendicular to the floor. Make a fist with both hands.
- Drive your elbows into the ground and use your back muscles to pull your torso off the ground. This should feel like a rowing motion, as if you are pulling your elbows through the floor.
- In the top position, your torso will be about 45 degrees off the ground. There should be a straight line running from your hips on the ground through your shoulders and to the back of your head.
- Keep your chin slightly tucked and your neck in line with your spine. Keep your chin off your chest, but make sure that your head isn’t collapsing toward the floor.
3. Reverse Plank on Elbows
Performing the reverse plank on your elbows is a great option for anyone who cannot yet perform a full reverse plank due to back strength. The reduced lever arm decreases the demand on your arms and upper back.
- Sit on the ground with your legs extended. Place your elbows on the ground slightly behind you so your forearms are resting on the ground. Point your fingers toward your feet.
- Drive your heels into the ground and lift your hips up into alignment with your legs and chest. Rest on your heels and elbows. Keep your forearms flat on the floor and grab the floor with spread fingers.
- Your body should form a straight line from shoulders to hips to feet. Your elbows should be directly under your shoulders.
- Gaze straight up toward the ceiling. Keep your chin off your chest, but make sure that your head isn’t collapsing toward the floor.
4. Reverse Tabletop
The reverse tabletop is sometimes called a bent-knee reverse plank. It's precisely this bent-knee position that makes the reverse tabletop a little bit easier than the reverse plank. You'll still stretch your upper body, but your lower body and core don't have to work as hard.
- Sit on the ground with your knees bent and feet flat on the floor. Place your hands on the ground slightly behind you. Point your fingers toward your feet.
- Drive your feet into the ground and lift your hips up into alignment with your chest. Rest on your feet and palms, fingers spread.
- Your knees should remain bent so your body forms a tabletop position. Position your feet so your knees form a 90 degree angle when your hips are fully extended. Your hands should be directly under your shoulders.
- Gaze straight up toward the ceiling. Keep your chin off your chest, but make sure that your head isn’t collapsing toward the floor.
How to Make the Reverse Plank Harder
Once you can hold a standard reverse plank for 30 to 60 seconds, experiment with harder progressions of the exercise to continue building strength. The variations listed below increase the difficulty by changing your body position or adding movement.
1. Reverse Plank With Fingers Facing Back
The standard reverse plank already stretches your upper body. But by changing the position of your hands, you can increase this stretch to seriously open up stiff and tight shoulders. You can also use this modified hand position with any of the other reverse plank progressions listed below.
- Sit on the ground with your legs extended. Place your hands on the ground slightly behind you. Point your fingers toward the back of your head.
- Drive your heels into the ground and lift your hips up into alignment with your legs and chest. Rest on your heels and palms, fingers spread.
- Your body should form a straight line from shoulders to hips to feet. Your hands should be directly under your shoulders.
- Gaze straight up toward the ceiling. Keep your chin off your chest, but make sure that your head isn’t collapsing toward the floor.
2. Single-Leg Reverse Plank
Lifting one leg off the ground while performing reverse planks decreases your base of support. Your glutes, hamstrings and core must work harder to keep your hips elevated and your body position level. If you're not yet strong enough to perform single-leg reverse planks with your arms extended, try practicing with your elbows and forearms on the floor.
- Sit on the ground with your legs extended. Place your hands on the ground slightly behind you. Point your fingers toward your feet.
- Lift one leg several inches off the floor. Drive your down-side heel into the ground and lift your hips up into alignment with your legs and chest. Rest on your heel and palms, fingers spread.
- Your body should form a straight line from shoulders to hips to feet. Your hands should be directly under your shoulders.
- Gaze straight up toward the ceiling. Keep your chin off your chest, but make sure that your head isn’t collapsing toward the floor.
3. Reverse Plank Crunch
Adding movement to your reverse planks makes them more challenging. Each time you pick one leg off the ground, you use your hips and oblique muscles to resist side-to-side rotation. The reverse plank crunch also recruits your hip flexors as you pull your knee in toward your chest.
- Sit on the ground with your legs extended. Place your hands on the ground slightly behind you. Point your fingers toward your feet.
- Drive your heels into the ground and lift your hips up into alignment with your legs and chest. Rest on your heels and palms, fingers spread.
- Your body should form a straight line from shoulders to hips to feet. Your hands should be directly under your shoulders.
- Gaze straight up toward the ceiling. Keep your chin off your chest, but make sure that your head isn’t collapsing toward the floor.
- Once you're holding the top position, slowly lift one leg up off the floor. Pull your knee in toward your chest. Do not allow your body to rotate side to side.
- Slowly lower the leg back into your standard reverse plank.
- Alternate sides.
4. Leg Pull
The leg pull is a progression of reverse planks that comes from Pilates. This movement is much more challenging than the reverse plank crunch because keeping your leg straight requires a high level of quad strength. Don't attempt leg pulls unless you've first nailed reverse plank crunches and the single-leg reverse plank.
- Sit on the ground with your legs extended. Place your hands on the ground slightly behind you. Point your fingers toward your feet.
- Drive your heels into the ground and lift your hips up into alignment with your legs and chest. Rest on your heels and palms, fingers spread.
- Your body should form a straight line from shoulders to hips to feet. Your hands should be directly under your shoulders.
- Gaze straight up toward the ceiling. Keep your chin off your chest, but make sure that your head isn’t collapsing toward the floor.
- Once you're holding the top position, slowly lift one leg up and off the floor. Keep the moving leg as straight as possible with toes pointed. Do not allow your body to rotate side to side.
- Flex your toes as you slowly lower the leg back into your standard reverse plank.
- Alternate sides.
5. Reverse Plank With Triceps Dip
Adding triceps dips is a great way to get more upper-body strength gains from reverse planks. This variation is not a good choice for anyone with a history of shoulder, collarbone or elbow injuries.
- Sit on the ground with your legs extended. Place your hands on the ground slightly behind you. Point your fingers toward your feet.
- Drive your heels into the ground and lift your hips up into alignment with your legs and chest. Rest on your heels and palms, fingers spread.
- Your body should form a straight line from shoulders to hips to feet. Your hands should be directly under your shoulders.
- Gaze straight up toward the ceiling. Keep your chin off your chest, but make sure that your head isn’t collapsing toward the floor. You should feel activation in your triceps on the outside of your upper arms.
- Once you're holding the top position, bend your elbows and lower your body toward the floor. Only allow your body to drop with the range of motion your bent elbows allow. Deactivate your triceps muscles once your hips start to lower.
- Maintain a plank position and do not let your hips sag or lower all the way to the ground. Do not shrug your shoulders or let your chest collapse.
- Finish the rep by pressing your hands into the ground and fully extending your arms.
Related Reading
Reverse Plank Alternatives
What should you do if you see reverse planks in your workout program but you can't or don't want to perform them? Although the reverse plank is a somewhat unique exercise, you can use the alternatives listed below to receive similar benefits.
1. Isometric Inverted Row
Isometrics are exercises where you hold one position for time. They are great for building full body strength with minimal equipment. All held planks are examples of isometrics, but they aren't the only options at your disposal. Just about any strength exercise can be turned into an isometric.
Inverted rows are a pulling movement that work your lats, core and glutes — all the same muscles as a reverse plank. Turn the inverted row into an isometric movement to create a shoulder, elbow and wrist-friendly alternative to reverse planks.
Unlike reverse planks, you will need some equipment to perform inverted row isometrics. If you're training at a gym you can use a TRX suspension trainer or gymnastics rings, or hold onto a barbell in a power rack or a smith machine. People who train at home can invest in a door or wall anchor TRX system. Some swear by tying a knot in a bedsheet, anchoring it behind a closed door and holding onto it to perform inverted rows, but this may not work in every home.
- Set the handles of TRX straps at waist height and grab one in each hand. Place your feet together on the ground in front of you and lean back into a plank position. Your toes should be flexed so only your heels are on the ground.
- Engage your back muscles by pulling your shoulders down away from your ears and squeezing your armpits. Your elbows should be even with your sides.
- Keep your hips level by squeezing your butt and pointing your belt buckle to your chin.
- Hold for time.
2. Body Saw
One of the limitations of traditional front planks is they aren't very effective at building strength in your upper back. Adding the pulling movement of the body saw changes this by recruiting more help from your lats. Body saws are a great option for anyone whose joints don't tolerate the reverse plank position.
Many gyms have exercise sliders specifically designed for fitness. But if you're training at home, you can use regular furniture sliders picked up from the hardware store. Towels also work well if you have hardwood or tile floors.
- Begin on all fours with your knees beneath your hips and your forearms flat on the floor. Place your toes in the middle of sliders.
- Extend your legs straight out behind you and push off the floor into a front plank position.
- Push your body backward by sliding your legs back behind you. Keep your legs straight.
- Slide back far enough that you feel your upper back muscles engage, but not so far that your hips sag to the ground.
- Finish the rep by pulling yourself forward using your upper body.
3. Plank Walkback
Plank walkbacks are a body-weight variation of the body saws. If you're training at home without any equipment, these will be one of your best bets to use in place of reverse planks.
- Begin on all fours with your knees beneath your hips and your forearms flat on the floor.
- Extend your legs straight out behind you and push off the floor into a front plank position.
- Walk your body backward by moving your heels together and then apart. Your toes will slide on the ground beneath you.
- Walk back far enough that you feel your upper back muscles engage, but not so far that your hips sag to the ground.
- Finish the rep by walking yourself forward with small steps.
4. Eccentric Leg Curl With Sliders
Leg curls heavily recruit your core, glutes and hamstrings. They don't target your lats or upper back muscles, but they are still a great core and posterior chain exercise.
The eccentric version of leg curls focuses on holding a plank position while you slowly extend your legs away from your body. It's easier than other slider leg curl variations, making it a better fit for more gym goers.
Use fitness sliders or furniture sliders if you have them. If you don't, you can use towels on hardwood or tile floor.
- Lie on your back with your knees bent and heels placed in the middle of sliders. The sliders should be as close to your hips as possible.
- Drive through your heels and lift your hips into a glute bridge.
- Slowly slide your feet out away from your body. Keep your hips off the ground and do not rush.
- Once your legs are fully extended, drop your hips to the ground. Keep them down as you pull the sliders back in toward your body.
5. Other Plank Variations
When in doubt, you can't really go wrong with substituting standard front planks, side planks or other advanced plank variations for reverse planks.
Common Reverse Plank Mistakes
1. Shrugging Your Shoulders
It's easy to let your upper body sag and your shoulders shrug up toward your ears when you've cranked out a bunch of reverse planks in your workout. Combat this form mistake by puffing up your chest, pulling your shoulders down away from your ears and trying to reach your hands through the floor beneath you.
If you can't stop your shoulders from shrugging even after focusing on these form cues, it's time to stop the exercise for the day. Continuing to reverse plank with shrugged shoulders places undue stress on your joints.
2. Sagging Your Hips
Keeping your hips in line with your knees and shoulders is an essential part of any plank variation. When you let your hips sag, your lower back takes on more than its fair share of the load and your core muscles stop functioning optimally.
One cue that can help with this is to imagine you're wearing a big cowboy belt buckle. Always keep the imaginary belt buckle pointed toward your chin. This keeps your pelvis in the slight posterior tilt (where your pelvis rotates slightly upward) that's ideal for great plank form.
It's best to put a pause on reverse planks if you're unable to prevent your hips from sagging, as this form error essentially defeats the purpose of the exercise.
3. Hyperextending Your Joints
Hyperextension occurs when a joint moves beyond its normal range of motion, placing it in an unsafe position to handle load. This can occur at your elbows, knees and low back during reverse planks. People with hypermobility should be especially cautious of hyperextension when working on reverse planks.
Avoid hyperextension at your elbows and knees by locking out your joints but not going beyond the point where your limbs are straight. Hyperextension at your lower back usually occurs when we try a little too hard to raise our hips off the ground. Focus on driving through your heels and squeezing your butt, and stop once your hips are fully extended. Your body should form a straight line through your shoulders, hips, knees and heels.
4. Letting Your Head and Neck Fall Backward or Forward
Your neck is part of your spine, which means it's important to keep an eye on your head position when performing reverse planks. Keep your neck in a neutral position by tucking your chin slightly and looking up to the ceiling. Avoid letting your head tilt backward behind your body. At the same time, don't tuck your chin so much that you're looking at your toes.
Tip
Hold a reverse plank only as long as you can maintain good form. It's tempting to attempt to hold planks for as long as physically possible. However, if your form starts to break down during your set, you not only lose the benefits of the exercise but also potentially put your joints in compromised positions.
Follow the form tips listed above and only hold your reverse planks for as long as you're able to maintain a good body position. If you're unable to hold a reverse plank for 10 seconds with good form, take a step back and build up your strength using some of the easier variations. And don't be in a hurry to move to more advanced reverse plank variations before you're truly ready.
How to Use Reverse Planks in Your Workouts
1. As Part of Your Warm-Up or Stretching Routine
Including core training exercises in your warm-up is a great way to prime your nervous system to prepare you to lift heavy loads or perform complex movements later in your workouts.
As an added bonus, performing reverse planks during your warm-up can help loosen up your chest, biceps and shoulders in preparation for your training session.
2. As a Strength-Focused Mobility Filler
Mobility fillers are drills or exercises paired with strength movements to provide active rest while training. Using fillers is a great way to save time and get the most out of your workouts. These are often static or dynamic stretches, but exercises that combine strength and mobility (such as reverse planks) also work well.
One example of using reverse planks as a mobility filler might be the following set of exercises:
- Dumbbell Romanian deadlift
- Dumbbell bench press
- Reverse plank
You'd perform each exercise in a row and repeat them until you've completed all the sets indicated in your program.
3. Paired With Push-Ups or Other Pressing Exercises
Reverse planks provide a great counter balance for pressing movements because they stretch your chest, biceps and anterior deltoids. Pairing reverse planks with push-ups, bench press or overhead press will stretch your muscles in between sets and potentially reduce the chances of feeling overly stiff or tight later.