If you're ready to take your biceps workouts to the next level, try them floating from a bench: By putting you at a gravity-defying angle, spider curls can challenge your arms more than normal curls.
They're a moderate-to-advanced exercise, though, so you'll want to make sure you know the right way to do these curls. Fortunately, this article covers it all!
Video of the Day
- What is a spider curl? Also called a prone incline biceps curl, it's an upper-arm exercise that involves lying facedown on an incline bench so your arms are hanging to the sides of the bench holding dumbbells. In this position, you curl the weights up to your shoulders by bending your elbows.
- What muscles does the spider curl work? They focus primarily on the biceps brachii, commonly called the "biceps." But they also work the brachialis and the brachioradialis, which help bend your elbow.
- Who can do this exercise? This is a moderate-to-advanced biceps exercise. Master other biceps curl variations before starting this one. Note that if you have a large stomach or breasts, the stomach-lying position may not be comfortable for you. Stop what you're doing if you feel any discomfort.
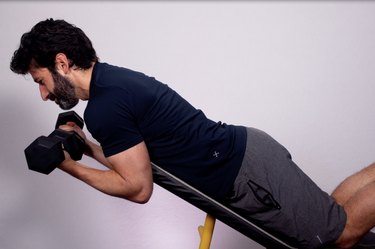
How to Do Spider Curls With Perfect Form
- Set a bench at around a 45-degree incline.
- Place your knees on the seat of the bench, and lay your stomach and chest down on the bench’s back. The top of the bench should be around mid-sternum.
- Hold dumbbells in each hand with an underhand, palms-up, grip, and let your arms hang down straight from the shoulder.
- Without swinging your upper arms, bend your elbows to bring the dumbbells up to your shoulders.
- Squeeze your biceps at the top, and then control the weights slowly back to the hanging position.
Can You Do Spider Curls at Home?
If you own a bench that inclines and dumbbells or a barbell, you can perform this move at home. Unfortunately, it's not advised to do this move without a proper bench.
5 Spider Curl Tips for Better Results
1. Set the Bench at a 30- to 45-degree Angle
If you set the bench too low, your arms will probably hit the floor. But if the angle of the bench is too steep, you won't be getting the intended benefit of spider curls — instead of increasing the range of motion, your arms will basically be in the same position as when you're doing standing curls.
At a 45-degree angle, the bench will form a perfectly diagonal line.
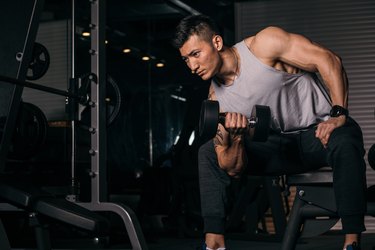
2. Put Your Knees on the Bench Seat
If you try to straddle the bench with your butt on the seat, your face will get mashed into the bench. Not good.
Instead, place your knees up on the bench seat so that your thighs, stomach and chest are all firmly against on the back of the bench. The top of your chest and your head should be above the bench.
Focus on keeping your knees, thighs, hips and chest stationary throughout the exercise.
3. Keep Your Upper Arms Vertical
Ideally, during the exercise, the only things that move are your elbows. To really focus on your biceps, you need to keep your upper arms still. They should be completely vertical, or perpendicular to the floor, throughout the entire exercise.
Consider recording yourself on your phone to check your reps.
4. Curl Higher Than Normal
Spider curls are hard all the way to the top.
For full benefits, curl the weights as high as your possibly can toward your shoulders while keeping those upper arms still. You might feel like you're moving farther than you usually do during curls. That's a good thing.
3 Spider Curls Benefits (AKA Why Are Spider Curls So Hard?)
1. They Take Advantage of Gravity
A lot of curls get easier at the top of each rep. That's not the case with spiders.
That's because, by positioning your torso at an angle, you feel the full effects of gravity on your dumbbells throughout more of the move, says Brandon Lirio, CPT, certified personal trainer, director of BattleGround Fitness and a professional bodybuilder.
Spider Curl vs. Preacher Curl
The main difference between the spider and preacher curl is how long your biceps have to work against gravity to raise the weights.
When you do a preacher curl, your arm starts at an angle — it isn't completely vertical. "But with a spider curl, you’re acting 100 percent against gravity because you [move the weight] 180 degrees,” Lirio says.
Put another way, spiders challenge your muscles through a fuller range of motion.
2. They Don't Let You Cheat
Using momentum from your lower power is a common biceps curl mistake. But with this variation, your torso, hips and legs are fixed against the bench, meaning it's tougher to cheat.
"You're eliminating the ability of your torso to move in either direction, so the arm — specifically the biceps tendon — has to do all the work," Lirio says.
3. They Require a Lot of Shoulder Control
Sure, the bench makes it harder to swing your hips around, but you still need to keep your shoulders in place. "If you're doing your spider correctly, basically the upper portion of the arm should be immobilized," Lirio says.
That means you have to be able to move one segment of your arm while keeping the other completely still. This takes practice, and can be the most difficult when holding the dumbbells in a supinated or underhand position with your palms facing up.
Beginners can benefit by doing move with a neutral, or hammer, grip. It makes it easier to keep the upper arm still throughout the exercise. (See more below.)
1 Modification to Make Spider Curls Easier
Move 1: Spider Hammer Curl
Using a neutral, or hammer, grip makes it easier to keep your upper arm still so that you better isolate your biceps. This can also be a more comfortable setup for some people's shoulders.
- Set a bench at around a 45-degree incline.
- Place your knees on the seat of the bench, and lay your stomach and chest down on the bench’s back. The top of the bench should be around mid-sternum.
- Hold dumbbells in each hand with a hammer grip, palms facing each other, and let your arms hang down straight from the shoulder.
- Without swinging your upper arms, bend your elbows to bring the dumbbells up to your shoulders.
- Squeeze your biceps at the top, and then control the weights slowly back to the hanging position.
Still Having Trouble With Spider Curls?
If you can't perform spider curls without proper form, it's best to back off of the move, build some more strength, and then return to this advanced exercise.
What can you use instead of spider curls? Other curl variations are easier to execute, but still strengthen and build your biceps brachii. If you don’t like doing spider curls, you can do standing curls, seated curls, and preacher curls are all good options.
2 Modifications to Make Spider Curls Harder
Move 1: Spider Curl Pause
At the top of this spider curl, pause and squeeze the muscles for a full second — or two, says Lirio. This isometric hold will increase the time your muscle is under tension … and it'll feel that much harder.
- Set a bench at around a 45-degree incline.
- Place your knees on the seat of the bench, and lay your stomach and chest down on the bench’s back. The top of the bench should be around mid-sternum.
- Hold dumbbells in each hand with an underhand grip, and let your arms hang down straight from the shoulder.
- Without swinging your upper arms, bend your elbows to bring the dumbbells up to your shoulders.
- Squeeze your biceps at the top, holding for 1-2 seconds. Control the weights slowly back to the hanging position.
Move 2: Spider Curl Twist
As you twist the dumbbell, holding your upper arm still will be more difficult.
- Set a bench at around a 45-degree incline.
- Place your knees on the seat of the bench, and lay your stomach and chest down on the bench’s back. The top of the bench should be around mid-sternum.
- Hold dumbbells in each hand with a hammer grip, palms facing each other, and let your arms hang down straight from the shoulder.
- Without swinging your upper arms, bend your elbows to bring the dumbbells up to your shoulders. As you bring them up, twist the dumbbells so that at the top of the movement, your palms face up.
- Squeeze your biceps at the top, and then control the weights slowly back to the hanging position, untwisting as the weights go down.
More Biceps Curls


Was this article helpful?
150 Characters Max
0/150
Thank you for sharing!
Thank you for your feedback!