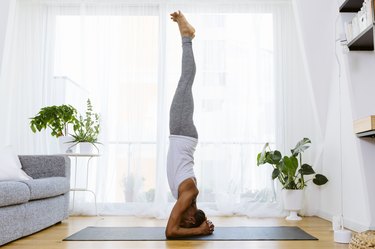
When it comes to impressive yoga poses, it doesn't get much more awe-worthy than a headstand, called Sirsasana (pronounced sheer-shah-suh-nuh) in Sanskrit. There's just something about seeing someone balancing their body upside down so elegantly that screams #goals. If you're wondering how you can work up to the pose, keep reading.
- What is a headstand? It's an advanced yoga posture where you place your head on the floor and use either your forearms or hands to support your body so you can straighten your legs toward the ceiling. It's also a type of inversion, which is a yoga pose where you place your head beneath your heart.
- Headstand versus handstand: What's the difference? While the two moves are similar in that you're upside down, you're balancing on your hands during a handstand, whereas you're balancing on your head during a headstand. However, the same muscle groups — core, back, arms and shoulders — are involved in both. One is not better than the other, but it's recommended you know how to do a handstand before you attempt a headstand.
- Why are headstands so hard to do? First, they require a ton of upper-body strength. Second, they can be scary! "Some people have the physical ability to do them but can't get past the fear of being upside down, or inverted," Veronica Najera, E-RYT 500, certified yoga instructor and master trainer with YogaSix, tells LIVESTRONG.com.
- Who can do a headstand? Who should not? Yoga beginners should not attempt a headstand, according to the National Center for Complementary and Integrative Health. The pose requires enough upper-body strength and core strength to get into the upside-down headstand position and hold your weight so it's not resting on your head. Also, "if you have high or low blood pressure, headstands are not for you," Najera says. "Anyone that has spinal disease or neck injury should avoid them as well, in addition to people who have sinus infections or inner ear problems."
Video of the Day
How to Do a Headstand (Sirsasana) With Proper Form
- Kneel on the floor and grab your elbows with your opposite hands.
- Place your forearms on the floor. Rest the back of your head between your hands. Your hands should form a crown around your head.
- Keeping the balls of your feet on the floor, straighten your knees to raise them off the floor.
- Brace your core and walk your feet toward your elbows.
- Slowly extend one leg toward the ceiling.
- Squeeze your core to pull the other leg up toward the ceiling.
- Tense your glutes, core and shoulders to keep your body in a straight line. Point your toes.
- Hold, then lower one leg at a time to lower back to the starting position.
Watch the Full Tutorial
Is It Safe to Do Headstands?
“Headstands are safe, depending on who you ask,” Najera says. “In general, if you have an experienced instructor to assist you, they are safe and can bring benefits and value to one’s practice. But because alignment is essential for weight bearing, and weight distribution is important to maintain safety, it’s key that for new practitioners, headstands are done with the supervision of an instructor.”
Surprisingly, the majority of injuries come from using the wall as support, she says. This is often done when people are just learning the move. The problem is if you lose control and fall out of the pose, you’re forced to fall to the side, and are more likely to injure your neck, Najera explains. If there’s no wall, you will likely fall backward and roll, which is safer for your neck.
Benefits of Headstands
There are plenty of benefits of headstands. First and foremost: "They build core and upper-body strength," Najera says. Headstands are also great for working on your balance and "strengthening your heart and major blood vessels and can help with blood circulation of your legs," Najera says.
In addition, yoga inversions are said to have additional benefits, including increasing blood flow to your face, reducing stress and promoting healthy digestion.
Related Reading
4 Headstand Form Tips
1. Engage Your Entire Upper Body
Placing your weight on your head and allowing your shoulders to collapse could potentially injure your neck and spine, according to Najera. "To avoid this, press your forearms (traditional or supported headstand aka Salamba Sirsasana) or hands down (tripod headstand) and engage your shoulders and back."
You want to think about constantly engaging the muscles of your upper body, using them primarily as your main support. (Your core will help out, too!)
2. Resist Jumping
If your upper-body and core strength aren't quite there yet, you may be tempted to jump up into a headstand.
"People tend to jump to lift their legs, moving their foundation, but you'll likely send your hips past your shoulders and roll," Najera says. "The best way to train your body to get up is by bending one knee at a time and bringing it to your chest and balance, then bending the second knee and holding before lifting your legs to the sky."
3. Limit Your Time
Yes, too much of a good thing can be bad. Staying in a headstand for too long can increase the chance you'll lose balance and fall, leading to a head or neck injury, according to Najera.
So, how long should you stay in a headstand?
"Headstands should be done for no more than three to five breaths, which on average is around 30 seconds to a minute," she says.
4. Be Patient
"Headstands require patience," Najera says. "Inverting your muscles requires a different orientation, and they need to learn how to work from a new center of gravity. Take the time to practice and spend time in each of the steps."
How long it will take you to reach a full headstand will depend on many things, including the level of strength and balance you're starting with.
"If you have an athletic background, it can take 10 minutes, with the guidance of an instructor and the correct steps. If the practice is totally new for you and you don't practice any other kind of physical movement, it can take anywhere from three to six months," Najera says.
Why Do Headstands Hurt My Head?
“Headstands might hurt your head if there is not enough strength in your upper body to support your weight,” Najera says. In a headstand, your head should be merely touching the floor, but bearing almost no weight. “For that to be accomplished, you press the floor away with your forearms in a traditional headstand (Sirsasana A) or with your hands in a tripod headstand (Sirsasana B),” she explains.
If your head hurts from headstands, scale the move back to one of the steps in the progression below and work on building upper-body strength outside of your headstand practice. Try again after a few weeks when your arms and upper back are more ready to support you.
4-Step Headstand Progression
To work up to a full headstand, Najera recommends the following progressions, which are variations of the headstand that start out easier and work up to the full thing.
1. Downward Facing Dog (Adho Mukha Svanasana)
Start by inverting (heart above the head) in easier poses, like downward facing dog, and notice how you feel, Najera recommends.
- Start in all fours, tuck your toes under and lift your hips up, straightening your legs.
- Draw your shoulders down your spine away from your ears. Elongate your spine and extend the backs of your legs only as far as your hamstrings allow.
- Depending on your flexibility, bring your heels down toward the mat or stay on the balls of your feet with your knees bent.
- After a few breaths, bring your knees back down to the ground in the starting position.
2. Legs on Floor
"Once you feel comfortable, start mimicking the headstand upper-body shape without the strain of the full body weight," Najera says.
- Start on your knees and place either your forearms (for traditional headstand) or hands (for tripod) in front of you on the floor.
- Tuck your toes and lift your hips, and then walk your feet close to your arms and hold.
- If you notice your shoulders collapsing, actively press the floor away.
3. Knees Bent
"Once you can hold the shape with your legs down, it is time to take flight!" Najera says.
- Start on your knees and place either your forearms (for traditional headstand) or hands (for tripod) in front of you on the floor.
- Tuck your toes and lift your hips.
- Bend one knee at a time and bring it to your chest. Keep the support of your opposite foot on the floor and switch.
- Keep your hips on top of your shoulders.
- Once you feel that you can hold one leg in, bend the second one in and notice how your upper body controls your balance.
4. One Leg Elevated
"If you can keep both knees into your chest, slowly play with extending one leg up to the sky and then both! You did it! You are in a headstand!" Najera says.
- Start on your knees and place either your forearms (for traditional headstand) or hands (for tripod) in front of you on the floor.
- Tuck your toes and lift your hips.
- Bend one knee at the time and bring it to your chest. Keep the support of your opposite foot on the floor and switch.
- Keep your hips on top of your shoulders.
- Once you feel that you can hold one leg in, bend the second one in and notice how your upper body controls your balance.
- Slowly extend one leg toward the ceiling.
Wall-Supported Headstand Variation
"I will use the wall, but with my chest facing it," Najera says.
- Start in table top with the soles of the feet rested on the wall.
- Keep your hips on top of your knees and your shoulders on top of your wrists.
- Lift your hips and climb your feet on the wall to a 90-degree angle, that way you get the correct alignment and accurate weight in your upper body but you have the support of the wall.
Tip
Najera suggests practicing your headstands at least three times a week, along with doing strengthening exercises for the muscles you will need.
“Try ab work, like boat pose and half boat pose, chaturangas and holding downward facing dog and dolphin pose,” she says.