Photos and videos of yogis performing advanced asanas are all over Instagram. Those poses may seem unattainable to a new practitioner, but it's important to remember that the yogis performing them were beginners once too. They weren't flipping up into handstands on day 1.
Acquiring the mobility, strength and flexibility necessary to perform challenging yoga poses comes with consistent practice, awareness and patience. But if one of these five poses is on your yoga bucket list, here's how to approach — and master — it.
Video of the Day
Video of the Day
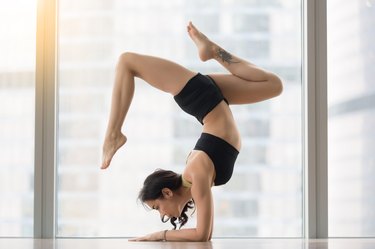
1. Titthibhasana (Firefly Pose)

Tittibhasana is a pose that demands the strength of an arm balance and the flexibility of a deep, wide-legged forward fold. "The hamstrings have to be so open for this pose," says Los Angeles-based yoga teacher Joan Hyman.
- Separate your feet slightly wider than hip-width apart and perform a forward bend (keep knees bent if needed), placing your hands down on the inside shoulder-width apart.
- Begin to bend your knees and lower your hips down. Maintain flexion through your spine and squeeze your knees to your triceps.
- Push into your hands and lean forward keeping your arms straight as you extend the legs parallel to the floor and point the toes.
To prep for this advanced pose, Hyman recommends starting with the following asanas to help you fly and shine.
Move 1: Utkatasana (Chair Pose)
- Begin in Tadasana (Mountain pose) by standing tall, arms at your sides.
- Bend the knees and lower the hips toward the floor, bringing the thighs parallel to the floor if possible.
- Simultaneously stretch your arms overhead and externally rotate the upper arms.
- Press your shoulder blades back and down so your shoulders move away from your ears.
- Lengthen your tailbone toward the floor and breathe deeply.
Move 2: Utthita Hasta Padangustasana A (Extended-Hand-to-Big-Toe Pose)
- From standing (Tadasana), draw your right knee in toward the chest.
- Bring your right arm along the inside of your bent right leg and hook the big toe with peace sign fingers.
- Either extend the leg fully out in front of you and activate the quadriceps and flex your foot or keep a bend in the knee if necessary.
Tip
You have the option to place a strap around the sole of the right foot to experience the full expression of the pose if you need.
Move 3: Bakasana (Crow Pose)
- Begin in a low squat. Place your hands on the ground shoulder-width apart with fingers spread wide. Have your feet wider than your shoulders.
- Come up to your tiptoes. If this isn't comfortable, try to put your feet on a blanket or on a block.
- Snuggle your knees in toward your rib cage. Shift forward, bringing your shoulders over the creases of the wrist. Squeeze your knees into the upper triceps.
- Draw one foot away from the floor squeeze heel to glute. T
- ry lifting the other foot off the floor and bring the big toes together. Keep your neck neutral and breathe calmly and deeply.
2. Adho Mukha Vrkasana (Handstand)
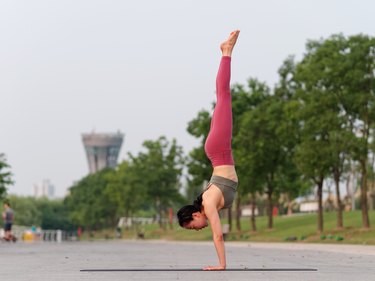
For a beginner, handstand may seem like the most challenging and coveted yoga poses out there, but yoga teacher Dylan Werner introduces handstands to his students early on. According to Werner, the key to holding a handstand is having open shoulders, but if you aren't able to make a straight vertical line like a Cirque du Soleil performer, don't fret.
"The major difference between gymnastics and yoga is that it's not about what the shape looks like, but the intention behind it. When I do a posture in yoga, my intention is about sensation, moving toward feeling things in the postures," Werner says.
- Start in Three-Legged Downward Facing Dog — hands and feet planted in the ground, hips pointing up to the sky, then raise one leg back behind you and into the air.
- Keep the back leg active as you bend your supporting leg and jump your hips over your shoulders.
- To counterbalance, bring your knee into your chest or into an L-shape as you reach your other leg toward the sky.
- When you catch your balance, straighten your other leg towards the sky as well.
Tip
Dylan recommends moving as little as possible in handstand. Don't have your hands too wide apart and stack the joints, bringing your shoulders over your wrists. Maintain activation through your legs and elevate your shoulders (think of pushing into the ground).
To get yourself stable upside down, try adding these poses to your yoga flow.
Move 1: Downward Facing Dog Variation
- Start on all fours — wrists under shoulder and knees under hips.
- Straighten your legs and push your hips up to the ceiling. You'll be in an inverted V.
- Focus on opening the shoulders by placing a slight bend in the knees and pressing the chest back through the arms.
- Spread your fingers and press down with your hands.
- Perform a gentle bouncing motion to move the shoulder heads back and increase your range of motion.
- Do this a few times with breath, then work on holding Downward Facing Dog for an extended period of time (20 to 30 breaths).
Move 2: Chest-to-Wall Handstand
- Stand about a leg's distance away from the wall. Turn away from the wall and place your hands down.
- Walk your feet up the wall until you're vertical. Keep the body activated. Shift your weight into your fingertips to develop balance.
- Aim to hold steady and breathe for as long as you can to build strength in this posture.
Move 3: Partner-Supported Handstand
- Come into Downward Facing Dog.
- Lift one leg into the air behind you for Three-Legged Downward Dog and kick up into handstand.
- Have your partner support you as you find balance.
3. Sirsasana (Headstand)
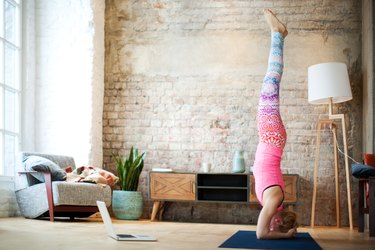
Yogis have coined Sirsasana as the "king of asanas." This inversion may help you flip your perspective, overcome fear, reduce stress, increase focus, improve digestion and improve blood flow.
"This is an advanced pose because it's a posture that is supposed to be held for several minutes, creating a profound shift in the nervous system," says Hyman.
While it doesn't require the same level of shoulder mobility as handstand, this inversion may be more risky and injurious if you fall out of it as you roll over the neck, so your setup and preparation is very important.
- Start kneeling with your toes tucked under and your forearms on the floor.
- Interlace your fingers and place the crown of your head down in front of your hands.
- Press the outer edges of your forearms into the floor and keep your shoulders lifted as you extend your legs and lift your hips.
- Maintaining the position of the shoulder girdle, walk your feet in closer and either bend the knees in toward the chest and lift your hips over your shoulders and extend the legs or keep the legs straight as you pike up into the posture.
- Squeeze the legs together, steady your gaze, deepen your breath and intention.
Not there yet? Nail your first headstand with these poses Hyman recommends.
Move 1: Forearm Plank
- Begin lying on your stomach with your forearms on the floor. Ensure your elbows are directly under your shoulders.
- Press down into your forearms. Tuck your toes under and lift your hips off the floor creating a line from the crown of your head to your heels.
Move 2: Dolphin Pose
- Begin in a forearm plank. Press your forearms into the ground firmly.
- Walk your feet in as if you're in Downward Facing Dog with your hips lifted into an inverted V position.
- Lift the heels and bend the knees if necessary.
Move 3: Wall Supported Headstand
- Facing a wall, come to a forearm plank. Hold and activate your core for a few breaths.
- Roll to the outer edge of your forearms and interlace your fingers.
- Walk your feet in. Place the crown of your head down in front of your interlaced hands.
- Push your forearms into the ground as you bring your hips over your shoulders and make and maintain contact with the block behind your thoracic spine as you use your core to lift the legs up overhead.
4. Urdhva Dhanurasana (Wheel Pose)
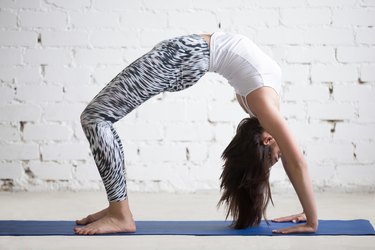
When you're approaching big, expansive asanas like wheel pose, Los Angeles-based yoga teacher Sean Phelps recommends breaking it down into pieces. "Find the hip flexor opening, find the shoulder opening, find the heart opening," he says.
- Lying on your back with your knees bent and feet hip-width apart, bring your hands alongside your ears with your fingers slightly pointed outward to avoid pinching at the wrist.
- Press into your feet and come to the crown of your head.
- Push into your hands and your feet simultaneously as you extend the arms and come into wheel pose opening the front side of the body.
To open your heart and get your back ready for this pose, Phelps recommends the following poses.
Move 1: Low Lunge With Quad Stretch
- From a straight-arm plank, lunge your right foot forward on the outside of your right hand.
- Lower your left knee to the floor and bend the knee bringing your heel toward your butt.
- Shift your weight into your left arm as you reach back with your right hand and grab your left foot on the outer edge.
- Draw the left foot closer to your body.
Tip
You have the option to place your left shin against a wall and come upright, extending the hips for a deeper hip flexor and quadriceps stretch.
Move 2: Puppy Dog Pose With Shoulder Flexion
- Position yoga blocks on their highest side in front of you shoulder-width apart.
- Come to Puppy pose, kneeling with your hips stacked over your knees and placing your hands on your blocks.
- Extend your spine, bringing your torso parallel to the mat. Press your chest down toward the ground to open the chest and shoulders.
Move 3: Elevated Backbends
- Lying on your back with your knees bent place your feet on blocks hip-width apart.
- Bring your hands alongside your ears with your fingers slightly pointed outward to avoid pinching at the wrist.
- Press into your feet and your hands to lift up, extending the hips and exploring movement in this position as you open the heart.
5. Padmasana (Lotus Pose)
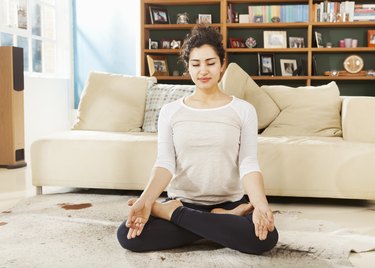
Padmasana is a meditative posture, but if you enter this pose with more force than patience and awareness, it'll feel anything but calm and meditative.
- Start in Dandasana (Staff pose), sitting down with your legs extended out in front of you.
- Bend your right knee and hook your hands under your shin to cradle the leg and open the hip.
- Draw your right heel in toward your left groin.
- Repeat the same action with the left leg placing it overtop.
- Keep the feet active. Press the knees down toward the ground and ground your sit bones as you sit up tall.
To get your OM on in Lotus pose, add these three postures to your flow for more open hips.
Move 1: Warrior 2 Pose
- Starting standing in Tadasana (mountain pose), step your feet a few feet apart.
- Turn your right foot to point straight ahead and turn your back foot to a 45-degree angle. Align the heel of your right foot with the arch of your left foot.
- Lower your hips down as you place a 90-degree angle bend in your right knee while keeping the back leg straight and grounding down through the outer edge of the foot.
Move 2: 90/90 External Hip Rotation
- Sit upright and bring both legs into 90-degree angles on the floor.
- Facing the lead leg, extend your spine and lean forward. Hover your navel over your knee and keep the chest lifted to feel a deep stretch in the hip.
- Hold this stretch passively for two minutes. Then actively press your leg into the floor for 30 seconds.
- Keeping your spine extended, sink deeper into the stretch if possible. Try to actively pull your knee in toward your chest for 30 seconds.
- Repeat this cycle two to three times on each side.
Move 3: Fire Log Pose
- From Dandasana (staff pose), bend both knees in and stack ankle over knee to resemble stacked fire logs.
- Keep your feet flexed.
Tip
You can also sit upright or hinge forward from the hips for a deeper stretch. Remember to perform the stretch on both sides.