Yoga is not what you'd call a competitive sport — but it can sometimes feel that way.
"So often we look to the neighbor to our left or to our right and think they're ahead of us, but yoga is really all about your breath," says James Norris, founder of Handi Capable Fitness, a Boston-based nonprofit dedicated to helping people with disabilities be active. "For that hour, it's just you, your mat and the instructor. You can just forget everything else that's going on."
Video of the Day
His yoga teacher echoes this: "I'm not in your body, I don't know exactly what you might need in a certain moment," says Sandy Cahill, RYT, registered yoga instructor and class experience lead at Life Time Northshore in Peabody, Massachusetts. "What you feel you need might just be breathing — and that's still yoga."
Cahill wasn't necessarily familiar with working with athletes with different abilities before she met Norris. "The first time I met James, I was a little intimidated. I didn't want him to ever feel like things I'm saying aren't specific to him."
"Figure out what works for you, and throw the rest away."
Norris is used to this type of reaction — and it's a big motivator behind the work he does with Handi Capable Fitness. "I love teaching people. I love seeing the confidence Sandy now has to work with me, which has now opened up doors for her. If somebody else comes into her class she now has a foundation to go off of to engage with that person and put them at ease more quickly so they'll stay around in her class."
Before you can stay in a class, though, you have to enter one first, and that can be intimidating for beginner yogis of all abilities. "It's a challenge for any person to come through that door and start working out," Cahill says. "But getting moving builds confidence and happiness and creates a community."
Ahead of his first flow yoga class with Cahill, Norris wasn't sold on the community. "I don't know if I can take that class," he remembers thinking at the time. "I can't do 'flamingo legs' or whatever the pose is. It's a fast-paced class and you have to go for the whole hour."
But he focused on his own goals — hamstring flexibility, hip mobility and a break for his spine from sitting in his wheelchair all day — to motivate him to enter the studio for the first time.
It can take some trial and error and close work with an instructor to determine what modifications work best for your body. But over time, the ability to listen to yourself will grow, he says. "Figure out what works for you, and throw the rest away."
How to Find a Welcoming Yoga Class
When Norris wants to try a workout class or gym for the first time, he starts by researching nearby facilities online and reading reviews. Then he recommends meeting with the instructor or teacher to get a sense of their style and how you two connect. "Have a conversation with them. Say, 'This is what I'm trying to do, do you think this is something I can do, and what would you recommend?'"
Keep in mind not every instructor will have worked with someone exactly like you, he says, so you may get varying degrees of helpful feedback. Look for instructors you feel comfortable with, Norris says.
Read more tips for finding inclusive fitness spaces at the link below.
How to Do the Workout
Cahill, on the left in the videos below, demonstrates the yoga poses as they are more traditionally performed in her classes. Norris, on the right, demonstrates his own modifications and variations.
Follow along while listening to your body. Any instructions written below are suggestions — make any changes you need. Maybe you won't hold a position as long as suggested, or you'll try a pose seated or lying down instead of kneeling. Maybe you'll keep your legs bent instead of straight or only do a pose on one side. It's all "still yoga," as Cahill says.
Check out more of our 20-minute workouts here — we’ve got something for everyone.
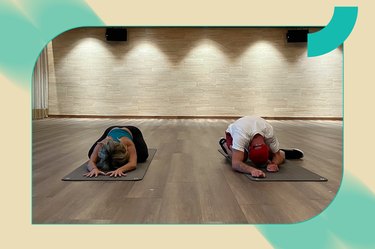
Child's Pose
- Start on all fours on your mat.
- Spread your knees wide and bring your big toes together.
- Sink your hips back toward your heels.
- Reach toward the top of your mat and collapse your chest down.
- Let the center of your forehead touch the mat and breathe deeply.
- Hold for up to 30 seconds.
Tabletop to Single-Arm Reach to Thread the Needle (Right)
- Start in tabletop position on all fours. Shift and shimmy your body until you feel grounded, then plant your hands shoulder-width apart and knees hip-width apart.
- When you're ready, lift your right arm up toward the ceiling as you open your chest and stack your shoulders. Look up at your right fingertips.
- Sweep your right arm down and "thread" it under your left armpit, bringing your right shoulder and the right side of your face to the mat with your right palm facing up. Sink your weight into your right shoulder and reach through your right fingertips.
- Hold for a breath, then press through your left hand and reach your right hand back up to the ceiling and look at your right fingertips.
- Exhale as you bring your right hand back down to your mat to return to tabletop position.
- Repeat on the left side (see below). Continue alternating sides for 3 rounds total.
Related Reading
Tabletop to Single-Arm Reach to Thread the Needle (Left)
- Start in tabletop position on all fours. Shift and shimmy your body until you feel grounded, then plant your hands shoulder-width apart and knees hip-width apart.
- When you're ready, lift your left arm up toward the ceiling as you open your chest and stack your shoulders. Look up at your left fingertips.
- Sweep your left arm down and "thread" it under your right armpit, bringing your left shoulder and the left side of your face to the mat with your left palm facing up. Sink your weight into your left shoulder and reach through your left fingertips.
- Hold for a breath, then press through your right hand and reach the left hand back up to the ceiling and look at your left fingertips.
- Exhale as you bring your left hand back down to your mat to return to tabletop position.
- Repeat on the right side (see above). Continue alternating sides for 3 rounds total.
Kneeling Side Bend to Back Bend
- Start in tabletop position on all fours, with your hands shoulder-width apart and your knees hip-width apart.
- Tuck your toes and inhale as you lift to kneeling. Stack your hips over your knees, your shoulders over your hips and keep your neck straight.
- Reach your arms out to the side and sweep them up over your head, reaching toward the ceiling.
- Gently grab your left wrist with your right hand as you exhale and bend your torso to the right, lengthening your left side.
- Inhale as you come back to center.
- Switch your grip: Hold your right wrist with your left hand and exhale as you bend toward the left, lengthening your right side.
- Inhale and come back to center.
- Gently lean backward and open your chest in a back bend.
- Exhale as you reach your hands forward to your mat and land in tabletop position.
- Perform 3 cat-cows (see below), then continue alternating between these two sequences until you've completed 3 rounds total.
Cat-Cow
- Inhale as you sink your belly toward your mat and lift your chest and head.
- Exhale as you round your back, pulling your bellybutton toward your spine, and tuck your chin.
- Continue moving between cat and cow with your breath for a total of 3 breaths.
- Continue alternating with the kneeling side bend to back bend (see above) for a total of 3 rounds.
Seated Forward Fold
- Start seated on your mat, legs extended in front of you, hands on or behind your hamstrings, calves or ankles, depending on what is available to you.
- Tuck your chin slightly and look at your knees as you stretch forward.
- Take 3 breaths through your nose.
- Bend your elbows to pull yourself a little deeper into the stretch on an exhale.
- Hold for up to 60 seconds, deepening on an exhale as often as you feel comfortable.
Tip
In a yoga class, an instructor may offer to gently support or press your back to help you deepen this stretch, Cahill says.
Full-Body Stretch
- Lie down on your back and stretch your arms and legs out as straight as you can. Reach your fingers and toes away from each other as you lengthen your spine.
- Take 3 big breaths as you reach and release the tension on an exhale.
- Repeat for up to 60 seconds.
Butterfly Stretch to Savasana
- Lie on your back. Bend your knees and bring the bottoms of your feet to touch. Let your knees fall open to the sides and extend your arms out to your sides at about a 45-degree angle from your body, palms facing up.
- Breathe deeply as you hold this stretch for 30 seconds. Allow your knees to fall out as deeply as possible to the sides.
- On an inhale, pull your knees together and plant your feet on your mat.
- On an exhale, extend one leg at a time out straight.
- Relax your entire body as you settle into Savasana (corpse pose).
- Hold this position as long as you'd like, breathing normally throughout.
Tip
Roll up a towel and place it under your back or knees if that feels more comfortable in Savasana. You can also keep your knees bent and feet planted and gently relax your knees in toward each other instead of extending your legs.
Related Reading