Whenever you feel some tension in your neck and shoulders, you can rely on the thread the needle pose to give you some quick relief. Also known as Urdhva Mukha Pasana in Sanskrit, this upper-body yoga pose provides a nice stretch in your shoulders and chest and helps with spinal mobility.
Plus, it can be done anywhere and doesn't require any equipment, so it's a good excuse to take a break during your day to stretch.
Video of the Day
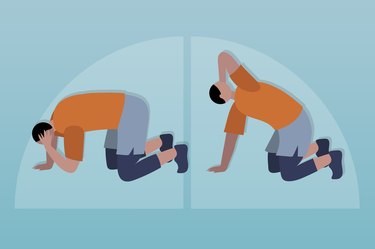
- What is the thread the needle exercise? It's an upper-body stretch that starts on your knees and involves you "threading" one arm under your chest. In yoga, it is often used as a warm-up pose before doing more advanced moves.
- What is the thread the needle pose good for? "It can help release neck pain and tension, and it is arguably one of the best ways to gently stretch your shoulders," says Esmey Leon, an AFAA-certified trainer and GOFA fitness trainer. It also improves mobility in your spine and rib cage, and loosens up your chest. In addition, it helps open up your pelvis and stretches the muscles around your hips.
- Who can do this exercise? It's a great yoga stretch for all fitness levels, especially for beginners who are looking to progress child's pose. There are many thread the needle pose variations (see below), so it can be adjusted to fit your needs and goals.
Warning
If you had a neck, back or shoulder injury, or live with a condition such as scoliosis, herniated disc or spinal fracture, check with your doctor before trying it out, and be cautious with this pose. Those who are 65 and older are particularly more susceptible to injuries from yoga, according to a November 2016 study in the Orthopedic Journal of Sports Medicine, so it's important to go slowly and listen to your body. Stop if you feel pain.
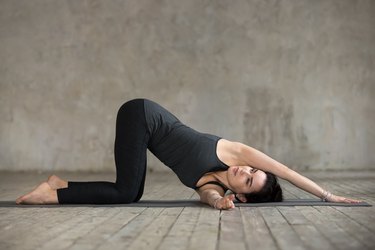
How to Do the Thread the Needle Exercise With Proper Form
- Start on all fours with your hands shoulder-width apart and your knees under your hips.
- Raise your left arm up toward the ceiling and look up at your fingertips.
- Next, "thread” your left arm under your chest until your left shoulder rests on the mat with your palm facing up.
- Make sure your head is turned to the right so that the left side of your face is resting on the mat.
- You can keep your right arm near your face if you have shoulder issues, or you can extend it overhead until your fingers touch the mat for a shoulder stretch.
- Keep your hips up and centered over your knees throughout the stretch.
- Take a deep breath, feeling the tension escape your muscles.
- Hold for three to four deep breaths.
- Return to the starting position and repeat on the other side.
Tip
You can hold this pose for up to a minute if it feels great, Leon says. Just make sure to switch sides and hold the pose for the same amount of time as the other side.
Do your knees hurt? Fold your yoga mat a few times or place a rolled-up towel under your knees for extra support.
Watch the Full Tutorial
Dasha Einhorn, CPT, a certified yoga and Pilates instructor, walks us through exactly how to nail the thread the needle pose.
6 Thread the Needle Yoga Pose Benefits
1. It Loosens Up Your Neck, Shoulders and Chest
What's so great about this yoga pose is that it stretches your muscles and improves the mobility of your joints.
The muscles on your neck, back and shoulders get a wonderful stretch, releasing any tightness you have in this area. The twisting motion of your neck and spine also helps improve your mobility in these joints. Reaching your arm up toward the sky and threading it under your chest allows your shoulder joint to go through its full range of motion and opens up your chest.
2. It Strengthens Your Core
Stabilizing yourself on all fours as you hold the stretch works your entire core. In addition, the twisting or "threading" motion targets your oblique muscles, which are your side ab muscles that are responsible for bending and twisting your torso, as well as maintaining good posture.
3. It's Beneficial for Your Spine
This move stretches your spine — from your neck to your low back — which is beneficial in relieving muscle tension and improving flexibility. Holding this pose also strengthens your core muscles.
According to Harvard Health Publishing, strengthening your core and improving the flexibility of your back muscles in yoga, such as doing the thread the needle pose, helps to protect your back and prevent injury. However, it's important to do this pose with proper form and to move slowly and deliberately.
4. It Relieves Tension and Eases Stress
Taking some time to reconnect to your body with the thread the needle pose is a great way to relieve stress because it activates your parasympathetic nervous system to help you relax and focus on breathing through the stretch.
A small February 2018 study in the International Journal of Preventive Medicine found that Hatha yoga was effective in lowering stress, depression and anxiety in women after just 12 sessions. Start with the thread the needle pose, and work your way up to a 20-minute yoga flow.
5. It May Aid Digestion
Yoga poses that involve twists, such as the thread the needle stretch, may help improve digestion. The theory is that the twisting motion improves circulation to the organs and stimulates the GI tract.
A September 2020 review from Digestive Diseases and Sciences shows that yoga may be a promising form of therapy for irritable bowel syndrome (IBS). Practicing yoga helped improve symptoms and mental health in those with IBS, but more research is needed to make specific recommendations.
6. It Opens Up Your Pelvis and Hips
This stretch, particularly the pigeon pose variation below, also opens up and stretches the muscles around your hips and pelvis, which is helpful if you have a tight pelvic floor.
"Not only does this pose help with thoracic mobility and stretches your shoulder, but it is also a great opener for the pelvis and the hips," Einhorn says. "It might alleviate sciatica pain since it stretches the piriformis muscle (small muscle behind your glutes)."
4 Thread the Needle Form Tips
To get the maximum benefit of the thread the needle pose, it's important to keep a few form tips in mind. Watching yourself in a mirror as you get into this stretch can help ensure you're doing this pose correctly.
1. Watch Your Hips
"One of the biggest mistakes is shifting your hips too far back or forward," Leon says. "Make sure to have your hip bones directly over your knees."
Keep your hips up, as you feel the stretch along your back in this twisted yoga pose.
2. Don’t Press Weight Onto Your Head
It's tempting to relax all of your weight onto your head, but keeping your hips raised and your shoulders broad helps distribute your body weight. Otherwise, this yoga pose could strain your neck and shoulders and cheats you out of gaining the core-strengthening benefits of this move.
3. Focus on Your Breath
"Take nice big inhales and exhales while holding this pose," Leon says. "Consciously 'send' your breath to the area in your body that feels tight or tense."
As you exhale, allow the tension to leave your shoulders, neck and back.
4. Work Within Your Range of Motion
Move slowly and with control when doing this stretch to avoid sudden, jerky movements. You also want to keep the motion in your pain-free range and only go as deep into the stretch as your flexibility and mobility allow.
As your flexibility and mobility improve, you will be able to move at a greater range and deepen the stretch.
4 Thread the Needle Pose Variations
1. Standing Thread the Needle
This standing variation of the pose is ideal for those with knee or wrist issues, as well as people who have difficulty getting down and up from the floor and those with larger chests who may find the regular pose uncomfortable.
- Stand arms-length distance from a wall with your feet shoulder-width apart. Place both hands on the wall.
- Keeping your right hand on the wall, lift your left hand and stretch your arm to the left side, gazing at your fingertips as you twist and open up your chest.
- “Thread” your left arm under your chest until your left shoulder rests on the wall with your palm facing up.
- Make sure your head is turned to the right so that the left side of your face is resting on the mat.
- You should be leaning into the wall, with your right arm helping to support your weight.
- Take a deep breath, feeling the tension escape your muscles.
- Hold for three to four deep breaths or up to one minute.
- Push off with your right arm to return to the starting position with both hands on the wall.
- Repeat on the other side.
2. Thread the Needle in Pigeon Pose
This thread the needle hip opener provides a great stretch for your hip flexors and pelvic muscles.
- Start in a downward dog pose, with your hands on the ground and legs behind you. (You can also start on all fours.)
- Bring your left leg forward, bend the knee, and gently place your knee behind your right wrist. Straighten your right leg behind you and rest your toes on the floor. Your left shin should be parallel to the top edge of your mat.
- Bring your right arm up toward the ceiling, and then thread it underneath your left arm.
- Bring your left arm up overhead and let the right side of your face rest on the mat.
- Hold for three or four counts.
- Repeat on the other side.
3. Thread the Needle With Leg Up
"This variation challenges your balance and control while providing a deeper stretch for the shoulder and opening of the hips," Einhorn says.
- Start on all fours with your wrists under your shoulders.
- Lift your right arm up toward the ceiling and thread it under your left arm.
- Lift your left arm up over your head and place your hand on the ground.
- Bracing yourself with your left and right hand on the ground, lift your left leg up until it is above hip level.
- Hold for one to three breaths.
- Repeat on the other side.
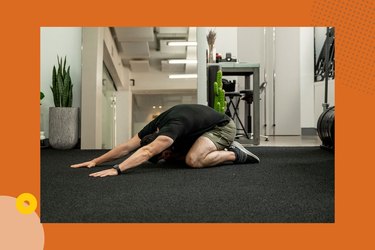
4. Advanced Thread the Needle
After you have mastered the regular pose, you can deepen this stretch by wrapping your other arm around your back.
As always, move slowly and stay within your pain-free range. This move is a great way to really stretch both shoulders.
- Start on all fours with your hands shoulder-width apart and your knees under your hips.
- Raise your left arm up to the ceiling and look up at your fingertips.
- “Thread” your left arm under your chest until your left shoulder rests on the mat with your palm facing up.
- Make sure your head is turned to the right so that the left side of your face is resting on the mat.
- Wrap your right arm around your back and hook your hand around your left hip crease.
- Take a deep breath, feeling the tension escape your muscles.
- Hold for three to four deep breaths.
- Return to the starting position on all fours and repeat on the other side.
Tip
Have a foam roller lying around? Use it to help deepen your stretch. Instead of threading your arm through and laying it on the floor, you place it on a foam roller and slowly move it to deepen your stretch. Be cautious using a foam roller with this move if you have previous back injuries, as you need good core strength to control the foam roller.
- Orthopedic Journal of Sports Medicine: "Yoga-Related Injuries in the United States From 2001 to 2014"
- Annals of Internal Medicine: "Yoga, Physical Therapy, or Education for Chronic Low Back Pain: A Randomized Noninferiority Trial"
- Harvard Health Publishing: "The Safe Way to Do Yoga for Back Pain"
- International Journal of Preventive Medicine: "The Effect of Yoga on Stress, Anxiety, and Depression in Women"
- Digestive Diseases and Sciences: "Yoga as a Therapy for Irritable Bowel Syndrome"