A foundational posture that's taught in most modern yoga classes, triangle pose (Trikonasana) is an essential yoga pose that offers something for just about everyone and can be easily modified to suit almost anyone's abilities and needs.
Read on to learn more about triangle, how to do it, benefits, variations and how to add it to your yoga practice.
Video of the Day
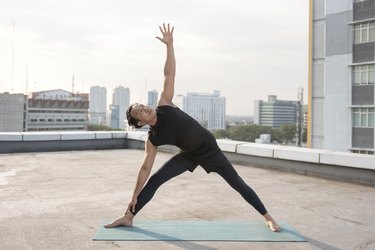
- What is triangle pose? One of the most common standing poses in a yoga practice, "Trikonasana" can be translated from Sanskrit as triangle pose ("tri" meaning three, "kona" meaning angle and "asana" meaning pose). It's classified as a basic hip-opening standing pose, and it's commonly practiced as a way to warm up your body and reduce muscle tension in your legs and hips.
- Who can do triangle pose? Like many of the standing poses (warrior I, warrior II and side angle pose), triangle pose is an accessible posture that most anyone can practice as long as they don't experience pain or extreme discomfort. If you're struggling to balance in this pose, props like yoga blocks, or even a wall, can offer plenty of support to modify the posture if needed. However, it may not be the best posture for those with a higher risk of falling, including women who are six or more months pregnant. If that's the case for you, check out two of the modifications below to safely build better balance.
- What is triangle pose good for? As a hip-opening standing pose, triangle pose is good for building strength in your legs and feet, increasing stamina during longer holds and stretching many of the muscles in your legs and pelvis (like your hamstrings, glutes and quadriceps). Although there is a major focus on your lower body, triangle pose can stretch your upper body through different arm positions, providing a wonderful full-body stretch.
- What muscles does triangle pose work? Triangle pose works many different muscles in your lower body. The main, larger muscle groups that turn on in your front leg and hip during triangle pose are your psoas, piriformis, glutes and hamstrings. In your back leg, this pose activates your gluteus medius and minimus, tensor fascia latae and adductors. As mentioned, it stretches many of the muscles in your hips and legs in addition to strengthening them.
- Are there any disadvantages to triangle pose? While triangle pose is generally accessible, it can be a precarious posture when it's not done mindfully and with proper alignment. As your upper body lowers, the supporting muscles need to counterbalance that weight to avoid straining your hamstrings or knee joints. Here, gravity can be a big — albeit sneaky — factor in overstretching your hamstrings or inner knees. Move slowly into the posture and use a yoga block (or two!) to deliver a deep stretch (rather than a strain).
How to Do Triangle Pose With Proper Form
In triangle pose, your spine follows the movement of your pelvis, which is key to setting yourself up for success and avoiding injuries as you move deeper into this posture.
Although it can be tempting to initiate movement from your arms, tip your pelvis first to slow things down. Read the instructions below and try it a few times until you can move into the pose with mindful awareness.
- Begin standing in the center of your yoga mat and step your feet about 4 feet apart from each other. Place your hands on your hips.
- Point your right foot to the long edge and point your left foot toward the top of the mat.
- Inhale as you raise your arms out to the side so they're parallel to the floor.
- Bend sideways to your left, tipping your pelvis to the side to initiate the movement from your hips first. Then allow the rest of your torso and your right arm to follow.
- Once you reach your natural stopping point, lower your left hand down to rest on your left foot or shin. Your right hand should be straight in the air. Maintain a soft bend in your front knee so you don't hyperextend it.
- Exhale and firmly press your feet down into the mat to engage the muscles of your legs. If you feel too much of a stretch in your inner knees, try shortening your stance or bending your knees a little more.
- Inhale and lengthen through the crown of your head, keeping your head in line with the rest of your spine and the crown slightly above your jaw to keep your side body long and prevent your rib cage from rounding.
- Finally, look directly ahead, keeping your eyes relaxed and face soft.
- Remain here for 3 to 5 rounds of breath and repeat on the other side.
Triangle Pose Benefits
When done correctly, triangle pose stretches and strengthens your legs, opens up your chest and back and improve balance. Overall, it's a great full-body posture to add to your repertoire and return to time and time again.
With your lower body in a powerful, wide-legged stance, triangle pose both strengthens and stretches the muscles of your legs and hips for a truly feel-good experience.
However, what makes triangle pose less intense than other standing poses (like warrior I or side angle pose) is a feeling of lightness in your upper body as your arms and spine reach out from center to stretch your chest and back with less effort.
Triangle pose also provides an opportunity for introspection, reminding you to take the time to align yourself properly. This helps strengthen your mind-body connection, which helps you become more in tune with how your body is feeling and what it needs.
Common Mistakes in Triangle Pose (and How to Fix Them)
Triangle pose is an easy culprit of "too much, too soon," because gravity can take you down into a deeper stretch than your body might be ready for. This is one common mistake that can be fixed by taking your time with the pose and moving more slowly than you might initially want to.
Another common mistake is placing your hand on your knee, which puts too much pressure on the joint.
Last, if you have neck pain, you may want to avoid turning your head to look up at the ceiling in triangle pose. Doing so can put more strain on your neck, so it's best to practice the pose with your face forward to minimize any discomfort.
Triangle Pose Modifications
Triangle Pose With Blocks
- Place one yoga block horizontally at the top left corner of your mat and stack another block vertically on top. (You might not need two block — play around with one or two blocks to find the height that works for you.)
- Begin standing in the center of your yoga mat and step your feet about 4 feet apart from each other. Place your hands on your hips.
- Point your right foot to the long edge and point your left foot toward the top of the mat.
- Inhale as you raise your arms out to the side so they're parallel to the floor.
- Bend sideways to your left, tipping your pelvis to the side to initiate the movement from your hips first. Then allow the rest of your torso and your right arm to follow.
- Once you reach your natural stopping point, lower your left hand down to rest on top of the stacked yoga blocks. Your right hand should be straight in the air. Maintain a soft bend in your front knee so you don't hyperextend it.
- Exhale and firmly press your feet down into the mat to engage the muscles of your legs. If you feel too much of a stretch in your inner knees, it may be helpful to stack another yoga block. (The bottom two yoga blocks should be stacked horizontally and the top yoga block should be vertical.)
- Inhale and lengthen through your spine, gently pressing down into the blocks to stretch more through your top arm.
- Finally, look directly ahead, keeping your eyes relaxed and face soft.
- Remain here for 3 to 5 rounds of breath and repeat on the other side.
Triangle Pose at Wall
- Set your mat and as many blocks as you like up against an empty wall that you can lean back into for support.
- Place your hands on your hips.
- With your heels at the wall, find your most comfortable stance (feet about 4 feet apart) and point your right foot to the long edge and point your left foot toward the top of the mat.
- Inhale as you raise your arms out to the side so they're parallel to the floor.
- Bend sideways to your left, tipping your pelvis to the side to initiate the movement from your hips first. Then allow the rest of your torso and your right arm to follow.
- Once you reach your natural stopping point, lower your left hand down to rest on the yoga blocks. Your right hand should be straight in the air. Lean back into the wall for support as needed.
- Maintain a soft bend in your front knee so you don't hyperextend it.
- Exhale and firmly press your feet down into the mat to engage the muscles of your legs. If you feel too much of a stretch in your inner knees, try shortening your stance or bending your knees more.
- Inhale and lengthen through the crown of your head, keeping your head in line with the rest of your spine and the crown slightly above your jaw to keep your side body long and prevent your rib cage from rounding.
- Finally, look directly ahead, keeping your eyes relaxed and face soft.
- Remain here for 3 to 5 rounds of breath and repeat on the other side.
Triangle Pose Progression
Extended Triangle Pose (Utthita Trikonasana)
Extended triangle pose differs from triangle pose in one notable way: In triangle pose, you rest your front hand on your front leg. In extended triangle pose, you reach your front hand all the way down to the floor for an even deeper stretch in your front leg.
- Begin standing in the center of your yoga mat and step your feet about 4 feet apart from each other. Place your hands on your hips.
- Point your right foot to the long edge and point your left foot toward the top of the mat.
- Inhale as you raise your arms out to the side so they're parallel to the floor.
- Bend sideways to your left, tipping your pelvis to the side to initiate the movement from your hips first. Then allow the rest of your torso and your right arm to follow.
- Once you reach your natural stopping point, lower your left hand down to rest on the mat behind your left foot. Your right hand should be straight in the air. Maintain a soft bend in your front knee so you don't hyperextend it.
- Exhale and firmly press your feet down into the mat to engage the muscles of your legs. If you feel too much of a stretch in your inner knees, try shortening your stance or bending your knees more.
- Inhale and lengthen through the crown of your head, keeping your head in line with the rest of your spine and the crown slightly above your jaw to keep your side body long and prevent your rib cage from rounding.
- Finally, look directly ahead, keeping your eyes relaxed and face soft.
- Remain here for 3 to 5 rounds of breath and repeat on the other side.
How to Add Triangle Pose to Your Yoga Practice
Depending on what your body needs, you can do triangle pose after a gentle warmup that includes sun salutations and hip- and shoulder-opening postures.
You can also do triangle pose after warrior II pose, as this is a natural transition that offers a great jumping off point to move into and out of other standing poses or balancing postures that require more flexibility in your legs and pelvis.