No matter if you're glued to your desk for hours on end or you're always on the move, even activities you love, like running or cycling, can trigger a chronic clenching in your psoas muscle.
And here's the kicker: You might not even feel the tension there. Instead, it sneaks up as slouching posture, nagging back pain and even gastric distress.
Video of the Day
"Release your psoas and you release all the 'issues of your tissues,' including endorphins and everything that you're holding emotionally, mentally and physically," says Jeri Reeder, a yoga therapist and instructor at Wellspring 88, a wellness collective studio and non-profit foundation in Redondo Beach, California.
A Brief Anatomy Lesson: What Is the Psoas Muscle?
Nestled deep within your body is a hidden hero, the psoas major muscle. This unassuming yet incredibly versatile muscle is the unsung champion behind everyday actions like pulling your knees to your chest, walking up a steep hill or gracefully ascending stairs.
But here's the twist: This muscle isn't just a behind-the-scenes performer. It's a movement rock star, ensuring your posture is on point, your joints move with ease and your body enjoys a full range of motion.
"The word 'psoas' generally refers to the combination of both the iliacus and the psoas major muscles," says yoga teacher trainer and author David Keil.
These two muscles cross the hip joint together and attach at the same point on the femur. The iliac and psoas major are the largest, strongest and most important of several muscles that control hip flexion, which makes the psoas the most important postural and structural muscle group in the body.
Your psoas is like the only bridge in town that connects your lumbar spine and your hip joint. It starts around your lower back's last thoracic vertebra (where your bottom-most ribs attach to your spine), wiggles through the pelvis's wing-like bone (the ilium), teams up with the iliacus and finally, hitchhikes its way to the femur's lesser trochanter (aka your hip bone).
"When in balance, this group of muscles supports standing with stability and ease, allows full and safe range of motion in the lumbar spine, supports the internal organs without compressing them and allows your breath to flow strongly and freely," says yoga teacher and author Mark Stephens.
On the other hand, with a weak psoas, your spine would round, your torso would hunch forward and your knees would be permanently bent, according to Stephens.
What Can Lead to a Tight Psoas Muscle
The psoas has deep origins in our most primal instincts. Back in the earliest days, it helped our ancestors outrun predators.
It makes perfect sense from an anatomy standpoint: The psoas begins at the spine, which also happens to house a hub of nerves at the core of your central nervous system. When you experience fear or tension, the nerves activate. When a sense of danger kicks the nervous system into gear, it in turn activates the psoas muscles, telling your body to get ready to run.
Today, the psoas is still our go-to muscle group for responding to modern stressors, though these days our stress more likely comes from overflowing schedules and financial worries than a saber-toothed tiger.
And unlike those ancient threats that are immediate and brief, the stressors, and therefore the tension in our psoas, often sticks around way too long. And the longer muscles are tensed, shortened and stressed without release, the more you'll feel it and the longer it will take to move past it.
A Yoga Sequence for a Tight Psoas Muscle
The great news is that by consciously embracing yoga poses designed to relax, stretch and strengthen your psoas, you can set this secret superhero free from its habitual tension patterns. This means not only improving your posture but also boosting your ability to face and overcome stress.
Check out more of our 20-minute workouts here — we’ve got something for everyone.
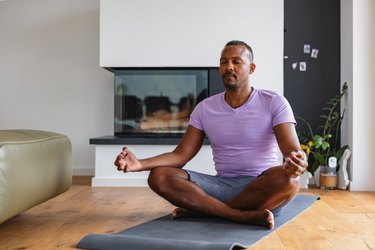
1. Easy Pose (Sukhasana)
- Start in a comfortable seated position with your legs crossed.
- Lengthen your spine and the crown of your head.
- Place your hands on your knees or place one hand on your heart and the other on your belly.
- Take 5 to 10 breaths, breathing slowly and deeply.
Tip
If this position strains your hips or back, raise your hips by siting on a yoga block, folded blanket or even on a chair with your feet flat on the ground.
2. Seated Hip Circle (Sufi Roll)
- From your cross-legged, seated pose above, place your hands on your knees.
- Keeping your hands on your knees as an anchor, shift your torso to the right, then back, then left, then forward.
- Take five circles and match your movement with your breath: Inhale as you move forward and to the right. Exhale as you shift your torso back and to the left.
- Then reverse and take five hip-opening circles in the other direction to the left. Inhale as you move forward and to the left, exhale as you shift to the back and right.
3. Standing Wind Release Pose (Tadasana Pavanmuktasana)
- Begin by standing tall in mountain pose (Tadasana), with your feet hip-width apart and your arms straight down at your sides, shoulders back and down.
- Take a moment to ground yourself, finding balance and stability. Take four calming, even breaths. Relax your abdomen and try to let go of any tension in your core and hips.
- Inhale and pick your left leg up, bending at the knee. Hold your left shin as close as possible to your body. Use your right hand for balance.
- Remain here for about four breaths, pressing your left shin toward your body to bring your left thigh closer to your abdomen with every exhalation.
- Maintain your balance while keeping the rest of your body straight and tall.
- Repeat on the opposite side.
Tip
If you have trouble balancing, you can stand next to a wall or chair for support.
4. Airplane Pose (Dekasana)
- From standing wind release pose above, let go of your left shin and begin to lean forward.
- Hinge at your waist, and as you bring your torso parallel to the ground, let your left leg extend straight back behind you.
- Once you get your balance, bring your arms out straight in front of you, stopping when they are in alignment with your back.
- Keep both hips level and pointing down at the floor.
- Keep your gaze down at the floor.
- Repeat on other leg.
5. Low Lunge (Anjaneyasana)
- From airplane pose above, start to bend your right leg. As you do so, lift your torso and step back with your left foot.
- Bend your front knee to 90 degrees, keeping your knee over your front foot, and leave your back leg straight (or you can bend the knee slightly).
- Straighten your torso and lift your arms up toward the ceiling, biceps by your ears.
- Relax your neck and keep your gaze forward. Keep your spine neutral.
- Take 4 deep breaths here. Place one hand on a wall or chair for support as needed.
- Repeat on opposite side.
6. Camel Pose (Ustrasana)
- Begin kneeling on your knees (you can place a folded blanket or towel underneath them if they are feeling sensitive) at the front of your yoga mat in front of two yoga blocks. Keep your knees hip-width (about two fists) apart.
- Lengthen your spine by slightly tucking your tailbone down towards the ground and lifting your sternum and crown of your head towards the ceiling.
- Place your hands on both yoga blocks behind you.
- Take a deep inhale and as you exhale, begin to lift your chin to look up and back, then very slowly, start to bend backward as far as you can. Be mindful to breathe into your entire rib cage and maintain the sensation of lifting and extending your spine and not dumping into your lower back.
- As you exhale, push your hips forward towards the front of your mat. Engage your quads and abs and continue to breathe deeply as you bend backward. Imagine you’re drawing your shoulder blades together behind you to open up your chest.
- Return to starting position and repeat four times.
7. Bridge Pose (Setubandha Sarvangasana)
- Lie on your back with your arms resting by your sides, knees bent and feet flat on the ground hip-width apart. Your feet should be close enough to your hips that if you reach one hand at a time toward each heel, you can just touch it with your fingertips.
- Relax your arms alongside your body. Think of your shoulders being "glued" to the floor to help keep your spine neutral.
- Squeeze your glutes and core, and press your heels into the ground to drive your hips up toward the ceiling until you form a diagonal line from knees to hips to chest.
- Reach for your block and place it directly under your sacrum — in the divot just above your butt on your lower back. You can place it on any of the two lower heights. Low and flat or sideways like a brick.
- Rest your hips on the block and return your hands to your sides, palms up. If you’d like to deepen the stretch, clasp your hands underneath you, just above the block, and wiggle your shoulder blades to meet each other.
- Rest here for 5 breaths.
- On your sixth inhale, unclasp your hands, lift your hips and remove the block. Roll down, one vertebra at a time.
- Repeat 5 times.
8. Child's Pose
- On your mat, begin by kneeling down with your hips approximately hip-width distance apart, feet untucked, and sit your hips back onto your heels.
- Inhale and elongate your spine. As you exhale, bow forward to fold over your knees and rest your forehead down on the mat.
- Stretch your arms forward with your palms facing down, and gently press your hips back and down onto your feet to stretch your lower back and outer hips.
- If this feels restrictive, try widening your knees even farther apart until you feel more comfortable. Alternatively, you can bring your knees closer together, or all the way together, if that position suits you better. A good rule of thumb is to listen to your body and do what feels right!
- Breathe for 5 to 10 breaths, enjoying the stretch through your side body and lower back.
- Jeri Reeder, Yoga Instructor at Wellspring 88 in Redondo Beach, California
- Teaching Yoga: Essential Foundations and Techniques, by Mark Stephens, North Atlantic Books, 2010
- David Keil, yoga teacher, trainer and author of Functional Anatomy of Yoga
- Videos Courtesy of YogaRenew certified teacher Alia Carangelo