Shoulder pain can derail your workout routine if you have impingement. The good news is, with modifications, you can still do yoga for shoulder impingement.
This condition typically develops over time from poor posture and repeated overhead activities. Impingement occurs when lifting your arm overhead causes bone to rub against the tendons of your rotator cuff. These four muscles — the supraspinatus, infraspinatus, teres minor and subscapularis — control your ability to rotate your arms and lift them overhead.
Video of the Day
Video of the Day
Exercises should be performed with caution if you have impingement, because this condition is generally caused by repetitive use of your arms, reaching overhead in activities such as swimming, tennis, pitching, painting, carpentry and even yoga.
To increase your shoulder range of motion and rebuild your strength, try some modified yoga poses. However, if you are experiencing severe shoulder pain that interferes with your daily activities, check with your health practitioner before doing any exercises.
Yoga for Rotator Cuff Syndrome
By increasing your mindfulness of how you use your muscles, following proper alignment principles can help ease shoulder pain during yoga for rotator cuff syndrome.
- Lift your arms straight out in front of you and turn your palms toward each other.
- Pull your belly in and lengthen the sides of your body.
- Externally rotate your upper arms, turning them away from your trunk and notice how your shoulders relax down your back.
- Gently release your arms to your sides.
Maintain this alignment for your yoga poses and all other activities.
Read more: 10 Best Yoga Poses for Beginners
Shoulder Injury Yoga Flow
While some yoga poses do not put excess pressure on the shoulder, others can make your pain worse.
Move 1: Half Downward-Facing Dog
To strengthen your rotator cuff muscles, incorporate downward dog modifications for shoulder injury.
- Place your palms flat on the wall at shoulder height, and walk your feet back directly under your hips as you bend forward with your head between your arms and your spine parallel to the floor.
- Keeping both hands firmly pressed into the wall, turn your arms inward and bend your elbows slightly.
- Turn your upper arms outward so the heads of your arm bones engage in your shoulder sockets.
Move 2: Cat/Cow
Cat/cow gently helps you acclimate to weight-bearing.
- On your hands and knees, make sure your hands are directly below your shoulders and tuck your toes under.
- Exhale as you curve your back upward and look back to your legs for cat pose.
- Inhale as you lift your head and seat and look forward for cow pose.
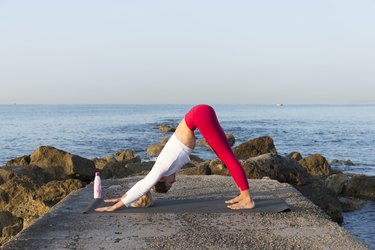
Move 3: Downward-Facing Dog
Because you extend your arms overhead during downward-facing dog, practice this pose cautiously as your healing progresses.
- Start with just the arms stretched out, keeping your knees slightly bent to decrease tension on your shoulders. Gradually work your way into the pose as your shoulder improves.
- From hands and knees, exhale and slowly straighten your knees as you lift your seat upward so you're in an upside-down "V" shape.
Move 4: Plank Pose
To help avoid further shoulder injury, strengthen your core and upper body muscles with plank pose.
- From downward-facing dog, inhale as you bring your shoulders forward directly over your hands.
- Keeping your abdominal muscles engaged and your upper arms externally rotated, hold for a few breaths.
- Exhale back to downward-facing dog.
- Repeat four times.