As far as ab exercises go, the L-sit sounds straightforward enough — you start seated on the floor with your legs in front of you, then use your arms to lift your hips and legs a few inches off the ground. Easy-peasy, right?
But anyone who's ever tried this deceptively simple body-weight core exercise is usually dumbstruck by how difficult it is, says certified strength and conditioning specialist Justin Kompf, CSCS.
Video of the Day
And, yes, being able to pull it off is quite impressive. We'll teach you how.
How to Do the L-Sit Hold
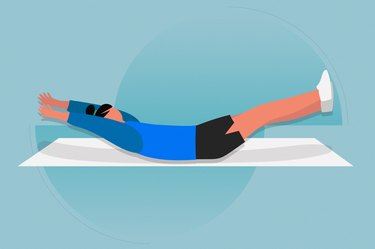
L-Sit Hold
- Sit with your legs straight in front of you and your palms flat on the floor or holding two dumbbells or parallettes slightly in front of your hips.
- Keeping your elbows locked at your sides, straighten your arms and press into your palms as you push the floor away from you to lift your body. Squeeze your thighs to keep your knees as straight as possible and feet off of the floor.
- Try to keep your shoulders away from your ears (don’t shrug) and tighten your lats and your core.
- Hold, then lower to return to start.
How Long Should You Hold an L-Sit?
Hold the pose as long as you can while keeping solid form. If it starts to break down, take a pause. Start with multiple 5-, 10- or 15-second holds. Over time, try to work up to a 60-second hold.
4 L-Sit Benefits and Muscles Worked
1. A Toned Core
The L-sit hold is an extremely challenging abs exercise, recruiting both your deep-lying transverse abdominis as well as your rectus abdominis six-pack muscle, Kompf says.
Think of it like a crunch and plank in one. To max out your core benefits, try to keep your torso as straight as possible during the hold. Don't let that lower back arch or upper back hunch foward.
2. Healthier Hip Flexors
When it comes to hip flexors, tightness is a leading concern. But did you know that a tight muscle is often a weak one?
Because the hold requires you to draw those legs up toward your chest, it's a prime hip flexor strengthener — improving both stability and mobility.
3. Stronger Quads
Many people don't realize that the L-sit exercise demands, and builds, a lot of quadriceps strength, Kompf says.
The rectus femoris, your largest quadriceps muscle, crosses your hip joint and is actually a main hip flexor. And because the quads' main role is extending your knees, keeping your legs straight — and feet off the floor — works your thighs big time.
The longer you hold the isometric exercise, the more you'll build not just strength, but also endurance.
4. A Balanced Upper Body
In the L-sit hold, your upper body is what gets credit for hoisting you off of the floor. And muscles involved include the delts, rotator cuff muscles, traps, lats and triceps.
Focus on actively pressing through your arms, and squeezing your shoulder blades down and together, for the greatest back and shoulder benefits.
Related Reading
3 Tips for Better L-Sits
1. Lock Your Elbows at Your Sides
This will help you better brace your core and upper-body muscles. "For a slightly nauseating reference, pretend like you had an orange between your armpits and you wanted to squeeze it hard enough to make orange juice," Kompf says.
2. Keep Your Back Rigid
As you hold the move, it can be easy to accidentally hunch your shoulders forward or round your lower back. Both errors reduce how hard your core works during the move, and also can make your torso rock back and forth.
To stay completely still in the movement, tuck your tailbone, brace your core and keep your shoulders up tall.
3. Point Your Eyes Straight Ahead
Speaking of staying vertical, "try not to look down," Kompf says.
Your body will follow your eyes and head positioning. Fix your eyes on a fixed object straight in front of you. This will help your torso stay up and strong.
3 L-Sit Progressions to Work Up to the Move
While there are no shortcuts for finally landing the position, Kompf recommends you add these L-sit progressions to your weekly workout routine to help you build up to the core-shredding move.
They are ordered from beginner to most advanced. Start with the first move and see how long you can hold the position.
You may need to start with super-short intervals (5, 10, 15 seconds) and add time as you slowly build your strength. Once you can do each move for a minute while keeping good form, move on to the next progression.
Keep in mine that, for each of the moves, you have options for how you position your hands. You can place your palms flat on the floor or hold onto either two rubber hex dumbbells or two parallettes (also called L-sit bars) with a neutral grip. Pressing your hands directly into the floor is the most common at-home option, but it can sometimes be uncomfortable on the wrists.
The 3 Best L-Sit Bars
- Nike Push Up Grip 3.0 (DicksSportingGoods.com, $22)
- Body Power Push-Up Stand Parallettes (Amazon.com, $36.89)
- Rubberbanditz Parallettes Bars (Amazon.com, $39.95)
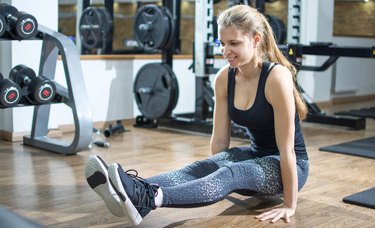
Move 1: Foot-Supported L-Sit
A perfect L-sit for beginners, this alternative builds strength through your upper body and core without requiring your feet to ever leave the ground.
- Sit with your legs straight in front of you and your palms flat on the floor or holding two dumbbells or parallettes slightly in front of your hips.
- Keeping your elbows locked at your sides, straighten your arms and press into your palms as you push the floor away from you to lift your body while leaving your feet on the floor.
- Try to keep your shoulders away from your ears (don’t shrug) and tighten your lats and your core.
- Hold, then lower to return to start.
Move 2: One-Leg L-Sit
As this move gets easier, try holding each leg raise for more time.
- Sit with your legs straight in front of you and your palms flat on the floor or holding two dumbbells or parallettes slightly in front of your hips.
- Keeping your elbows locked at your sides, straighten your arms and press into your palms as you push the floor away from you to lift your body while leaving your feet on the floor.
- Try to keep your shoulders away from your ears (don’t shrug) and tighten your lats and your core.
- Keeping your body lifted, slowly raise one foot a few inches off the ground, pausing for a second, then place it back on the floor and raise the other.
- Continue alternating for as long as you can.
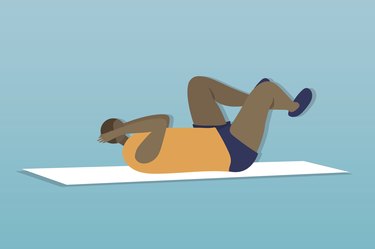
Move 3: Tuck L-Sit
This more advanced L-sit progression involves fully loading all of your body weight into your arms.
- Sit with your legs bent and your palms flat on the floor or holding two dumbbells or parallettes slightly in front of your hips.
- Keeping your elbows locked at your sides, straighten your arms and tuck your knees to your chest, then lift your body off the ground.
- Hold, then lower to return to start.
More Abs Exercises
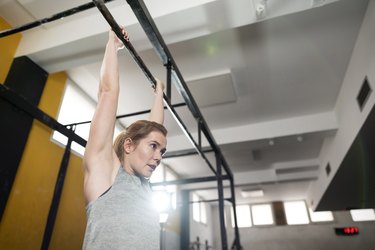
How to Do the Dead Hang Exercise for Arm, Back, Core and Even Glute Strength
8 Hollow Body Hold Progressions to Level Up Your Core Workouts
How to Do Frog Crunches for Sculpted Upper and Lower Abs
How to Do the Bird Dog Exercise for a Stronger Core and Pain-Free Back