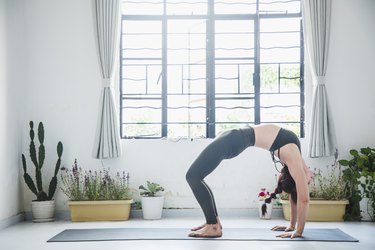
Wheel pose is the backbend of all backbends in yoga. Also known as Urdhva Dhanurasana in Sanskrit, wheel pose is a favorite amongst many yogis, since it serves as a deep stretch for both the chest, shoulders and back and is also a gentle hip opener.
While wheel pose is an invigorating asana for body and mind that's popular in many classes, it's not the easiest pose to get into and can cause injury if done incorrectly.
Video of the Day
So if you're experiencing a few challenges while trying to come into wheel pose, try adding these adjustments, modifications and supporting poses to your practice.
Warning
This is an advanced pose that requires back flexibility and shoulder and hip mobility. If you lack any of these or experience severe or stabbing pain in your back or wrists, don't attempt this pose. If pain persists even after your yoga session, talk to your doctor or physical therapist.
If You: Can't Arch Your Back
You Might: Lack Thoracic Spine Flexibility
If you find yourself sitting for prolonged periods throughout your day, whether for typing for hours at a desk or participating in a sport such as cycling that has you hunched over, this can result in poor thoracic spine (mid-back) flexibility.
Due to the increased rounding of the spine, you may unsurprisingly find it difficult to arch your back during wheel pose.
Fix It
Foundational yoga poses such as downward dog and cat-cow are excellent and effective mobility exercises that promote thoracic extension, as well as the opening of the chest and shoulders.
1. Downward-Facing Dog
- Start on all fours, tuck your toes under and lift your hips up, straightening your legs.
- Draw your shoulders down your spine away from your ears. Elongate your spine and extend the backs of your legs only as far as your hamstrings allow.
- Depending on your flexibility, bring your heels down toward the mat or stay on the balls of your feet with your knees slightly bent.
- After a few breaths, bring your knees back down to the ground in the starting position.
2. Cat-Cow
- Start on all fours with your knees under your hips and your hands under your shoulders.
- Draw your navel in toward your spine and arch your back like a cat.
- Starting at your tailbone, begin to extend your spine, vertebrae by vertebrae until your back is arched the other way with your belly dipping toward the ground.
- Continue slowly alternating between the two.
If You: Experience Lower Back Pain
You Might: Have Tight Hip Flexors and Quads
Lower back pain can be a result of tight hip flexors and quads, since they're connected to your pelvis (hip bones). During wheel pose, the pelvis is in an anterior tilt, which causes more of a pronounced arch in the lower back.
If you find that you're experiencing lower back pain while in this pose, try practicing stretches that are geared toward stretching the hips, hamstrings and quads.
Fix It
Stretching the hips and quads regularly can improve hip mobility, which not only is a major key to unlocking several yoga poses but can also release tension in your lower back and inner groin.
Poses such as pigeon, crescent lunge, wide-legged standing forward fold, lizard and downward-facing dog are also great hip openers that strengthen the legs and help you prep for wheel pose.
1. Pigeon Pose
- From downward-facing dog, lift your right foot off the floor and raise your leg toward the ceiling.
- Bend your right knee and bring it forward, in between your hands.
- Place your right leg on the floor with your knee still bent, lowering your shin and thigh to the floor.
- Extend your right leg behind you, hips facing forward and your chest lifted.
- Press down into the floor with your hips and use your fingertips on the floor for balance.
- Come back into downward dog before repeating on the other leg.
2. Crescent Lunge
- From downward-facing dog, lift your right foot off the floor and raise your leg toward the ceiling.
- Then, step your right leg forward between your hands.
- Keep a bend in your front leg as you inhale and lift your torso, bringing your arms up by your ears with your palms facing each other.
- Keep a slight bend in your back leg.
- Lengthen your tailbone toward the floor and engage your core. Avoid flaring your ribs forward by drawing the two sides of your rib cage together.
- Push back through your left heel while keeping your hips squared forward.
- Then, go back into downward dog, lower your back knee to the ground and repeat on your left leg.
Related Reading
If You: Experience Wrist Pain
You Might: Lack Full-Body Strength
Supporting your body weight may seem like an easy feat, but that's not always the case, especially if you're lacking strength in certain areas. For example, while practicing wheel, if you lack strength in your core, arms or quads, you may dump weight into your wrists.
Additionally, because we spend lots of time during the day typing, texting, writing and driving, our wrists are used to bending forward with no additional weight put onto them.
But in wheel pose, our wrists are bent backward and bear half of your body weight, so it makes sense if you may be experiencing wrist pain while doing wheel.
Fix It
The way to combat this is to strengthen your entire body. Poses such as plank, boat, cobra, reverse plank, crescent lunge and warrior II are a good place to start.
Of course, there are also daily wrist exercises that can be done to increase the strength in your wrists, such as wrist rotations on your mat, wrist squeeze and release and wrist flexion and extension.
1. Cobra Pose
- Lie on your stomach with your legs together, the tops of your feet down and your hands under your shoulders.
- On an inhale, peel your chest away from the floor.
- Roll your shoulders back and down your spine as you straighten your arms as much as your flexibility allows. Be careful not to go too far too soon.
- Breathe deeply and maintain awareness of the feedback your body is providing to avoid stress or strain.
- Lower your chest back down to the floor in the starting position.
2. Reverse Plank
- Sit with your legs extended out in front of you.
- Place your hands a few inches behind you, fingers pointing toward your feet.
- Lift your hips off the floor with your weight in your hands and heels. Your body should be in a straight line from head to hips to heels.
- Hold for 30 seconds.
If You: Can't Straighten Your Arms
You Might: Have Tight Shoulders
If you notice that it's hard for you to straighten your arms while practicing wheel pose, you likely lack shoulder flexibility. It's also another reason you may experience wrist pain, as the lack of shoulder flexibility causes your body to overcompensate and dump weight into your wrists.
Fix It
To help increase shoulder flexibility, practice more heart-opening poses such as reverse plank, fish pose, cow-face arms, camel, cobra, locust, puppy and cat-cow. However, if you’re also experiencing wrist pain, practice dolphin pose or forearm plank instead.
1. Fish Pose
- Lie on the floor with your arms by your sides.
- Push down into your heels to slightly lift the hips and slide your hands underneath your glutes with palms facing down.
- With your glutes resting on the tops of your hands, press down into the mat with your forearms, slightly bending your elbows.
- Lift your chest and head off the floor, creating an arch in your upper back.
- Tilt your head back and place it on the floor, while keeping the majority of the weight on your elbows.
2. Camel Pose
- Kneel with your knees hip-width apart, thighs perpendicular to the floor and hips open.
- Place your hands on your lower back with your elbows bent and your fingers pointed toward your glutes.
- Lean your shoulders and upper torso backward, opening your chest and pushing forward with your hips.
- As you exhale, drop back and press your pelvis forward and elongate your spine.
- Press your shoulder blades back and lean slightly to the right as you reach your right hand toward your right heel.
- Lean slightly to the left as you lean the left hand toward the left heel. Fingers should be pointed toward the toes.
- Drop your head back and relax your throat if neck mobility allows.