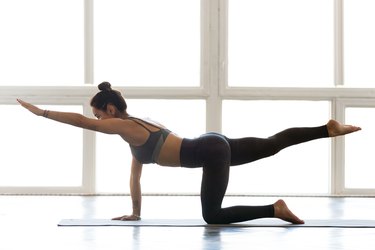
The plank is a standout among core exercises: It's a great move on its own, and there are endless variations to improve strength and stability. Enter plank hip dips, a riff on the basic forearm plank that takes things up a notch by adding some side-to-side twists.
- What is a plank hip dip? It's a core exercise that involves dipping your hips to one side at a time in a forearm plank so you target your obliques, the muscles that run along the sides of your abdominals.
- What muscles do plank dips work? "The plank hip dip strengthens your back, transverse abdominis (your deepest internal abdominal muscle) and obliques, and strains the stabilizer muscles of your shoulders — which is vital to posture," Caleb Herman, CPT, CSCS, personal training leader at Life Time Des Moines, tells LIVESTRONG.com.
- Who is it good for? "A plank hip dip is a great exercise for everyone, especially athletes who rotate at the hips," Herman says. While plank hip dips are good for beginners, the move does require some prerequisite core strength, so he recommends holding off on attempting this move until you can hold a plank for at least 30 seconds.
Video of the Day
How to Do a Plank Hip Dip Correctly With Proper Form
- Lie on your stomach and place your forearms on the ground so your elbows are directly under your shoulders
- Extend your legs behind you, hip-width apart, and ground your toes into the floor.
- Brace your core and start to raise it off the ground, keeping your spine straight, so you’re in a forearm plank.
- Draw your bellybutton toward your spine and squeeze your glutes to keep your back from rounding or arching.
- Slowly drop your hips to the left, hovering a few inches above the ground, or as far as you can go without overarching your lower back.
- Hold for one second, continuing to breathe.
- Return to the center. This is 1 rep. Then, drop your hips to the right and hold for one second.
- Continue alternating sides for 30 seconds.
Tip
If you're wondering, "How long should I do plank hip dips?" you should aim to do 10 reps on each side for 2 to 3 sets to get the best results. The exact time this will take varies from person to person, depending on fitness levels.
Watch the Full Tutorial
4 Plank Hip Dip Benefits
1. Plank Hip Dips Strengthen Your Core
The plank dip strengthens your back, transverse abdominis and obliques, which are the muscles that run along the sides of the abdomen.
"Strength in these areas can decrease your risk of injury. So, when you do squats or other exercises, you'll be able to better support the weight," Herman explains. "When you add the twist, your obliques are strengthened, giving you more force when you twist in sport or to bend and pick up household items or kids."
2. It Stabilizes Your Body
Plank hip dips also work the smaller muscles in your core and shoulders that are used to stabilize the body.
"Stability of the full body is key to nearly every lift that a person can do at the gym. It can expedite strength gains and lower the chances of injury during any specific movement," Herman says. Shoulder stability is also important for maintaining good posture throughout daily life, he adds.
3. Plank Hip Dips Are Functional
Not only are plank hip dips effective at building strength and stability, but the also train your body to rotate, which is a motion you do in everyday life.
"Anyone doing any sort of bending or twisting can see a benefit, whether it's picking up a child or working to improve strength and flexibility in your golf game," Herman says. "As we bend or twist, we rely heavily on our obliques, which is one of the main muscles the plank hip dip targets."
4. It's Equipment-Free
One of the best things about the plank hip dip is that it's a simple way to progress a basic plank, and you don't need anything except your body to do it. It's easy to add to longer workouts, too.
That means you can do it anywhere: the gym, at home, even in a hotel room where you're completely without your usual workout set-up. We love an effective body-weight movement!
4 Plank Hip Dip Form Tips
1. Keep Your Elbows Directly Underneath Your Shoulders
A common mistake people make is not setting up their elbows directly underneath their shoulders, Herman says. "This can strain the shoulders and will limit your ability to keep a straight line with your spine, putting tension in the lower back," he explains.
When you get into your plank, look down and make sure your elbows are bent and directly aligned with your shoulders. You may need to shift yourself forward a bit to get there, feeling your upper back and shoulders engage to maintain the position.
2. Place Your Toes In Line With Your Hips
When setting up, think about keeping your feet hip-width apart.
"Keeping the hips and toes in line allows the body to be in its natural position," Herman says.
Having your feet too wide makes the move easier — it helps give you a more stable base — but can also shift the distribution of weight more into your shoulders and neck as you rotate, which can increase the risk of tweaking these areas, Herman explains.
"Also, when the stance is too wide, it can cause the lower back to [sag] and the pelvis to not be parallel to the floor," he says.
3. Relax Your Head and Neck
Throughout the movement, you want to maintain your head and neck in a relaxed position.
"A relaxed head and neck allow you to focus on keeping the weight in the core," Herman says. Too much tension in the neck and head could actually cause you to tighten your back too much — not to mention leave your neck feeling a bit strained and uncomfortable if you keep making this form mistake over time.
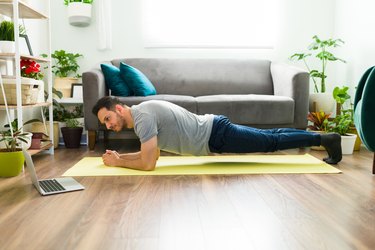
4. Maintain a Straight Line With Your Body
As with a regular plank and any other plank-based exercise (think: plank shoulder taps, plank up-downs and even push-ups) it's important to maintain a straight line with your body and spine throughout this exercise, Herman says. This will help keep the weight distributed properly from your shoulders to your core to your toes.
"If the spine isn't straight, it will cause the hips to rise, which takes away from the effectiveness of the exercise," he says. On the other hand, letting your hips dip too low puts strain on your lower back.
A good way to keep your hips in line: Engage your abdominals, glutes and quads. Your entire lower body should be working hard to keep your midsection straight and stable. "This will also take some of the load off the shoulders, making it easier to keep the butt down," Herman says.
2 Hip Dip Variations
If the plank hip dip is too challenging or not challenging enough, here are two plank hip dip alternative exercises to try.
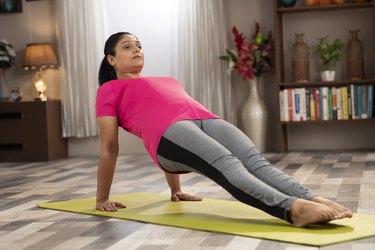
1. Forearm Plank
While this isn't exactly a plank hip dip on your forearms, this plank hip dip modification will help you develop a stronger core so you can ultimately keep your body straight and hips in the right position during plank hip dips.
If this move feels too difficult — and you can't execute it without dropping your hips and feeling it in your low back — start with a traditional plank. "Work at building your time up to a minute in a traditional plank, keeping a straight body," Herman says.
- Start lying face down. Press up into a plank position with your weight on your forearms and toes. Keep your body in a straight line from head to hips to heels.
- Draw your bellybutton toward your spine and squeeze your glutes to keep your back from rounding or arching.
- Hold for 10 to 20 seconds. Build up to holding for a full minute.
Tip
Once you nail down the forearm plank, you can pair it with a side plank (or even side plank dips) to directly target your obliques. Herman suggests holding for 30 seconds on each side, then returning to the plank hip dips in a few weeks.
2. Slow Tempo Plank Hip Dip
"One of the easiest ways to progress any movement is to work on tempo," Herman says. By slowing down how quickly you rotate, you'll have to use even more strength to hold each position for a few seconds longer. It requires even more control.
- Place your forearms on the floor and press up into a forearm plank.
- Draw your bellybutton toward your spine and squeeze your glutes to keep your back from rounding or arching.
- Slowly drop your hips to the left, hovering a few inches above the ground, or as far as you can go without overarching your lower back.
- Hold for 3 seconds, continuing to breathe.
- Return to the center before dropping your hips to the right. Hold for 3 seconds.
- Continue alternating sides for 30 seconds.