Although scoliosis — a sideways curvature of the spine — can sometimes irritate or put pressure on your back, it doesn't mean that you need to avoid exercise completely.
Working out can be safe for people living with scoliosis — and even help manage the condition — if you choose the right types of exercise and listen to your body.
Video of the Day
One of the best types of exercises to ease the physical discomfort of scoliosis is yoga. Ahead, Ahead, Sonya Luz Costanza, RYT, a yoga instructor who specializes in yoga for scoliosis and back care, explains why and demonstrates six yoga poses that can help manage your scoliosis.
Warning
The following yoga poses may be best for people with mild cases of scoliosis. Always get the green light from your doctor before starting a new exercise routine, like a yoga practice.
How Yoga Can Help With Scoliosis
Yoga poses offer one of many therapeutic avenues to help with scoliosis. However, it's essential to work with an instructor who is knowledgeable about the condition. Improper alignment of your body or overstretching in the yoga poses may make your scoliosis worse, according to Luz Costanza.
"It's effective when working with a qualified instructor, who focuses on correct alignment in the yoga postures, to strengthen weak muscles and release tight muscles to de-rotate the spine, bring it toward mid-line and balance hips and shoulders," Luz Costanza says.
Yoga isn't a quick fix, but rather a daily practice that, when done diligently, can improve stability and flexibility in your spine and help reduce your scoliosis pain.
Tip
Always rest, lying on your back with eyes closed, for 5 to 10 minutes after practicing yoga to allow your nervous system to get used to the new patterns you’ve introduced.
The 6 Best Yoga Poses for Scoliosis
1. Downward Dog (Adho Mukha Svanasana)
Downward dog brings length to your spine and strengthens your arms and legs. It can also bring balance to your shoulders and pelvis.
- Start from a tabletop position on your hands and knees with your wrists under your shoulders and your knees under your hips.
- Curl your toes under and press through your hands and toes to lift your knees away from the mat or floor.
- Extend your arms while lifting your hips up and back. Your body should form an inverted “V.”
- Let your head relax naturally toward the ground.
- Keep your knees soft to avoid shifting your weight too far forward.
- Distribute your weight as evenly as possible between your hands and feet.
- Prioritize finding length and extension in your spine over pressing your heels to the floor or straightening your knees all the way.
- Work up to holding for 1 to 3 minutes.
Tip
You can make downward dog easier by using a chair (as shown in the second half of the video above). Here's how:
- Start facing your chair with your arms by your sides.
- Place your hands on the seat at least shoulder-width apart.
- Take a step back so that both feet are under your hips about hip-width apart, your arms are fully extended and your chest lowers toward the floor.
- Press your hands down into the seat.
- Keep your knees a little soft, but press down into your feet while lifting your hips up and back.
2. Extended Puppy Pose (Uttana Shishosana)
Extended puppy pose is like downward dog, but your knees are on the floor, so it's a lot easier and can be held for a longer period of time. This makes it more effective for elongating your spine. Because your knees are bent, there's more mobility in your pelvis, which further allows your spine to lengthen.
- Start in a tabletop position with your hips over your knees and shoulders over your wrists.
- Engage your abdominals by pulling your belly button in toward your spine and up toward your ribcage. It should be a gentle drawing in, not a full sucking in of your stomach.
- Walk your hands forward until your arms are outstretched in front of you, allowing your chest to lower between your shoulders.
- Keep your palms flat on the mat and actively press into your hands, maintaining an elevated position of your elbows from the floor.
- Look down toward the floor, keeping your neck in line with the rest of your spine and making sure your hips have remained stacked over your knees.
- Work up to holding for 1 to 2 minutes.
Tip
To make extended puppy pose easier, rest your head on a yoga block (as shown in the second half of the video above).
3. Bird Dog Pose (Dandayamana Bharmanasana)
Bird dog pose strengthens your core and back muscles, and it also helps align your pelvis.
- Get on your hands and knees with your hands directly in line with your shoulders and knees in line with your hips. You should be close enough to a wall that if you were to extend one leg, your foot would press into the wall.
- Look down at the floor and brace your core (tucking your tailbone just slightly) to create a straight line from the tip of your head to your tailbone.
- Reach your right leg back and press your right foot into the wall. With your left hand, feel your pelvis to see if it's level to the floor.
- Feel your lower front ribs with your left hand and see if one side is sagging down. If so, try to lift the side that is sagging.
- Keep the symmetry you’ve just created as you hold the posture for 3 to 8 deep breaths.
- Repeat 2 to 3 times on each side.
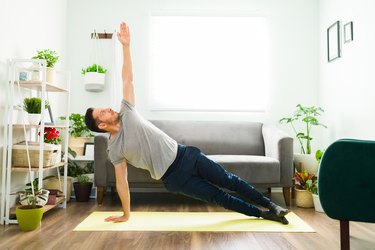
4. Side Plank Pose (Vasisthasana)
Side planks strengthen your oblique muscles (ab muscles at the sides of the waist), quadratus lumborum muscle (the deepest back muscle) and paraspinal muscles (the muscles surrounding and attaching to your spine), as well as your arms and shoulders. If done with proper alignment, it can help your spine reorient toward your mid-line.
- Get on your hands and knees with your hands directly in line with your shoulders and knees in line with your hips.
- Take a deep breath and press through your palms to lift yourself up into the top of a push-up position. Your body should make a straight line from your heels through your hips to the top of your head.
- Put all of your weight into your right hand as you rotate your body to the right into a side plank. Align your right shoulder over your right wrist. Place your left hand on your left hip or extend it up toward the ceiling — whichever is most comfortable for you.
- Stagger your feet on the ground, but keep them in line with each other.
- Keep your abs, glutes and thigh muscles tight as you hold this position for 3 to 8 deep breaths.
- Slowly lower back down, then repeat on the other side.
- Work up to doing 2 to 3 repetitions on each side
Tip
You can make a side plank easier by dropping down to your knees (as shown in the second half of the video above). Here's how:
- Lie on your side.
- Prop yourself up on your forearm with your elbow in line with your shoulder.
- Bend your knees and keep them stacked on top of each other.
- Tighten your abs and glutes to stiffen your torso.
- Lift your hips off the ground, supporting your body weight on your knee.
- Hold, then slowly lower back down.
5. Spinal Twist (Matsyendrasana) in Chair
The spinal twist in a chair helps to de-rotate the twist in a scoliotic spine.
- Sit sideways on your chair. Place your feet flat on the floor hip-width apart, and place a yoga block between your knees for stability.
- Inhale and sit up tall, engaging your pelvic floor and lifting your breast bone while being mindful not to hyperextend your back.
- With an exhale, twist to the left by turning your ribcage, shoulders and head toward the left side of your chair and look over your shoulder. Place your hands on the back of the chair.
- Breathe deeply for 5 to 10 breaths.
- Return to the starting position and repeat on the other side.
Tip
If you have a right thoracic curve and you are twisting to the right, don’t go as far as you can. Put the brakes on in your upper back and try to twist a little bit more through your lower back. When you twist to the left, twist more in the upper back and hold the posture longer than you did on the right. If you have a left thoracic curve, do the opposite.
6. Triangle Pose (Trikonasana)
Triangle pose helps align your pelvis, strengthen your legs and lengthen the sides of your body.
- Stand next to a wall, about 6 inches away from it, with your right shoulder facing it.
- Spread your feet 2 to 3 feet apart, turning your right foot out 90 degrees and your left foot in just slightly.
- Place your hands on your hips and bend at your waist to the right. Place your right hand flat against the wall. (Adjust your stance closer or further from the wall if needed.)
- Reach your pelvis, especially your outer right hip, away from the wall and lengthen the right side of your waist.
- Bend your right knee a little to draw your outer right hip further from the wall.
- After 5 to 10 deep breaths, repeat on the other side.
Tip
If your scoliotic curve goes to the right in your thoracic or lumbar spine, you’ll want to turn your belly and chest more toward the sky than the floor. If your curve goes to the left, pay extra attention to lengthening the right side of the torso.