Although it may sound like a bad thing, inflammation in your body is a normal part of life. Be it a painfully swollen ankle or hot, stuffy sinuses with a head cold, inflammation is your body's natural response to all kinds of stress.
"The stress could be on a cellular level that causes changes in your tissue or mental stress that causes changes in the way you breathe," says Josie Conte, DO, RYT-200, a board-certified osteopathic family physician and registered yoga teacher.
Video of the Day
Despite the fact that it's normal it is to experience inflammation, this physiological response is also meant to bring us back to a healthy state. In other words, your body's inflammatory response is a means to an end, and we aren't meant to stay there.
"We are designed to tolerate some stress, but then we come down and return to homeostasis — or balance," Dr. Conte tells LIVESTRONG.com.
When stress doesn't leave your system, your body continues to release the hormone cortisol that causes chronic inflammation, wreaking havoc on your body in the form of pain, tension, fatigue and more, according to Dr. Conte.
To break out of the cycle and decrease inflammation, practicing yoga, meditation and breathing exercises have been proven to regulate an overactive stress response and restore balance. For instance, a March 2019 review in Biological Research for Nursing found that yoga reduced inflammation in both healthy people and those with chronic conditions like cancer, cardiovascular disease and chronic stress.
However, it wasn't that doing yoga once in a while proved beneficial. The research showed that the most significant results came from practicing it frequently, along with adding in high-intensity physical activity to a yoga practice through more demanding or advanced postures.
Keep in mind that high-intensity activity is relative from person to person, and even beginners or those working on building strength can add a safe, healthy challenge to their practice without overdoing it.
Dr. Conte insists that both stress and deep relaxation are crucial in maintaining that precious homeostasis to keep chronic inflammation at bay.
"It's important to challenge yourself and rest," Dr. Conte says. The more active yoga poses introduce a healthy stress, she explains, while more relaxing poses, like corpse pose, are the opportunity to "rest and digest."
But the most important part? According to Dr. Conte, the real game changer is harnessing the power of the breath.
"I think it's really important that people learn how to breathe well," she says. "It doesn't need to be complicated — simply notice how you're feeling when you breathe."
How to Do This Yoga Flow
This 20-minute yoga sequence combines gentle stretches with more invigorating postures to encourage circulation throughout your body. It winds down with a breathing exercise and deep relaxation for equanimity in your body and mind.
Practice the poses in the order they're shown below to warm up your body and connect to your breath, which can make it easier to slide into a state of rest and ease. If you experience pain or extreme discomfort at any point, exit the pose and practice child's pose to center yourself and check in.
If you're brand new to yoga, start out by practicing this sequence once a week and notice how you feel. Once you get more comfortable, you can ramp up to two or three times a week.
Check out more of our 20-minute workouts here — we’ve got something for everyone.
A 20-Minute Yoga Flow to Reduce Inflammation
1. Cat-Cow Pose (Bitilasana-Marjaryasana)
- Begin on your hands and knees in tabletop position.
- Drop your belly toward the floor or mat while inhaling. Lift your chin and chest while looking toward the ceiling. You can drop your belly fully to create a deep curve in your back if it's comfortable to do so.
- Exhale while pulling your belly toward your spine and rounding your back. Shift the crown of your head so it's facing the floor.
- Repeat this cycle 5 to 8 more times.
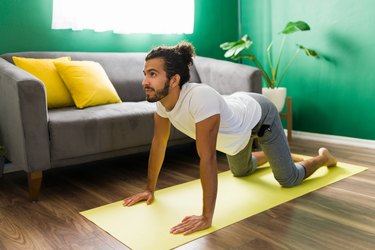
2. Modified Side Plank (Vasisthasana)
- Start on your hands and knees with your shoulders stacked above your wrists and your hips directly above your knees.
- Step your left foot back and then your right foot to balance on your hands and toes. Your body should form a straight line from the top of your head to your heels. Tuck your pelvis in to engage your core and squeeze your glutes.
- Roll onto the outer edge of your left foot and step your right foot out in front of you into a 90-degree angle as you shift your weight into your left hand.
- Press through your left hand and squeeze your shoulder blades to open up your chest.
- Place your right hand on your hip or, if you feel steady enough, extend it up toward the sky.
- Remain here for 3 rounds of breath, then repeat on the other side.
3. Downward Dog (Adho Mukha Svanasana)
- Start in a tabletop position on your hands and knees with your wrists under your shoulders and your knees under your hips.
- Curl your toes under and press through your hands and toes to lift your knees away from the mat or floor.
- Extend your arms while lifting your hips up and back. Your body should form an inverted V.
- Let your head relax naturally toward the ground.
- Keep your knees soft to avoid shifting your weight too far forward.
- Distribute your weight as evenly as possible between your hands and feet.
- Prioritize finding length and extension in your spine over pressing your heels to the floor or straightening your knees all the way.
- Remain here for 3 to 5 rounds of breath.
4. Low Lunge Twist (Anjaneyasana)
- From downward dog, exhale to step your right foot forward in between your hands with your right knee bent at 90 degrees. Your left foot should be straight back behind you.
- On an exhale, twist your torso to the right. As you do so, lift your right arm straight up toward the sky.
- Remain here for 3 to 5 rounds of breath, then return to downward dog and u7repeat on the other side.
Tip
If this posture feels restrictive and your hips are very tight, place a yoga block underneath your bottom hand to lift the floor up toward you for more space.
5. Supported Child’s Pose (Balasana)
- On your mat, begin by kneeling down on your shins with your hips approximately hip-width apart, feet untucked, and sit your hips back onto your heels.
- Place a yoga bolster length-wise in between your knees with a yoga block under the top of the bolster to raise it up to a low angle.
- Inhale to lengthen your spine and as you exhale, gently lie your torso down onto the bolster, resting your left cheek on the bolster.
- Exhale and either rest your hands down in front of you or reach them back behind you, depending on what's most comfortable for you.
- Remain here for about 2 minutes.
- Then, turn your head and rest your right cheek down on the bolster and remain here for another 2 minutes.
6. Alternate Nostril Breathing (Nadi Shodhana)
- Sit on a bolster, folded-up blanket or yoga block in a cross-legged position.
- Fold down the first two fingers of your dominant hand so your thumb, ring finger and pinky finger remain lifted.
- Exhale out completely, then use your ring finger to cover your left nostril where the cartilage meets the bone and inhale through your right nostril.
- At the top of the inhalation, use your thumb to pinch your nose closed. Release the left side and breathe out through your left nostril.
- Inhale through your left nostril, then exhale out through your right nostril.
- Repeat this about 10 times in total or for 2 minutes, alternating from left to right nostril.
- To end, take a few smooth and deep breaths in and out of your nose. Notice how you feel.
7. Elevated Legs Up the Wall (Viparita Karani)
- Begin by placing a yoga bolster or folded blanket about 6 to 8 inches away from a wall.
- Sitting sideways, gently shift your hips up and over the bolster or blanket and the swing your legs up against the wall.
- Place the back of your pelvis on the bolster or blanket, ensuring that your tailbone is hanging off the bolster between the prop and wall. You’ll notice your lower ribs are gently spreading apart from each other in a slight backbend.
- Rest your shoulders and head on the floor.
- Shift your weight from side to side and scoot your sit bones close to the wall.
- Let your arms rest open at your sides, palms facing up. If you’re using a bolster, your lower back should now be fully supported by it.
- Let the heads of your thigh bones (the part of the bone that connects the hip socket) release and relax, dropping toward the back of your pelvis.
- Remain here for 1 to 5 minutes.
- To exit the pose, slowly draw your knees into your chest and roll over to one side to slowly press yourself back up to a sitting position.