
So you want to start meal prepping. Maybe it's because you're tired of filling up on salty, processed foods rife with preservatives every day. Or maybe you're overspending on takeout each week.
Whatever your reasons, meal prepping for the week is the perfect way to save time and money and, most importantly, eat healthier.
Why You Should Meal Prep — and Where to Start
Meal prepping is a system of preparing food ahead of time in order to have nutritious, well-rounded meals on hand to eat at home, school or work.
"Meal prepping reduces the likelihood that you'll make less healthy food choices in those moments when you find yourself starving during mealtime," Malina Malkani, RD, spokesperson for the Academy of Nutrition and Dietetics and creator of the Wholitarian Lifestyle, tells LIVESTRONG.com.
And while there's a time investment involved in meal prepping, the payoff is significant. "It can be the difference between having a nutritious meal in a time-pressed situation versus giving way to spontaneous indulgences on a meal delivery app," Moe Schlachter, RD, CDE and spokesperson for the Texas Academy of Nutrition and Dietetics, tells LIVESTRONG.com.
However, proper planning is required to ensure that meal prepping actually makes your life easier, saves you money and helps you eat healthier. So before you start, take time to plan, and focus on what you are trying to achieve.
Ready to Lose Weight?
Set yourself up for success with more from our 30-Day Weight-Loss Kickstart.
Step 1: Set Realistic Goals
Don't get deterred by the perceived time involved. There are many variations of meal prepping, and if you do your research, you can find a strategy that works best for you.
Start by setting realistic goals for how much food you can prepare (and eat), and consider any other pitfalls. This can save you from having to toss a bunch of meals because you or your family get bored with eating the same thing day after day. So to start, consider prepping for one meal only, or try prepping for only a few days each week.
Related Reading
Step 2: Pick a Day
Now that you're all geared up for meal prepping, pick a day to prep all of your meals for the week. Most people choose Sunday because they're off from work and it allows them to have fresh meals for the workweek. However, you'll want to start off by prepping for just a few days rather than the whole week when you're first testing the meal prep waters.
Whether you write out your meals for the week by hand and stick them on the fridge or record them on your phone, keeping track of your plans will help you stay organized each week and make your prep easier.
Smartphone apps can also help make your meal planning more organized. Consider a planner, template or app like FoodPlanner or MealBoard.
Step 3: Choose Your Meals
Schlachter has a formula that he recommends to his clients at Houston Family Nutrition. "We teach clients to approach each meal with one question: What does my body need from this meal?"
Then, he uses a modified plate model to help clients answer this question. "The plate is about 3/8 veggies, 1/8 fruit, 1/4 starch (whole grains, beans and starchy vegetables) and 1/4 protein." A small amount of healthy fat, such as nuts, seeds, avocado or olive oil is also included in the meal or on the side. Schlachter says this formula allows clients to capture the various food and nutrient groups in the approximate proportions the body requires.
What to Shop For
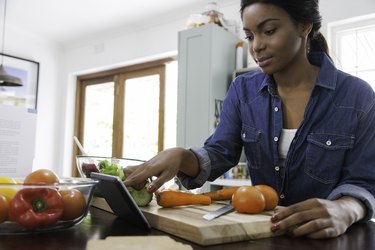
Once you figure out your meal prepping system, there's a good chance you'll be making fewer trips to the grocery store. (Yay!) Still, you'll need to be organized when you go, and have a list from the menus you have planned for the week. When stocking up on groceries, shop according to your menus, but also be mindful of what foods work well with meal prepping.
Advance-prep breakfasts may include smoothies, overnight oatmeal, yogurt and fruit or homemade breakfast bars. Common prepped meals for lunch and dinner include a cooked protein (like chicken, fish or beans), cooked pasta or grain, and a steamed or roasted vegetable. Other common prepped meals include hearty salads or soups or stews.
Fresh vegetables, salad and fruit make good sides, and nuts, seeds, cheese and yogurt make nutritious snacks. Also, some meals or snacks need a healthy dip, like salsa, hummus or guacamole, or a salad dressing.
So to start, be sure to add fruits and vegetables to your weekly shopping list. There's no magic rule here, simply pick from your favorite in-season produce, and include heads of lettuce or prewashed greens if your prepped meals will include salads.
Fresh berries, sliced apple or orange, or diced melon all make good sides to your meal. Frozen or dried fruit can work well too, especially if you plan to pair it with oatmeal or yogurt. And even if your prepped meal has a vegetable included, it's good to also have fresh vegetables on hand for snacks, such as carrots, cucumber, cauliflower, small tomatoes, sugar snap peas or sliced jicama.
The type of protein foods and grains to keep on hand will be somewhat dictated by the menus you choose. But to make things easier and ensure you always have healthy ingredients on hand, it helps to keep some your favorite protein options in the freezer — such as frozen chicken breasts or thighs, frozen fish fillets or plant-based sausage.
Also, stock the pantry with no-salt-added canned beans or tomatoes, low-sodium broth for soups, and whole grains including rolled or steel-cut oats, whole-grain crackers, brown rice, quinoa, bulgur or whole-grain barley. Having your favorite unsalted nuts or seeds will also come in handy for meal prepping.
Plan to also shop for healthy snack items. In addition to fruits and vegetables, popular options include unsalted nuts, pumpkin seeds, low-fat mozzarella cheese sticks, hummus (to use as a vegetable dip), plain, light or Greek yogurt and hard-boiled eggs.
Herbs and spices are important too, although the ones you have on hand can be tailored to your personal preferences. Common herbs include basil, thyme, oregano, parsley and cilantro, and favored spices include pepper, chili powder, cumin, curry, garlic powder, celery and onion, as well as cinnamon and rosemary.
Step 4: Use the Right Tools
As part of your prepping process, it's also helpful to understand the tools of the trade. You probably already have many things you need, like a good set of knives, cutting boards, bowls, measuring cups and spoons, baking dishes, and pots and pans. If your meal prep involves using a slow cooker, food processor or pressure cooker, you'll need to ensure you have this equipment. But not to worry, you can find menus that use the kitchen equipment you already have.
One essential type of "equipment" you'll need, though, is good quality containers for your prepped meals. It helps to have a variety of sizes, so you can store prepared salads, soups or pasta dishes in large containers in the refrigerator. You'll also need the smaller containers for your individual prepped meals, salads and soups, as well as very small containers for dips, peanut butter, hummus and salad dressing.
Shop around as there are many options, including containers that are specifically designed for meal prepping. Snack and sandwich bags are also useful, and the options include single-use or reusable bags.
Whether to use glass or plastic containers is a decision you'll also need to make. Most veteran preppers like to go with glass meal-prep containers, which can easily be found in retail stores or online. Mason jars are also commonly used for oatmeal, soups and salads. If you choose plastic containers, only use ones designed for food storage.
Warning
Don't reuse plastics you purchase food in, such as cottage cheese containers or frozen meal trays, as these are not designed for reuse and the chemicals in these plastics can break down over time.
To avoid unhealthy chemicals in your plastics, the Academy of Nutrition and Dietetics recommends you check the resin identification code, which is a number ranging from 1 to 7 located inside a triangle on the bottom of the container.
The Academy recommends using containers that have the numbers 1, 2, 4 and 5 to minimize exposure to potentially harmful chemicals. This echoes the August 2018 recommendations from the American Academy of Pediatrics (AAP), which advise avoiding plastic food containers that have codes 3, 6 and 7, as these contain the chemicals phthalates (3), styrene (6), and bisphenols, including BPA (7), which can pose health risks with exposure. According to AAP, an exception applies to plastics labeled as "biobased" or "greenware," since these do not contain bisphenols.
Meal Prep Tips
While this sounds like a lot to consider, the planning phase is important because you want to find ways to make your experience in the kitchen easy, efficient and effective. The more streamlined your process, the more time you'll save and embrace some degree of meal prepping. Whew!
You can get meal prepping ideas from your own favorite recipes. For example, if you like to make your own energy bars, these can be paired with a piece of fruit or yogurt for an easy breakfast. If you can cook a large pot of soup over the weekend, you can pack some with whole-grain crackers, fresh fruit and a salad for an easy lunch. And you can meal prep as you pack up your dinner's leftovers — if you make enough you may be able to get several extra meals prepped in no time.
Repurpose your meals. Another smart option is to routinely make enough dinner for two meals, then freeze half for another night, or for example use the roasted chicken from Monday night's dinner for tacos, pasta or salad on Tuesday.
Try freezer meals. You can make a big batch of vegetarian chili or an extra pan of lasagna and freeze in portions that work for your household. Plan to defrost and reheat for dinner, add a vegetable or salad — and you have a homemade meal! Another option is to prepare big batches of spaghetti sauce, meatloaf, chicken cacciatore, cooked beans or meatballs, and freeze the amounts needed for one meal. At dinnertime, pair with a fruit, vegetable and a whole grain which you can also cook and freeze in advance.
Tip
Take care to avoid freezer burn by wrapping the cooled food tightly with plastic wrap then foil, or by using freezer bags — making sure you remove as much air as possible — or by using a vacuum sealing device. Although heating up these foods will take a bit of time to prepare your meal, these freezer meals can help you make a healthy dinner with minimal work in the kitchen.
Get inspo from your favorite restaurants. As an alternative to smoothies, breakfast bowls or overnight oats, Schlachter suggests a morning meal based on a popular coffee shop's boxed breakfast. "It includes a boiled egg, cheese single, fruit slices, whole-grain mini pita, peanut butter single and carrot sticks. It requires about 45 seconds to prep and hits on all food groups!"
Soups and stews are a good place to start for lunch or dinner meal prep. "I love batch cooking a huge pot of soup or stew that is rich in vegetables, greens, beans, legumes and whole grains," says Malkani. I store and freeze the extra in lidded glass containers of various sizes — single portions and family-sized portions, so that I can flex with the needs of my family and however many people might be eating on a given night. Add some whole-grain bread, sliced avocado and maybe a green salad and there is a nutrient-dense, tasty meal on the table in no time."
Related Reading
Keeping Food Safe and Fresh
As you plan for and prepare your meals, it's also important to take steps to maintain the quality and safety of your food. By the third day after you've prepped your meals, the quality of any refrigerated leftovers becomes a concern, according to Schlachter, because flavors and textures may not hold up.
While some prepared foods may taste just fine into their third or fourth day, this is when you also need to consider food safety and the risk of foodborne illness, according to the U.S. Department of Agriculture (USDA).
The USDA recommends consuming all leftovers within three to four days of preparing them, in order to maintain safety, nutrients and quality — which is an issue that can add complexity to your weekly prepping plans.
If you want to prepare more than three days of meals in advance, the USDA recommends you freeze some meals right after prepping and move to the fridge the day before you plan to eat them. Of course, this won't work with Mason jar salads or breakfast smoothies, so prepping these only two to three days in advance is wise in order to maintain safety and quality.
To prevent the risk of foodborne illness while prepping your meals, follow these tips:
- Keep cold foods cold, and hot foods hot. Keep food out of the danger zone of 40 to 140°F as much as possible, and toss perishable food that has been in this zone for two or more hours. For example, don't pull chicken or fish out of the refrigerator until you need it, and refrigerate again shortly after cooking.
- Prevent bacterial growth by cooling foods quickly. For example, large batches of soup or spaghetti sauce can stay in the danger zone or many hours if left in large containers, even if refrigerated. Instead, place in shallow containers to more quickly cool.
- Reheat leftovers to a temperature of 165°F. For sauces, soups and gravies, bringing to a rolling boil should suffice. For microwaved foods, ensure the food is evenly heated and steamy if you don't have a thermometer to check. Foods with some liquid will steam in the microwave, which can help ensure more adequate heating of the food, according to the USDA.
- Toss leftovers after three or four days. While leftovers that have deteriorated or spoiled are easy to spot, harmful bacterial growth may not be seen or smelled, according to the Academy of Nutrition and Dietetics. When it doubt, throw it out!
Related Reading
Additional reporting by Nicole Fabian-Weber.